


...................................................................................................................
Daring Bakers June 2013: Life of Pie
Hi! I'm Rachael from pizzarossa and I'm thrilled to be your host for the June Daring Bakers' challenge! This month, we're all about pie. Sweet pie, to be precise. I'm giving you four delicious treats to choose from (or you can make all four, if you like!) - Momofuku Milk Bar's (in)famous Crack Pie; a rich, smooth and utterly indulgent French Chocolate and caramel tart; and two slightly healthier but no less scrumptious options, an Italian Crostata di Marmellata and a traditional Grandma-style Double crust apple pie.

Bon Appetit says about Crack Pie, "Anyone who has taken a bite of this Milk Bar best seller immediately knows the reason for the sassy name. Once you start eating this rich, salty-sweet pie with its oat cookie crust, you won't be able to stop." A thick, chewy crust filled with an outrageously sweet gooey filling, it's a wicked sugar-rush. You'll want small servings!

Chocolate and caramel tart brings together two of my very favourite sweet flavours, but the pie itself is not overbearingly sweet. It is, however, rich and smooth and amazingly good! A buttery crust, a layer of creamy caramel and a layer of rich chocolate mousse. Swoon!

Crostate are a traditional Italian sweet treat, most often filled with jam, preserved or fresh fruit, or nut-based fillings such as almond or hazelnut paste, or they can be filled with pastry cream, citrus curd or numerous other delights. The recipe I’m giving here is for a simple Crostata di marmellata, filled with home-made strawberry preserves. Out of the four pies, this was the quickest to be eaten at my place!

Double crust apple pie is a true classic throughout many parts of the world. With a light flaky crust encasing a luscious warmly spiced filling, it's a pie that really needs no further introduction.
Recipe Source:
Crack pie: Bon Appetit
Chocolate and caramel tart: Pastry from chefsimon, filling from Valéry Drouet's "Chocolat"
Crostata: adapted from Carol Field’s “The Italian Baker”
Double crust fruit pie: adapted from "Baking Bible: From the oven to the table"
Blog-checking lines: Rachael from pizzarossa was our lovely June 2013 Daring Bakers’ host and she had us whipping up delicious pies in our kitchens! Cream pies, fruit pies, chocolate pies, even crack pies! There’s nothing like pie!

Posting Date: June 27, 2013
Download printable file HERE
Mandatory Items: You have to make one (or more!) of these pies and you must make your own crust/pastry.Variations allowed: The crostata can be filled as you prefer (fresh fruit, preserves or jams, custards or nut pastes etc) and you can choose different fruit for the double crust pie - it's a great use for whatever is in season. While the crack pie probably can't be veganised because it relies on egg yolks in the filling, the others certainly can, and they can all be made GF or with different sweeteners. If you are making a vegan, GF, dairy-free or other dietary-restriction pie, you’re welcome to use your preferred pastry recipe, as long as you make it yourself.
Note: As with all dough recipes, whether they be for pastry or bread or whatever, measurements will be affected by humidity, size of eggs, type of milk etc. If your dough seems too dry, add a touch more liquid; if it seems too moist, add a touch more flour. Trust your instincts - you are a Daring Baker, after all!
Preparation time:
See each recipe for specifics.
Equipment required, depending on recipe:
Electric stand/hand mixer or whisk and strong arms
Mixing bowls and spoons
Bench scraper
Sifter or fine sieve
Measuring cups and spoons, scale optional
Saucepans
Box grater
Pie dish to suit recipe
Crack pie:

Servings:12
Preparation time: 20 + 20 minutes
Baking time: 18 + 50 minutes
Cooling time: 1 hour + 2 hours, approx.
Chilling time: overnight
Ingredients
Oat Cookie Crust

9 tablespoons (1 stick + 1 tbsp) (135 ml) (4½ oz) (125g) unsalted butter, room temperature, divided (6 & 3 tbsp; 85gm & 40gm)
5 1/2 tablespoons (85 ml)(2½ oz) (70 gm) (packed) light brown sugar, divided (4 & 1½ tbsp; 50 gm & 20 gm)
2 tablespoons (30 ml) (30 gm) (1 oz) white sugar
1 large egg
3/4 cup plus 2 tablespoons (210 ml) (80 gm) (2¾ oz) old-fashioned oats
1/2 cup (120 ml) (2½ oz) (70 gm) all-purpose flour
1/8 teaspoon (2/3 gm) baking powder
1/8 teaspoon (2/3 gm) baking soda
1/4 teaspoon (1½ gm) salt
Filling

3/4 cup (160 ml) (170 gm) (6 oz) white sugar
1/2 cup (packed) (120 ml) (100 gm) (3½ oz) light brown sugar
1 tablespoon (15 ml) (8 gm) (¼ oz) dry milk powder
1/4 teaspoon (1½ gm) salt
1/2 cup (1 stick) (120mlk) (4 oz) (115gm) unsalted butter, melted, cooled slightly
6 1/2 tablespoons (100ml) heavy whipping cream
4 large egg yolks
1 teaspoon vanilla extract
Powdered sugar for dusting
Directions:
Oat Cookie Crust

1. Position rack in center of oven and preheat to moderate 350°F/180°C/gas mark 4. Line a 13x9x2 inch/33x22x5cm metal baking pan with parchment (baking) paper. Lightly spray or butter a 9 inch/22cm diameter glass or ceramic pie dish.
2. Combine 6 tablespoons (85 gm) of the softened butter, 4 tablespoons (50 gm) of the brown sugar and the white sugar in medium bowl. Using an electric mixer, beat until light and fluffy, about 2 minutes.
3. Add egg and beat until pale and fluffy, about 1 minute.
4. Add oats, flour, baking powder, baking soda, and salt and beat until well blended, about 1 minute.
5. Dump oat mixture into prepared baking pan and press out evenly to edges of pan.
6. Bake until light golden, 18 minutes. Transfer baking pan to wire rack and cool cookie completely, about an hour.
7. Using your fingertips, crumble the cookie a into large bowl - there should be no identifiable pieces of cookie remaining. Add the remaining 3 tablespoons (45 gm) butter and 1-1/2 tablespoons (20 gm) brown sugar. Rub in with your fingertips until the mixture is moist and sticks together when pressed between your fingers.
8. Transfer cookie crust mixture to pie dish. Using your fingers, press mixture evenly onto bottom and up sides of pie dish (about 1 inch/2.5cm up the sides if your pie dish is deep). If your pie dish is shallow, place it on a baking sheet in case of overflow.
Filling

1. Position rack in center of oven and preheat to moderate 350°F/180°C/gas mark 4. If possible, use bottom-only heat, or the filling may brown too quickly.
2. Whisk both sugars, milk powder, and salt together in a medium bowl.
3. Add melted butter and whisk until blended.
4. Add cream, then egg yolks and vanilla and whisk until well blended.
5. Pour filling into crust.
6. Bake 30 minutes (filling may begin to bubble up). Reduce oven temperature to 325°F/160°C/gas mark 3. Continue to bake until filling is brown on top and set around edges but center still jiggles slightly, about 20 minutes longer.
7. Cool pie completely in pie dish on wire rack. Chill uncovered overnight.
8. Sift powdered sugar lightly over top of pie. Cut pie into thin wedges and serve cold.
Chocolate and Caramel Tart:

Servings: 8
Active time: 1 hour altogether
Baking time: 35 minutes altogether
Cooling time: approx. 2 hours altogether
Ingredients
Pâte sablée

1 large egg yolk
5 tablespoons (75 ml) (70 gm) (2½ oz) granulated or powdered sugar, as you prefer
1¾ cups (420 ml) (250 gm) (8¾ oz) all-purpose flour
pinch salt
9 tablespoons (1 stick + 1 tablespoon) (125 gm) (4 ½ oz) cold butter, diced
3 tablespoons plus 1 teaspoon (50 ml) cold water
Filling

For the caramel
7 tablespoons (105 ml) (100 gm) (3½ oz) granulated sugar
7 tablespoons (100ml) whole cream, hot
For the chocolate mousse
2 large eggs
7 tablespoons (100ml) whole milk
1/3 cup (80 ml) (75 gm) (2½ oz) powdered sugar (optional)
13 tablespoons (200ml) whole cream
1 cup plus 3 tablespoons (280 ml) (200 gm) (7 oz) dark chocolate, broken into pieces
Directions:
Pâte sablée

1. Preheat oven to moderate 350°F/180°C/gas mark 4. Lightly grease a 9"/24cm or 10"/26cm tart pan, ideally a fluted metal one with a removable bottom.
2. In a small bowl, whisk the egg yolk and sugar together with a teaspoon of the water until pale and fluffy. Set aside.
3. Sift the flour and salt together into a mound on a work surface.
4. Scatter the diced butter over the top of the flour. Quickly toss the butter in the flour so it's all coated, then, using your fingers, rub it in until it resembles breadcrumbs. Keep repeating the operation until it has the consistency of sand.
5. Gather the flour mixture into a mound and make a well in the center.

6. Pour the egg mixture and the rest of the water into the well. Working quickly, incorporate the wet ingredients into the flour, first with your fingertips then with a bench scraper until just mixed but not brought together.
7. Gently gather dough together into a rough ball between your palms. If it stays together, it is sufficiently moist. If it doesn't stay together, add a touch more water and repeat the process.
8. Using the palm of your hand, push away from you to smear the dough across the work surface, gather it up and repeat until it comes together into a smooth, soft ball. You aren't kneading, you are using the smearing action to bind the elements of the dough without developing the gluten in the flour. The dough ball shouldn't spring back when pressed.
9. Lightly flour your work surface and lightly roll the dough out to about 3mm thick in a circle to fit your pan. Press the dough gently into the pan, prick all over the bottom with a fork.
10. Line the tart pan with baking paper and fill with dry beans or pie weights and bake until set, around 9 minutes. Remove pie weights and paper and bake another 6 minutes, until dry.
11. Remove the pastry from the oven and allow to cool in the pan. Leave the oven on.
Filling
For the caramel

1. Spread the sugar evenly across the bottom of a small, heavy-based, non-coated saucepan (it needs to be metallic so you can see the color). Heat over a medium-low heat without stirring until the sugar starts to melt and becomes liquid around the edges. Once about a quarter of it has melted, gently stir continuously with a wooden spoon or heat-proof spatula until it turns a deep amber color, a few minutes depending on how high the heat is.
2. Remove from heat and very slowly and carefully pour all (100ml) of the hot cream into the caramel, stirring continuously - it will splutter and steam so be very careful as it is extremely hot. The cream needs to hot and poured very slowly, otherwise the caramel will seize. Keep stirring until it stops bubbling and is well combined then set aside to cool. I couldn't take a lot of pictures of this process because I needed both my hands!
For the chocolate mousse

1. In a medium bowl, whisk the eggs together with the milk (and powdered sugar, if using).
2. In a small heavy-based saucepan, bring all (200ml) of the cream to a boil.
3. Remove cream from heat and add the broken chocolate. Stir until the chocolate has melted completely and the mixture is smooth. Let cool a few minutes.
4. Pour the chocolate mixture into the egg and milk mixture and stir gently with a spatula to obtain a smooth cream.
5. Spread the cooled caramel in the bottom of the cooked tart shell.
6. Gently pour the chocolate cream over the caramel so you don't disturb it.
7. Place the tart into the hot oven and bake for 30 minutes, until the filling has set but is still wobbly in the center.
10. Remove the tart from the oven and allow to cool to room temperature. If using a tart pan with removable bottom, unmold before serving.
Crostata di marmellata:

Servings: 8
Active time: 1 hour altogether
Baking time: 30 minutes altogether
Chilling and resting: 2 hours altogether
Cooling time: 3 hours altogether
Ingredients
Filling
Note: You need about 2 cups (500 ml) (680 gm) (24 oz) of jam for the filling. This should make about as much as you need, depending on the juice content of the strawberries, but you can use more or less filling without a problem.
My apologies, I forgot to take step-by-step pictures of the filling but I'm sure you can imagine what some strawberries and sugar look like!
3-1/3 cups (800 ml) 500 gm strawberries, washed, hulled and quartered
250 gm 2:1 gelling sugar (or 500 gm of 1:1 gelling sugar, or as much white sugar (1 to 2 cups) as desired + pectin according to manufacturer's quantities)
2 tablespoons (45 ml) freshly squeezed lemon juice
Pasta Frolla (basic Italian pie pastry)

2/3 cup (160 ml) (150 gm) (5-1/3 oz) unsalted butter, room temperature
1/3 cup (80 ml) (75 gm) (2-2/3 oz) sugar
1 large egg, room temperature
1 teaspoon (5 ml) vanilla extract
grated zest of 1 medium lemon
1-2/3 cups (400 ml) (225 gm) (8 oz) all-purpose (plain) flour
pinch salt
Glaze

Note: This will make more than you need. Store leftover glaze in a jar in the fridge and reheat before using. It should keep indefinitely.
¼ cup (60 ml) (75 gm) (2-2/3 oz) apricot jam
1-2 teaspoons (5-10 ml) freshly squeezed lemon juice
Directions:
Filling

1. Stir everything together in a heavy-based saucepan and heat slowly over medium-low heat, stirring constantly.
2. When the strawberries have released their juice and the mixture comes to a boil, allow to boil for the time given in the gelling sugar/pectin manufacturer's directions.
3. Allow mixture to cool to room temperature.
4. Can be made ahead and refrigerated, covered, for up to a week until needed.
Pastry

1. Using a paddle attachment on a stand mixer or an electric hand mixer or whisk, cream the butter and sugar until pale and fluffy, 2 - 5 minutes. The amount of time you cream the butter will affect the final dough - longer means lighter which in turn means a softer, more fragile dough which is less easy to work, but I prefer the texture of the cooked pastry this way because it's lighter too. If you want to do a more intricate lattice, I'd recommend a shorter creaming time so you have a firmer dough.
2. Add the egg, vanilla and lemon zest, one at a time, mixing thoroughly after each addition.
3. Add the flour and salt and mix until the dough comes together but remains soft, about 1 minute using a stand or electric mixer or a wooden spoon if mixing by hand. Don't over-mix.
4. Wrap dough in plastic wrap and refrigerate for 30 minutes to one hour.
5. When getting ready to bake, rest dough at room temperature for about 30 minutes.
6. Lightly grease a shallow 9"/24cm metal pie dish.
7. On either a piece of parchment or a lightly floured surface, roll 2/3 of the dough (I weighed my dough and 2/3 was about 12oz/340g) out to a circle to generously line the pie dish. I prefer to use parchment with a circle traced on it so I can roll it as quickly as possible, before the dough gets too soft to handle, then use the parchment to transfer it to the dish.
8. Transfer the dough to the pie dish, press in gently and roll the edges to form a good surface for attaching the lattice later. Prick all over the bottom with a fork.
9. Refrigerate the dough-lined pie dish for 30 minutes to reduce shrinkage during baking.
10. Preheat oven to moderate 350°F/180°C/gas mark 4..
11. Line pastry with parchment and fill with dry beans or pie weights. Bake until set, around 15 minutes.
12. Remove the weights and parchment and allow to cool. If using a springform or loose based pie dish, remove the side of the pan.
13. Preheat oven to moderately hot 400°F/200°C/gas mark 6.
14. Roll the remaining dough to fit the pie dish and cut it into roughly half inch/1.5cm-wide strips.
15. Spread the filling over the par-baked crust.
16. Arrange the strips of dough in a lattice over the filling (see links below for some how-to guides - you can do an intricate intertwined lattice or a very simple overlay one like I've done), trim as needed and lightly pinch the ends onto the rolled edge of the bottom crust.
17. Place pie dish on a baking sheet and place in center of oven. Bake until lattice is golden, around 20 minutes. Meanwhile, prepare the glaze.
Glaze

1. Heat the jam and water in a small saucepan over medium heat until mixture comes to a boil. Alternatively, you can heat it on medium-high in a bowl in the microwave for about 2 minutes, stirring halfway.
2. Strain through a fine mesh sieve if it's chunky.
3. While glaze and pie are both still warm, brush over lattice crust.
4. Allow pie to cool completely before serving.
Double crust apple pie:

Servings: 8
Active time: 45 minutes altogether
Baking time: 50 minutes
Chilling time: 1 hour
Ingredients
Flaky pastry

2/3 cup (160 ml) (150 gm) (5-1/3 oz) unsalted butter
1¾ cups (420 ml) (250 gm) (8-2/3 oz) all-purpose flour
2 teaspoon (10 ml) (10 gm) (1/3 oz) sugar
1/4 teaspoon (1½ gm) salt
3-8 tablespoons (45-120 ml) cold water
Filling

1 – 1½ kg (2¼ to 3-1/3 pounds) apples (depending on the depth of your pie dish)
1 cup (240 ml) (200 gm) (7 oz) light brown sugar, lightly packed (more or less to taste)
1 tsp ground cinnamon
pinch of ground cloves, nutmeg and/or ginger (optional)
1 - 2 teaspoons (5-10 ml) (5-10 gm) white sugar for sprinkling (optional)
Glaze
either 1 egg beaten with 1/2 teaspoon water, or 1 tablespoon milk
Directions:
Flaky pastry

1. Weigh/measure out the correct amount of butter, wrap it in foil and freeze it for at least 30 minutes.
2. Sift the flour, sugar and salt into a large bowl.
3. Using the large holes on a box grater, grate the frozen butter directly over the flour in the bowl. Hold the butter by the foil to avoid warming it up too much and work as quickly as possible.
Using a table fork, toss the grated butter in the flour until it's all coated.
Alternatively, finely chop the butter and rub in with your fingertips, working quickly to avoid warming it. This is best left to those lucky folk with cool hands!
4. Sprinkle 3 tablespoons (45 ml) of cold water over the mixture and mix together with the fork. Add more water, spoon by spoon, as needed - it will depend on temperature, humidity and a million other factors, but the finished dough should be moist and starting to come together, but not wet. I used 7 tablespoons (315 ml). Use your fingertips to test if it's sticking together.
5. Finish by using your hands to quickly bring the dough together into a ball. Just press, don't knead.
6. Wrap dough in plastic and refrigerate for at least 30 minutes.
Pie

1. Preheat oven to hot 220°C/425°F/gas mark 7 . Lightly grease a deep 9"/24cm ceramic or metal pie dish. Note that a dish this size results in quite a thin top crust - if you want a sturdier top which cuts more cleanly, then you should use a smaller dish so you don't need to roll it out so thinly.
2. Take 2/3 of the pastry dough (I weighed my dough and 2/3 was about 12oz/340g) and roll out to fit pie dish, right up to the rim. Line the pie dish with it, prick all over the bottom with a fork and set aside.
3. Peel, quarter, core and slice the apples and place in a bowl. How tightly you can pack them into the pie depends on how thinly they are sliced - I like them chunky, but you will get a firmer filling if they are very thin.
4. Sprinkle the brown sugar and spice(s) over the apples and toss well to coat.
5. Pack the apples tightly into the lined pie dish. The filling can come up above the rim of the dish in a mound.
6. Roll out the remaining pastry dough to fit over the apples.
7. With a wet finger, moisten the edge of the pastry in the dish. Place the dough lid on the pie and press the edges together. Trim the edges as necessary and crimp the seam closed with your fingers or the back of a fork.
8. With a pair of kitchen scissors, cut three vents in the top of the dough. You can either cut leaf-shaped vents and use the pieces you removed to fashion decorative leaves, or you can cut straight vents and use any pastry trimmings to fashion decorations as desired. Moisten the back of the decorations with a wet finger and gently press onto the top of the pie.
9. Glaze the top of the pie with a beaten egg or milk, then sprinkle the top with a little white sugar.
10. Place pie dish on a baking sheet and put it into the center of the oven. Bake for 20 minutes, then reduce heat to moderate 180°C/350°F/gas mark 4 and bake for a further 30 minutes. The top should be light golden brown.
11. Serve hot, warm or cold.
Storage & Freezing Instructions/Tips:
Crack pie will keep well in the fridge, covered with plastic wrap, for 5 days. You can freeze it, well wrapped in plastic, for one month. Defrost in the fridge.
Chocolate and caramel tart will keep in the fridge, covered with plastic wrap, for 3 days. It is unsuitable for freezing. The pastry can be made a day ahead.
Crostata di marmellata and Double crust apple pie will both keep well in the fridge, covered with plastic wrap, for 5 days, although the crust will soften. Crostata filling containing custard would keep for only 3 days. The baked pies can be frozen, well wrapped in plastic, for one month. Defrost at room temperature or in a slow oven. The pastry for both can be made a day ahead.
Additional Information:
Lattice video
http://www.youtube.com/watch?v=Hv4809RKhzg
Lattice photo step-by-step guide
http://www.annies-eats.com/2010/11/19/how-to-make-a-lattice-pie-crust/
Pâte sablée step-by-step pictures (the text is in French but the pictures are great)
http://chefsimon.com/pate-sablee.html
and a video of the pâte sablée process
http://chefsimon.com/videos/pate-sablee.html
David Lebovitz has some great tips and pictures on making caramel here
http://www.davidlebovitz.com/2008/01/how-to-make-the/
A somewhat limited but still useful list of apple varieties and their uses
http://allrecipes.com/howto/baking-with-apples/
Disclaimer:
The Daring Kitchen and its members in no way suggest we are medical professionals and therefore are NOT responsible for any error in reporting of “alternate baking/cooking”. If you have issues with digesting gluten, then it is YOUR responsibility to research the ingredient before using it. If you have allergies, it is YOUR responsibility to make sure any ingredient in a recipe will not adversely affect you. If you are lactose intolerant, it is YOUR responsibility to make sure any ingredient in a recipe will not adversely affect you. If you are vegetarian or vegan, it is YOUR responsibility to make sure any ingredient in a recipe will not adversely affect you. The responsibility is YOURS regardless of what health issue you’re dealing with. Please consult your physician with any questions before using an ingredient you are not familiar with. Thank you!
__________________ Rachael @ pizzarossa
......................................................................................................................
Daring Bakers May 2013: Swedish Prinsesstarta
Hi! I’m Korena from Korena in the Kitchen. One of the reasons I started writing a food blog was so I could join the Daring Bakers, so needless to say I am pretty excited to be hosting a challenge. The recipe I’m sharing this month is the Swedish Prinsesstårta, or princess cake. I first discovered this cake when I saw a picture of it posted on Facebook. I can never pass up a pretty cake, and the domed shape and green marzipan covering had me intrigued. And what’s not to like? Layers of light sponge cake, raspberry jam, and vanilla custard/pastry cream, topped with a mound of fluffy whipped cream, covered in green marzipan, and garnished with a marzipan rose. (Don’t worry, if you don’t like or don’t eat some of those components; I’ve given some alternatives). But what I really wanted to know was what did it have to do with princesses and why was it green?


Recipe Source:
- Cake components and assembly adapted from Semiswede
- Custard method adapted from Tartelette
Posting Date: May 27, 2013
Download printable file HERE
Notes: Here is a cross-section diagram to illustrate the layered components of a prinsesstårta:
- Marzipan
- Sponge cake
- Whipped cream
- Custard/pastry cream
- Sponge cake
- Custard/pastry cream
- Raspberry jam
- Sponge cake
The sponge cake recipe uses potato starch, which is gluten-free and NOT the same as potato flour. If potato starch is unavailable, cornstarch can be used instead. This article has more information about potato starch, if you are unfamiliar with it. I couldn’t find potato starch so I used cornstarch and it worked very well.
Gel or paste food colouring is best for tinting the marzipan because it doesn’t contain enough excess moisture to make the marzipan sticky. Liquid food colouring will work, but you may have to knead some extra icing sugar into the marzipan to make it less sticky (this is what I did).

Variations Allowed: Get creative with the flavour profile of your prinsesstårta! Add flavour to the sponge cake or custard or whipped cream. Use any kind of jam/sauce/spread/purée. Replace the marzipan with chocolate plastique or fondant or any other rolled covering (and it doesn’t have to be green!) You may decorate the top of the cake however you want. As long as it is still “in the spirit” of a prinsesstårta, go for it!
I have provided a prinsesstårta recipe using the traditional flavours of plain sponge cake, raspberry jam, vanilla custard, plain whipped cream, and marzipan, decorated with a marzipan rose. Use these as a base for your flavour variations. If you want to use a different recipe than those provided for one or more components of the cake, that’s fine too.
These videos show some prinsesstårta variations (videos are in Swedish but again, the visual is very informative):
- Hallonprinsesstårta, or raspberry prinsesstårta, made with custard, whipped cream flavoured with raspberry jam, whole raspberries, and topped with pink marzipan
- Karl-Gustav tårta, made with custard, sliced banana, a chocolate-covered meringue disc replacing the middle layer of cake, and covered with yellow marzipan
- Williamtårta, made with custard, poached pear, whipped cream, topped with marzipan, covered with a shiny chocolate glaze, and garnished with toasted sliced almonds
- Gluten-free sponge cake: replace all the wheat flour in the sponge cake recipe with potato starch, as seen in this prinsesstårta recipe
- Vegan sponge cake (egg and dairy free)
- Eggless sponge cake and eggless pastry cream from Daring Baker Gayathri’s take on the July 2011 Fresh Fraisier challenge
- Vegan pastry cream (egg and dairy free)
- Cashew and coconut pastry cream (egg and dairy free)
- Coconut whipped cream (dairy free and vegan) – my experience is that this doesn’t get as firm as real whipped cream, so you might want to try assembling the cake upside-down in a bowl.
- Chocolate plastique/modeling chocolate (here’s a recipe)
- Fondant (here’s a recipe for marshmallow fondant)
- “Marzipan” made with hazelnuts, coconut, peanuts, etc, instead of almonds

Vanilla Custard: 20 minutes hands-on, plus chilling (several hours or overnight)
Sponge Cake: 30 – 40 minutes hands-on, plus 40 minutes baking, plus cooling
Marzipan Covering and Rose: 20 – 30 minutes, depending on your rose-making skills (note: homemade marzipan recipe requires overnight refrigeration)
Prinsesstårta Assembly: 30 – 40 minutes, plus chilling if necessary
Equipment required:
- one medium and one large mixing bowl/stand mixer bowl
- balloon whisk
- medium saucepan
- fine mesh sieve
- 9” (23 cm) round springform pan or other deep 9” (23 cm) round pan
- electric mixer or stand mixer with whisk attachment
- rubber spatula
- rolling pin
- cooling rack
- long serrated knife
- off-set spatula or long thin spatula
- paring knife
- parchment paper
- plastic wrap
- piping bag (optional)
- cake decorating turntable (optional)
Traditional Swedish Prinsesstårta
Servings: 8 – 10. Makes one 9” round cake.Vanilla Custard
Ingredients1 cup (240ml) heavy cream, divided
4 egg yolks from large eggs
2 tablespoons (30 ml) (15 gm) (½ oz) cornstarch
2 tablespoons (30 ml) (30 gm) (1 oz) granulated white sugar
1 vanilla bean, split and scraped (or 2 teaspoons (10 ml) vanilla extract)
Directions:
1. In a medium bowl, whisk together the cornstarch, sugar, and egg yolks. Gradually whisk in ½ cup (120 ml) of heavy cream until smooth.


(If desired, pass the custard through a fine mesh sieve before continuing.)


Sponge Cake
IngredientsFine dry breadcrumbs for the pan (such as crushed panko)
4 large eggs, at room temperature
1 cup (240 ml) (225 gm) (8 oz) granulated white sugar
½ cup (120 ml) (70 gm) (2½ oz) all-purpose (plain) flour
½ cup (120 ml) (65 gm) (2¼ oz) potato starch (or cornstarch)
1 teaspoon (5 ml) (5 gm) baking powder
1/8 teaspoon salt
Directions:
1. Preheat the oven to moderate 350°F/180°C/gas mark 4 with a rack in the lower third of the oven. Thoroughly butter a 9” (23 cm) round springform pan, line the bottom with a circle of parchment paper, then butter the paper. Dust the buttered pan with enough breadcrumbs to coat the bottom and sides, just like flouring a cake pan. Set aside.


Marzipan Covering and Rose
Ingredients10 oz (285 gm) marzipan
Green and yellow food colouring
Icing sugar, for rolling
Red food colouring
Directions:
1. Set aside a small amount of plain marzipan (about the size of a walnut) to make a rose for decoration. Knead the remaining marzipan on a surface dusted with icing sugar until it becomes softer and smooth (the warmth from your hands will help this).
2. Add a small amount of green food colouring (I used 3 or 4 drops of liquid food colouring) and knead it into the marzipan to get the desired shade of green. You might need to add a little more green or yellow food colouring to get the right colour – anything from pastel green to bright spring green (just not neon green!) Wrap tightly in plastic and refrigerate until you are ready to cover the cake (or store as directed on the marzipan package).


Prinsesstårta Assembly
Ingredients2 cups (480 ml) heavy cream, chilled
granulated white sugar, to taste (scant 1 tablespoon is plenty)
Sponge Cake, cooled
1/3 cup (80 ml) seedless raspberry jam (or regular jam pressed through a sieve to remove seeds)
Vanilla Custard, chilled
Marzipan Covering and Rose
Icing sugar, for rolling and dusting
Optional: melted chocolate, royal icing, or piping gel
Directions:
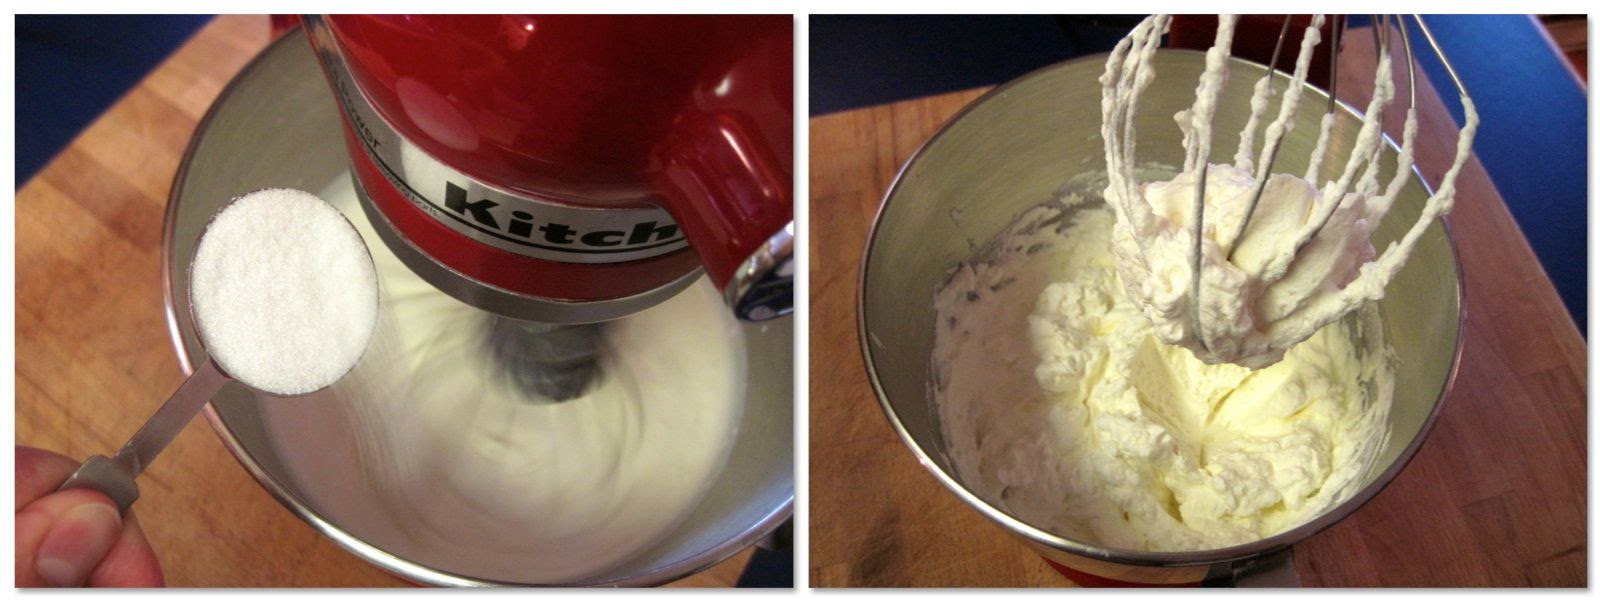
1. In a large bowl, whip the heavy cream until soft peaks form. Add sugar to taste (keep in mind that the rest of the cake components are sweet, so the whipped cream should be very lightly sweetened at most) and continue whipping the cream until stiff. You want it to be sturdy enough to provide structure to the cake, but not over-whipped enough to make butter. Set the whipped cream aside.


9. Use the rolling pin to drape the rolled-out marzipan sheet over the cake and smooth it around the cake gently with your hands.


(You can also use melted chocolate, royal icing, or piping gel to pipe a design on top of the cake, if you wish.)


The finished Prinsesstårta should be refrigerated until serving, and any leftovers refrigerated as well. Ideally the cake is eaten the day it is made, but will keep in the refrigerator for a day or so, after which it may lose its structural integrity and aesthetic appeal (but it will still taste good!)
Additional Information:
Other methods for making a marzipan rose (no special equipment needed):
A Google image search of prinsesstårta for inspiration
Incredibly cute Princess Cupcakes
Egg-free Marzipan Recipe
(adapted from Cake Central)Ingredients
4 oz (115 gm) ground almonds
8 oz (225 gm) icing sugar
¼ cup (60 ml) corn syrup
½ teaspoon (5 ml) almond extract
1 tablespoon (15 ml) lemon juice or water
Directions:
1. Place the ground almonds and icing sugar in the bowl of a food processor and pulse to combine and break up any lumps
2. Add the corn syrup and almond extract and pulse again to combine. The mixture should be quite dry and crumbly still.


The Daring Kitchen and its members in no way suggest we are medical professionals and therefore are NOT responsible for any error in reporting of “alternate baking/cooking”. If you have issues with digesting gluten, then it is YOUR responsibility to research the ingredient before using it. If you have allergies, it is YOUR responsibility to make sure any ingredient in a recipe will not adversely affect you. If you are lactose intolerant, it is YOUR responsibility to make sure any ingredient in a recipe will not adversely affect you. If you are vegetarian or vegan, it is YOUR responsibility to make sure any ingredient in a recipe will not adversely affect you. The responsibility is YOURS regardless of what health issue you’re dealing with. Please consult your physician with any questions before using an ingredient you are not familiar with. Thank you!
__________________ My blog: Korena in the Kitchen
..............................
Daring Bakers February 2013: Crisp Crackers and Flatbreads
Hi, I am Sarah from All Our Fingers in the Pie. I am so excited about this challenge with The Bakers! I can hardly wait to see what ideas you all come up with. I have been on a mission to find all the crisps recipes that I can because they make lovely hostess gifts and healthy nibblies to have in your kitchen.
Recipe Sources:
“Menus from an Orchard Table” by Heidi Noble
“Dinner with Julie” blog with Julie van Rosendahl
Arrowhead Mills
Martha Stewart
Blog checking lines: Sarah from All Our Fingers in the Pie was our February 2013 Daring Bakers’ host and she challenges us to use our creativity in making our own Crisp Flatbreads and Crackers!
Posting Date: February 27th, 2013
Download printable file HERE
Mandatory Items: To make a crisp or crispy flatbread. These recipes are suggestions but let your imagination run free. Soft is not a part of this challenge, so no soft pretzels or soft flatbreads. It must be crispy.Variations Allowed: Any flavors your mind can create. Any type of flour and ingredients.
Preparation Time: varies, see each recipe below
Equipment Required:
Mixing bowls, spoons and spatulas
Baking sheet
Raincoast Crisps
From Dinner with Julie blog with Julie van RosendahlServings: About 8 dozen

2 cups (480 ml) (280 gm) (10 oz) all-purpose (plain) flour
2 teaspoons (10 ml) (10 gm) (1/3 oz) baking soda
1/2 teaspoon (2½ ml) (3 gm) salt
2 cups (480 ml) buttermilk
1/4 cup (60 ml) (50 gm) (1¾ oz) brown sugar, firmly packed
1/4 cup (60 ml) honey
1 cup (240 ml) (180 gm) (6½ oz) raisins
1/2 cup (120 ml) (60 gm) (2 oz) chopped pecans
1/2 cup (120 ml) (125 gm) (4½ oz) roasted pumpkin seeds (optional)
1/4 cup (60 ml) (30 gm) (1 oz) sesame seeds
1/4 cup (60 ml) (30 gm) (1 oz) flax seed, ground
1 tablespoon (15 ml) (2 gm) finely chopped fresh rosemary
Directions
Preheat oven to moderate 350°F/180°C/gas mark 4.
In a large bowl, stir together the flour, baking soda and salt. Add the buttermilk, brown sugar and honey and stir a few strokes. Add the raisins, pecans, pumpkin seeds, sesame seeds, flax seed and rosemary and stir just until blended.
Pour the batter into two 8”x4” (20cmx10cm) loaf pans that have been sprayed with nonstick spray. Bake for about 45 minutes, until golden and springy to the touch. Remove from the pans and cool on a wire rack.
The cooler the bread, the easier it is to slice really thin. You can leave it until the next day or pop it in the freezer. Slice the loaves as thin as you can and place the slices in a single layer on an ungreased cookie sheet. Slice so thin that they are almost lacy. Reduce the oven heat to slow 300°F/150°C/gas mark 2 and bake them for about 15 minutes, then flip them over and bake for another 10 minutes, until crisp and deep golden. You can also cut in half before the second baking. This is the way I like them. The size works better. Be careful not to burn.
Storage and Freezing Instructions/Tips: Store in an airtight container at room temperature for up to 1 month. Prolong the freshness by freezing for up to 3 months.
Spicy Corn Crackers
From Arrowhead MillsServings: About 4 dozen

½ cup (120ml) buttermilk
3 tablespoons (45 ml) vegetable oil
1 cup (240 ml) (170 gm) (6 oz) blue corn meal
½ cup (60 gm) (2 oz) pastry flour
¾ teaspoon (1½ gm) salt
¼ teaspoon (1½ gm) baking soda
1/8 teaspoon cayenne
½ teaspoon (3 gm) chili powder, or more, to taste
1 teaspoon (4 gm) garlic powder
Directions:
Preheat oven to moderate 350°F/180°C/gas mark 4. Combine buttermilk and oil. In separate mixing bowl, thoroughly stir together the dry ingredients. Add milk mixture and stir until dough forms a ball. Knead on floured board (adding a little more flour if necessary) about 5 minutes. Divide dough in half and roll each. Roll as thinly as possible. Cut into 2-inch squares. Sprinkle with additional salt or paprika. Bake in a preheated moderate oven on baking sheet lined with parchment paper for about 15 minutes. Be careful not to brown the bottoms. Cool slightly before removing from baking sheet, finish cooling on wire rack. Store in loosely covered container.

Onion and Poppy Seed Crackers
From “Menus from an Orchard Table” by Heidi Noble featured on Sarah’s blog.Servings: About 6 dozen

1 medium onion
1 large egg
1/3 cup (80 ml) vegetable oil
2 teaspoons (10ml) (12 gm) salt
2 cups (480 ml) (280 gm) (10 oz) all-purpose (plain) flour
1 teaspoon (5 gm) baking powder
2 tablespoons (30ml) (18 gm) (2/3 oz) poppy seeds
1 tablespoon (15 gm) (½ oz) granulated sugar
1/4 teaspoon freshly ground black pepper
Directions:
In the bowl of a food processor fitted with the blade attachment, puree the onion. One medium onion will yield approximately 1 cup puree. Measure 1 cup puree and liquid from the onion and return to the food processor. Add the egg, oil and salt and blend until well incorporated.
In another bowl, measure the dry ingredients. Mix lightly to combine. Make a well in the center and add the liquids in this well. Mix in one direction until the dough is fully combined. Lightly knead the dough, flouring as needed, for 2 minutes. Wrap tightly in plastic wrap and rest in the refrigerator for 1 hour.
Preheat oven to moderate 350°F/180°C/gas mark 4.
This is a very soft dough and you may find it best to roll it between two sheets of parchment paper. Roll as thinly as possible. In fact, it is best if rolled as thinly as a strudel dough. But don't worry if you can't get it that thin. The crackers will still be fine. Cut into desired shapes.
Bake until evenly golden. The time required will depend upon thickness but anywhere from 5 - 15 minutes. If they are thicker, the crackers will puff up like little pitas. Cool thoroughly before storing in air tight container.
Storage and Freezing Instructions/Tips: Store in an airtight container at room temperature for up to 1 month. Prolong the freshness by freezing for up to 3 months.
Herbed Flatbread
Servings: About 16 pieces
1 cup (240 ml) warm water (about 110°F/43°C)
1 teaspoon (5 ml) (2 ¾ gm) active dry yeast
3 cups (720 ml) (420 gm) (15 oz) all-purpose (plain) flour, plus more for rolling
3 tablespoons (45 ml) of extra virgin olive oil
coarse salt
1 teaspoon (5 ml) (5 gm) sugar
1 large egg whisked with 1 tablespoon (15 ml) water, for egg wash
sea salt, for sprinkling
1/4 cup (60 ml) (7 gm) (¼ oz) fresh rosemary or thyme
Directions:
Place the water in a medium sized bowl and sprinkle the yeast. Let stand until the yeast is foamy, about 5 minutes. Stir in flour, oil, 2 teaspoons coarse salt, and the sugar. Stir until a dough forms.
Turn out dough onto a lightly floured surface and knead until smooth, about 2 minutes. Use as much flour as necessary so it is not a sticky dough. Place in a lightly oiled bowl and roll the dough around in the bowl so that it is also lightly oiled on the surface. Cover with saran wrap. Let stand in a warm place until it doubles in volume, about 1 hour.
Preheat oven to moderate 350°F/180°C/gas mark 4. Divide dough into 16 equal portions and cover with plastic wrap. Roll out each piece to approximately 4"x10" (10cm x 26cm) on a lightly floured surface. Transfer to parchment lined baking sheet. Brush with the egg mixture and sprinkle with sea salt and herbs.
Bake, rotating sheet halfway through baking, until crisp and golden, 18-22 minutes. Let cool on the baking sheet then transfer to a wire rack to cool completely.
Storage and Freezing Instructions/Tips: Store in an airtight container at room temperature for up to 1 month. Prolong the freshness by freezing for up to 3 months.
Disclaimer:
The Daring Kitchen and its members in no way suggest we are medical professionals and therefore are NOT responsible for any error in reporting of “alternate baking/cooking”. If you have issues with digesting gluten, then it is YOUR responsibility to research the ingredient before using it. If you have allergies, it is YOUR responsibility to make sure any ingredient in a recipe will not adversely affect you. If you are lactose intolerant, it is YOUR responsibility to make sure any ingredient in a recipe will not adversely affect you. If you are vegetarian or vegan, it is YOUR responsibility to make sure any ingredient in a recipe will not adversely affect you. The responsibility is YOURS regardless of what health issue you’re dealing with. Please consult your physician with any questions before using an ingredient you are not familiar with. Thank you!
__________________ Sarah G
http://allourfingersinthepie.blogspot.com
..............................................
Daring Bakers January 2013: Gevulde Speculaas
Gevulde Speculaas
Daring Bakers
January 2013

Hello! My name is Francijn from Koken in de Brouwerij, and I'm proud to be a Dutch Daring Baker since April 2008. I made my first cake for my own twentieth birthday, using my very first cookbook. And since then I am a devoted baker, and my slogan is “I can make that myself”. I love to bake things that other people buy.
This month we're going to make a traditional Dutch pastry: gevulde speculaas (stuffed speculaas). It is not hard to make, it doesn't take a lot of time, but it is delicious, beautiful and very traditional. And everyone I know buys it instead of baking.
Download the printable .pdf file a HERE

Recipe source: Dutch culture
Blog-checking lines: Francijn of Koken in de Brouwerij was our January 2013 Daring Bakers’ Hostess and she challenged us to make the traditional Dutch pastry, Gevulde Speculaas from scratch! That includes making our own spice mix, almond paste and dough! Delicious!
Posting date: January 27, 2013
Notes: You can choose to make this recipe in one day. But to enjoy the full flavor you could take a few days. Make the almond paste and speculaas dough, put both in the refrigerator and wait a few days before assembling the stuffed speculaas. Make sure to read the notes about eggs I made in the almond paste recipe. Work hygienically. Storage instructions are included with each part of the recipe.
Mandatory items: I challenge you to make this recipe from scratch. Make your own almond paste, mix your own spices. And if you really want to taste a piece of Holland, stick to the recipe
Variations allowed: You can use your creativity for the shape and almond-decoration of the pastry.
Preparation times:
Making the almond paste: 10-20 minutes
Making the speculaas dough: 10-20 minutes
Waiting: 2 hours or a few days (your choice)
Assembling: 30 minutes
Baking: 40 minutes.
Cooling: a few hours.
Equipment required:
rolling pin
food processor (to grind the almonds)
clingfoil
shallow baking pan, 8x10 inch (20x26 cm) or round with a 10 inch (26 cm) diameter

History
Let us start with a little history, about the Netherlands and spices. Until 1800 cloves, mace and nutmeg are exclusively found on the Maluku Islands, in the East Indian Archipelago. That's why these islands are called “the spice islands”. To make one's fortune in Europe through the spice trade, one needed a monopoly on the European trade. Since 1500 the Portuguese owned that monopoly. The Republic of the Seven United Netherlands, too, wanted to get rich from the spice trade, and established the Dutch East India Company around 1600, to join forces. Since 1660 the monopoly on spice trade was firmly in Dutch hands. In the Dutch Golden Age, roughly the 17th century, the republic got rich through this trade, and flourished like never before, economically, artistically and scientifically. In many Dutch cities the heritage of this century is still visible. Sadly, this wealth must be considered in the light of war and repression. The Dutch used much violence and oppressed people to establish and defend their monopoly.
Only after World War II Dutch India became independent from the Netherlands. Until that moment the trade of spices, coffee, rubber, tobacco, opium, sugar, indigo and tea from Dutch India contributed significantly to the Dutch economy. In light of this historical involvement of the Netherlands in the spice trade, the contents of my kitchen cupboard are not surprising. Anise seeds, cayenne pepper, chili pepper, lemon grass, mace, ginger, cinnamon, cardamom, curry powder, cumin, coriander seeds, cloves, galangal, mustard seed, nutmeg, paprika, allspice, saffron, vanilla, fennel, white pepper, black pepper. And that's without the long list of herbs.
Speculaas spices
When spices had become commonly available in the 17th century, bakers' guilds began to make their secret spice mixtures. A mixture that gloriously survived the ages is “speculaaskruiden” (speculaas spices). Speculaaskruiden contain at least cinnamon, cloves, mace and ginger, and these spices to taste: pepper, cardamom, coriander, anise seeds and nutmeg.
The smell of speculaaskruiden is overwhelming, especially when you take the trouble to mix them yourself. The deliciously warm and woody aroma is a perfect fit for the chilly Dutch winter months. From the golden age onward, this spice mixture was used to bake a crisp, buttery biscuit: speculaas. For centuries it remained a luxury item, baked only in the holiday season, and often given as a present. Sometimes bakers made the dough three months in advance so that the flavor would permeate the dough.
Ever since the 15th century, the 6th of December has been celebrated as the nameday of St. Nicholas, combined with an exchange of gifts on the evening before. But in the age of the Dutch East India Company St. Nicholas became associated with speculaas. And that is not so strange, as St. Nicholas was the patron saint of sailors as well as many bakers' guilds.
In the course of time many recipes using speculaas spices have been created. Speculaasjes (“speculaas cookies / windmill cookies”) which are shaped using a wooden mold, speculaasbrokken (“speculaas chunks”), kruidnoten (“spiced nuts / miniature spiced cookies”), gevulde speculaas (“speculaas stuffed with almond paste”). And that is not the end of it: speculaas spices can be used in custards, cakes, muffins, bread toppings, cheesecake crusts and so on.

Recipe Speculaas Spices
Speculaas spices can be bought in a store. But it's more fun to make your own mixture, so that you can adjust the flavor. Here is a representative recipe from the extensive Dutch tradition.
Mandatory:
cinnamon 40 to 60 % of the total amount
ground cloves 1 or 2 parts
mace ½ or 1 part
ginger ½ or 1 part
Optional:
white pepper ½ or 1 part
cardamom ½ or 1 part
coriander ½ or 1 part
anise ½ or 1 part
nutmeg 1 or 2 parts
A convenient way to mix the spices is as follows:
Take at least 1 or 2 teaspoons of ground cloves, ½ or 1 teaspoon of mace and ½ or 1 teaspoon of ginger.
Add to taste ½ or 1 teaspoon of white pepper, ½ or 1 teaspoon of cardamom, ½ or 1 teaspoon of coriander, ½ or 1 teaspoon of anise, and 1 or 2 teaspoons of nutmeg.
Measure or weigh the amount of spices you have now, and add an equal amount of cinnamon.

This method yields at least 4 and at most 18 teaspoons of spices, so if you plan to mix just a few spices, use bigger or more spoons to get a reasonable amount. Take your time to smell the ingredients individually before you decide how much to add. And remember the proportions, that will make adjustments easier next time.
Store the spices airtight, dry and dark, they will not spoil for a long time.
Recipe Almond Paste
As we are going to make stuffed speculaas, we will need almond paste. You can buy it in a store, but homemade almond paste tastes better.
Ingredients:
7/8 cup (210 ml)(125 gm)(4½ oz) raw almonds (or 1-1/3 cups (320 ml)(125 gm) (4½ oz) ground almonds)
5/8 cup (150 ml) (125 grams) (4½ oz) granulated sugar
1 large egg
1 teaspoon (5 ml) (3 gm) lemon zest

Directions:
If the raw almonds still have their brown skins, remove them as follows. Bring water to a boil, add the almonds, cook them for one minute, drain immediately and let cool for a few minutes. Rub them between your fingers to remove the skins.

Grind the almonds for one or two minutes in a food processor, until you see nothing but very small pieces. (Or skip this step if you use ground almonds.)
Add the sugar, and grind for another one or two minutes. It must be very fine after this step.
Add the egg and let the food processor combine it - if it is powerful enough. Otherwise you will have to combine it with your fingers.
Store the almond paste in an airtight container in the refrigerator. Although the flavor gets better as days pass by, it is not wise to store the paste for too long, as it contains a raw egg. For the same reason you should not eat the paste unbaked.

To be safe, you could choose one of these options:
use egg powder and water to replace the egg (follow instructions with the powder)
use 50 ml of an other liquid, like lemon juice (in that case, leave the zest out)
add the egg just before you are going to bake the pastry
The paste can also be kept in the freezer.
Recipe Speculaas Dough
Ingredients:
1¾ cups (250 gm) (9 oz) all purpose (plain) flour
1 teaspoon (5 ml) (5 gm) baking powder
¾ cup (150 grams) (5-1/3 oz) brown sugar, firmly packed
a pinch salt
2 tablespoons (30 ml) (15 gm) (½ oz) speculaas spices
3/4 cup (1½ stick) (175 gm) (6 oz) unsalted butter

Directions:
Put flour, baking powder, sugar, salt and spices in a bowl.
Cut the butter in dices and add.
Knead until smooth.
Feel free to add a little milk if the dough is too dry.
Wrap in clingfoil and put in the refrigerator for two hours.
You can choose to make the dough a few days in advance, just like the almond paste, that will benefit the flavor. Freezing is no problem.

Assembling and baking the Gevulde Speculaas
Ingredients:
speculaas dough
almond paste
whole almonds without skins for decoration
1 large egg
shallow baking pan, 8x10 inch (20x26 cm) or, round with of diameter 10 inch (26 cm)
Directions:
1. Grease the pan.
2. Preheat the oven to moderate 350°F/180°C/gas 4
3. Divide the dough into two portions.
4. Roll out both portions on a lightly floured surface, until they are exactly as big as the baking pan.

5. Put one of the layers in the pan and press it lightly to fill the bottom.
6. Lightly beat the egg with a teaspoon cold water.
7. Smear 1/3 of the egg over the dough in the pan.
8. Roll out the almond paste between two sheets of clingfoil, until it is exactly as big as the pan, and put it on the dough in the pan. (If you chose to make the paste soft, you can smear the paste instead of rolling it.)
9. Press the paste lightly down to fit in the pan, and smear the next 1/3 of the egg over it.
10. Now put the second layer of dough on top of the paste, press it lightly, and make as smooth as possible.
11. Smear the last 1/3 of the egg over the dough.
12. Decorate the pastry with the almonds.

13. Bake for 40 minutes in the preheated oven.
14. Let cool completely in the pan, then cut it in portions as you like.

15. If you wrap the stuffed speculaas in clingfoil, after it has cooled completely, you can store it a few days at room temperature. Freezing is possible, but fresh speculaas tastes better.

Storage & Freezing Instructions/Tips:
Speculaas spices: store them airtight, dry and dark, and they will not spoil for a long time.
Almond paste: keep it in the refrigerator. Some people keep it there for months, but if it contains raw egg, I recommend not more than a few days. Can easily be frozen.
Speculaas dough: can be kept in the refrigerator for days, or in the freezer for months. But remember: fresh tastes better.
Stuffed speculaas: if you let it cool completely, you can wrap it in clingfoil and keep it a few days at room temperature. And again: freezing is possible, but fresh is better.
Additional Information:
And all these below are links to inspiring pictures. Have fun
www.goddelijkehuisvrouw.nl
t1.gstatic.com
simmerboston.com/
4.bp.blogspot.com
www.patisseriespeekenbrink.nl
elfjeskruid.files.wordpress.com
www.flickr.com/photos/fotoosvanrobin/
www.broodenbanketbestelling.nl/
jansen-amstelveen.ambachtsbakker.nl
www.zeelandia.nl
recept-recette.be
www.weekendbakery.com
www.growntocook.com
www.coquinaria.nl
www.vdpol.nl
crejjtion.blogspot.nl
www.lekkerensimpel.com
zoetenverleidelijk.blogspot.nl
Disclaimer:
The Daring Kitchen and its members in no way suggest we are medical professionals and therefore are NOT responsible for any error in reporting of “alternate baking/cooking”. If you have issues with digesting gluten, then it is YOUR responsibility to research the ingredient before using it. If you have allergies, it is YOUR responsibility to make sure any ingredient in a recipe will not adversely affect you. If you are lactose intolerant, it is YOUR responsibility to make sure any ingredient in a recipe will not adversely affect you. If you are vegetarian or vegan, it is YOUR responsibility to make sure any ingredient in a recipe will not adversely affect you. The responsibility is YOURS regardless of what health issue you’re dealing with. Please consult your physician with any questions before using an ingredient you are not familiar with. Thank you!
No Cookbook
..................................................................
Daring Bakers July 2012: Crazy for Crackers
Hello everyone! My name is Dana McFarlane and I am thrilled to be your host for the month of July! I have not joined the world of blogging yet with the excuse that I am working on a cookbook to unveil my culinary interests all at once. It’s a slow going task but being part of the DB challenges for almost two years now has got me in the habit of documenting my dishes!
July’s challenge is all about crackers! Crackers are something I particularly like making because I find it an uncommon practice these days. Most people think I am crackers for going to the trouble but delight when given the opportunity to taste them. Making crackers also allows you to avoid the additives that make store bought crackers last for years and they make wonderful hostess and parting gifts.
You can make crackers a variety of different ways, which is what I would like to focus on this month. It can be as simple as combining ingredients in a bowl, shaping into a log and slicing like icebox cookies, or mixing a dough in the stand-up mixer, passing through your pasta rollers and cutting pretty shapes with cookie cutters. I will challenge you to try some different methods and present some suggested recipes down below. Cheeses can be swapped, flours altered and spices changed; I encourage creativity! As long as you a making small crispy platforms on which to add a myriad of toppings, you are on the right track!!
Recipe Source: A few recipes from the pile of books I own:
• Brown, Alton (2011). Good Eats 3:The Early Years, “Seedy Crisps”. Stewart, Tabori & Chang, New York, NY.
• The American Culinary Institute. (2008). Garde Manger: The Art and Craft of the Cold Kitchen (3rd ed.) “Pepper Jack and Oregano Crackers”. John Wiley and Sons, Inc. Hoboken, NJ.
• The American Culinary Institute. (2008). Garde Manger: The Art and Craft of the Cold Kitchen (3rd ed.). “Cheddar and Walnut Icebox Crackers”. John Wiley and Sons, Inc. Hoboken, NJ.
• Smith, Sandy (2000). Kootenay Country Kitchens Cookbook: A Collection of Kootenay Favourites. “Health Crackers” Kootenay Kitchens Publishing, Nakusp, BC.
Blog-checking lines: Our July 2012 Daring Bakers’ Host was Dana McFarland and she challenged us to make homemade crackers! Dana showed us some techniques for making crackers and encouraged to use our creativity to make each cracker our own by using ingredients we love.
Posting Date: July 27, 2012
Download printable file HERE
Note: The end product is something that should be crispy so, if after your crackers have cooled they remain a little soft, simply pop them back in the oven until crispy. The leaner the dough (less fat and cheese) I find are the most successful baked twice. More rich doughs tend to be perfect when browned and less likely to need additional baking. You really are just drying out the dough rather than cooking the ingredients so keep any eye on them and adjust cooking times to suit your oven.Mandatory Items: Two different crackers recipes must be prepared using two different methods of forming. Hand rolling and pasta rollers, pasta rollers and icebox or pasta rollers and icebox etc.
Variations allowed: The recipes listed here are a suggestion. You may substitute for any you choose so long as they are formed in two different ways.
Preparation time:
• Preparing the dough: 20 minutes• Chilling (as applicable): 1 hour to overnight
• Rolling and forming: approximately 30 minutes
• Baking: 10 to 30 minutes depending on recipe
Equipment required:
• Mixing bowls• Measuring spoons
• Measuring cups
• Rolling pin
• Cookie sheets
• Parchment paper
• Spatula
• Lifter
• Knife or pizza wheel
• Food processor (optional)
• Stand mixer (optional)
• Pasta rollers (optional)
Health Crackers (Roll these by hand):
Servings: Approximately 80 crackersIngredients
3 cups (720 ml) (240 gm)(8½ oz) rolled oats2 cups (480 ml) (280 gm/10 oz) plain (all-purpose) flour
1 cup (240 ml) (80 gm) (2¾ oz) wheat germ
3 tablespoons (45 ml) (40 gm)(1½ oz) sugar
1 teaspoon (5 ml) (6 gm) salt
¾ cup (180 ml) vegetable oil
1 cup (240 ml) water
1 large egg white
Cracker topping:
Sesame seeds, poppy seeds, nigella (onion) seeds, salt
Salt sprinkling
Directions:
1. Mix the oats, flour, wheat germ sugar and salt together in a large bowl or bowl for the standup mixer.2. Combine the water and oil and stir into the oat mixture until it comes together and a dough forms.

3. Form dough into a disk and allow to rest in the fridge for about 20 minutes but up to a day if you are making the ahead.
4. Preheat the oven to moderate 325°F/160°C/gas mark 3.
5. Divide the dough into quarters and work with one piece at a time, allowing the remaining pieces to stay in the fridge as you proceed with rolling out the crackers.
6. On a lightly floured surface, roll the dough to about 1/16 inch (1½ mm) thick and transfer to a parchment lined baking sheet by carefully wrapping the dough around the rolling pin.

7. Brush the dough with the egg white mixed briefly with a tablespoon of water and sprinkle with seeds and salt of your choice.
8. Cut the dough with a pizza wheel and bake for 25-30 minutes until browned. Crackers that are not crispy once cooled may be returned to the oven.
9. Store in an airtight container and eat within two weeks

Seedy Crisps (Roll with pasta rollers or by hand):
Servings: Varies depending on thickness; approximately 50 crackersIngredients
1 cup (240 ml) (140 gm/5 oz) whole wheat four1 cup (240 ml) 140 gm/5 oz) all-purpose (plain) flour
1/3 cup (80 ml) (50 gm) (1¾ oz)poppy seeds
1/3 cup (80 ml) (40 gm) (1¼ oz) sesame seeds
1½ teaspoons (7½ ml) (9 gm) table salt
1½ teaspoons (7½ ml) (8 gm) baking powder
3 tablespoons (45 ml) olive oil
¾ cup plus 1 tablespoon (195 ml) (6½ fl oz) water

Directions
1. Mix the flours, seeds, salt and baking powder in a large bowl.2. Add the oil and stir until combined.
3. Add the water until the dough comes together.
4. Kneed the dough 5 or 6 times and allow to rest, covered, on the counter for 15 minutes. You can also chill the dough at this point and come back later.

5. Preheat the oven to hot 450°F/230°C/gas mark 8.
6. Working with a quarter of the dough at a time, either use a rolling pin to reach a desired thickness (thick or thin) or roll out in your pasta rollers. If you use pasta rollers, ensure the dough is well-floured so as not to stick.

7. Place strips of dough on a sheet pan lined with parchment.

8. If the crackers are thick, bake for 7minutes, flip them over and bake for 7 minutes more. Then cut or break into crackers shapes while still warm. Return to the oven for a further 5 minutes until crispy.
9. If not crispy enough when cooled, crackers can be returned to the oven.
10. Store in an airtight container and eat within 2 weeks

Pepper Jack and Oregano Crackers (Roll with pasta rollers or by hand):
Servings: Approximately 80 crackersIngredients
1⅔ cups (400 ml) (235 gm) (8¼ oz) all-purpose (plain) flour2¼ cups (540 ml) (225 gm/8 oz) grated pepper jack cheese, firmly packed
2 teaspoons (10 ml) (1 gm) dried oregano
½ teaspoon (2½ ml) (3 gm) salt
½ teaspoon (2½ ml) (½ gm) black pepper
½ cup (120 ml) (4 fl oz) vegetable oil
½ cup (120 ml) (4 fl oz) water
Spice topping
¼ teaspoon (1¼ ml) (1/8 gm) cayenne1 teaspoon (5 ml) (3 gm) kosher salt
1 teaspoon (5 ml) (5 gm) sugar

Directions:
1. Combine the spice topping and set aside.2. Grate the cheese and put in the bowl of a food processor with flour, oregano, salt and pepper and pulse to combine. This can also be done by hand.

3. Add the oil and pulse until the consistency of wet sand is reached.

4. Add enough water for the dough to come together.

5. Form the dough into two disks, wrap with cling film and refrigerate for several hours or overnight.
6. Heat the oven to moderate 325°F/160°C/gas mark 3.
7. Working with a quarter of the dough at a time, either use a rolling pin or roll out in your pasta rollers to 1/8 of an inch (3 mm) thick. If you use pasta rollers, ensure the dough is well floured so as not to stick.
8. Cut the strips into cracker shapes or cut out using a cookie cutter.

9. Transfer to a parchment lined cookies sheet and sprinkle with the spice mixture.
10. Bake for 20-25 minutes until medium golden brown.
11. Store in an airtight container and eat within three days

Cheddar, Rosemary and Walnut Icebox Crackers (form into a log and slice):
Servings: Approximately 48 crackersIngredients
½ cup (120 ml) (1 stick) (115 gm/4 oz) butter, well softened2¼ cups (540 ml) (225 gm/8 oz) grated aged cheddar cheese (the better the cheese, the better the cracker), firmly packed
1 cup plus 3 tablespoons (285 ml) (190 gm/6oz) all-purpose (plain) flour
1 teaspoon (5 ml) (6 gm) salt
1/2 cup (120 ml) (60 gm/2 oz) finely chopped walnuts
1 tablespoon (15 ml) (1¾ gm) finely chopped rosemary

Directions:
1. Combine butter, rosemary and cheese in a stand mixer and beat well (can also be done by hand)
2. Add the flour, salt and nuts and stir to combine
3. Form the dough into two tight logs and wrap with cling film

4. Chill for at least an hour and up to several days. The log can be frozen at this point for several months.
5. Heat the oven to moderate 325°F/160°C/gas mark 3.
6. Slice a log into 5mm (1/5 inch) coins and place on a parchment lined baking sheet

7. Bake about 10 minutes until golden brown
8. Store in an airtight container and eat within three days
9. Try this recipe with different cheeses, nuts (or no nuts), and spices. Get creative!

Storage & Freezing Instructions/Tips:
Storage and freezing outlined in each recipe. Generally I find that crackers with less fat and cheese last for weeks in an airtight container and richer crackers only a few days. Dough can be made days ahead, stored in the fridge and baked when needed. The icebox cracker dough can be frozen for several months before thawed, sliced and baked.Additional Information:
Here is a link to gluten free crackers, which I found successful: http://www.nourishingmeals.com/2010/01/gluten-free-quinoa-seed-crackers-...Disclaimer:
The Daring Kitchen and its members in no way suggest we are medical professionals and therefore are NOT responsible for any error in reporting of “alternate baking/cooking”. If you have issues with digesting gluten, then it is YOUR responsibility to research the ingredient before using it. If you have allergies, it is YOUR responsibility to make sure any ingredient in a recipe will not adversely affect you. If you are lactose intolerant, it is YOUR responsibility to make sure any ingredient in a recipe will not adversely affect you. If you are vegetarian or vegan, it is YOUR responsibility to make sure any ingredient in a recipe will not adversely affect you. The responsibility is YOURS regardless of what health issue you’re dealing with. Please consult your physician with any questions before using an ingredient you are not familiar with. Thank you!
..................................................................................
.......................................
Daring Bakers April 2012: Armenian Nutmeg Cake and Nazook
Hi! My name is Jason, and I blog at DailyCandor.com. I’ve been participating in the Daring Bakers’ challenge since January of 2011, and have enjoyed each and every challenge. I am by no means a whiz in the kitchen, but I love baking and cooking, so every month I find myself learning something new and mastering a new skill and/or recipe. I am thrilled to be hosting this month!
As a child of immigrants to the US, I was raised eating things that look and sound alien to most Americans (dining on ghormeh sabzi for Thanksgiving, munching on choreg during the holidays, etc.). A half-Croat myself, I was pleased as punch when Jenni at the Gingered Whisk challenged us to make povitica (what my mom calls orahnjača) this past October, since I remember eating this annually growing up, though never baking it myself.
For my hosting challenge, I’m giving a nod to the other half of my heritage: Armenian. We’ll be trying two recipes: nazook (or nazouk, or nazuk) and nutmeg cake. I am far more familiar with the former, and mastering nazook will certainly garner looks of approval from little old Armenian ladies (although they might tell you how their version is different). Armenian nutmeg cake is a twist on traditional coffee cake, although it might bring a nice respite to bakers longing for a break from yeasted dough pastries. You can make either one, or both, if you’re up to the challenge!

Recipe Source: The nazook is my Aunt Aida’s recipe. I’ve tried a LOT of nazook, and have to say hers is the best I’ve tried. The Armenian nutmeg cake is adapted from a recipe for the same in The Commonsense Cookery Book, by the NSW Cookery Teachers’ Scholarship Fund.
Blog-checking lines: The Daring Bakers’ April 2012 challenge, hosted by Jason at Daily Candor, were two Armenian standards: nazook and nutmeg cake. Nazook is a layered yeasted dough pastry with a sweet filling, and nutmeg cake is a fragrant, nutty coffee-style cake.
Posting Date: April 27, 2012
Download printable file HERE
Note: I created videos to showcase the technique for each if you’re more of a visual learner: nazook (with my Aunt Aida showing you how it’s really done) and nutmeg cake (made by yours truly).
Mandatory Items: You must make either nazook or nutmeg cake. I tip my hat off to those who take on both.
Variations allowed: Filling variations abound for nazook, so you can fill them with what you like. The traditional vanilla-scented filling is the most common, but you can also add about ½ cup of ground walnuts, almonds, pecans, or even mahleb (if you can find it; it’s a powder made from the pits of dark cherries, and has a cherry/almond aroma). My aunt insists just about anything sweet…except chocolate…will work, but if you want to deviate even further, be my guest (go ahead and try chocolate, if you like; I won’t tell my aunt!)
Nutmeg cake, despite its moniker, can be made with cinnamon or cardamom instead, and can also use different nuts on the top (or none at all). Like with nazook, there are substantial possibilities to change the spice & nut choices on top of the basic cake recipe.
Preparation time: Nazook: Dough and filling preparation: 30 minutes. Dough chilling: 3-5 hours (or longer). Pastry prep: 30 minutes. Baking: 30 minutes.
Armenian Nutmeg Cake: Preparation: 30 minutes (20 minutes if using food processor). Baking: 30-40 minutes.
Equipment required:
Nazook:
- 1 large bowl
- 1 medium bowl
- 2 cookie sheets (if doing full recipe; 1 if doing half)
- pastry brush
- rolling pin, or empty win bottle
- crinkle cutter, or a sharp knife
- measuring spoons/cups
- 1 large bowl
- 1 large cup
- measuring spoons/cups
- springform pan (9”/23cm)
- standing mixer with whisk and paddle attachments (optional)
- food processor (optional)
Nazook
Yields 40 piecesVideo instructions by my aunt Aida
Ingredients
Pastry dough
- 3 cups (720 ml) (420 gm/15 oz) all-purpose (plain) flour, sifted
- 2½ teaspoons (12½ ml) (7 gm) (¼ oz) (1 packet) active dry yeast
- 1 cup (240 ml) (225 gm/8 oz) sour cream
- 1 cup (2 sticks) (240 ml) (225 gm/8 oz) softened butter (room temperature)
- 1 1/2 cups (360 ml) (210 gm) (7½ oz) all-purpose (plain) flour, sifted
- 1 1/2 cups (360 ml) (340 gm/12 oz) sugar
- 3/4 cup (1½ sticks) (180 ml) (170 gm/6 oz) softened butter (room temperature)
- 2 teaspoons (10 ml) vanilla extract
- 1-2 egg yolks (for the wash; alternatively, some yogurt, egg whites, or a whole egg)
Make the Pastry Dough
1. Place the sifted flour into a large bowl.
2. Add the dry yeast, and mix it in.
3. Add the sour cream, and the softened butter.
4. Use your hands, or a standing mixer with a paddle attachment, to work it into a dough.
5. If using a standing mixer, switch to a dough hook. If making manually, continue to knead for about 10 minutes, or until the dough no longer sticks to the bowl or your hands. If it remains very sticky, add some flour, a little at a time.
6. Cover the dough and refrigerate for 3-5 hours, or overnight if you like.
Make the filling
7. Mix the flour, sugar, and the softened butter in a medium bowl.
8. Add the vanilla extract.
9. Mix the filling until it looks like clumpy, damp sand. It should not take long. Set aside.
Make the nazook
10. Preheat the oven to moderate 350°F/175°C/gas mark 4.
11. Cut the refrigerated dough into quarters.
12. Form one of the quarters into a ball. Dust your working surface with a little flour.
13. Roll out the dough into a large rectangle or oval. The dough should be thin, but not
transparent.

14. Spread 1/4 of the filling mixture across the rolled-out dough in an even layer. Try to spread the filling as close as possible to the edges on the short sides, but keep some of pastry dough uncovered (1 inch/2.5 cm) along the long edges.
15. From one of the long sides, start slowly rolling the dough across. Be careful to make sure the filling stays evenly distributed. Roll all the way across until you have a long, thin loaf.

16. Pat down the loaf with your palm and fingers so that it flattens out a bit (just a bit).
17. Apply your egg yolk wash with a pastry brush.

18. Use your crinkle cutter (or knife) to cut the loaf into 10 equally-sized pieces. Put onto an ungreased cookie sheet.

19. Place in a preheated moderate oven for about 30 minutes, until the tops are a rich, golden brown.
20. Allow to cool and enjoy!
Armenian Nutmeg Cake
Makes one 9”/23cm cake which yields 12 servingsVideo Instructions by me
Ingredients
- 1 cup (240 ml) milk (I use whole, but nonfat or lowfat should be fine; non-dairy might work just fine, as well)
- 1 teaspoon (5 ml) (5 gm) baking soda
- 2 cups (480 ml) (280 gm/10 oz) all-purpose (plain) flour (I suspect pastry flour or another low-gluten flour might even work better to achieve a light, fluffy crumb)
- 2 teaspoons (10 ml) (10 gm) (⅓ oz) baking powder (I used single-acting, because it's aluminum-free, and it turned out fantastic)
- 2 cups (480 ml) (400 gm/14 oz) brown sugar, firmly packed
- 3/4 cup (1½ sticks) (180 ml) (170 gm/6 oz) butter, preferably unsalted, cubed
- 1/2 cup (120 ml) (55 gm/2 oz) walnut pieces, may need a little more
- 1 to 1-1/2 teaspoons (5 to 7 ½ ml) (5 to 8 gm) ground nutmeg (try to grate it fresh yourself; the aroma is enchanting)
- 1 egg
Directions - the Traditional Way (The Fast, Easy Way further down)
1. Preheat your oven to moderate 350°F/175°C/gas mark 4.
2. Mix the baking soda (not baking powder; that's for the next step) into the milk. Set it aside.
3. Sift together the flour and the baking powder into a large bowl. One sift is fine
4. Add the brown sugar. Go ahead and mix the flour and brown sugar together. Or not.
5. Toss in the cubed butter.

6. Mash the butter with a fork into the dry ingredients (you can also use your fingers if you want). You'll want to achieve a more-or-less uniform, tan-colored crumbly mixture.

7. Take HALF of this resulting crumbly mixture into your springform (9”/23cm) pan. Press a crust out of it using your fingers and knuckles. It will be easy.

8. Crack an egg into a mixer or bowl.
9. Toss the nutmeg in with the egg.
10. Start mixing slowly with a whisk attachment and then increase to medium speed, or mix with a hand whisk if you're doing it manually. Once it's mixed well and frothy (about 1 minute using a standing mixer, or about 2-3 minutes of vigorous beating with a whisk), pour in the milk and baking soda mixture. Continue to mix until uniform.
11. Pour in the rest of the crumbly mixture. Mix that well, with either a paddle attachment, or a spatula. Or continue to use the whisk; it won't make much of a difference, since the resulting batter is very liquidy.

12. Pour the batter over the base in the springform pan.

13. Gently sprinkle the walnut pieces over the batter.

14. Bake in a preheated moderate oven for about 30-40 minutes. You'll know it's done when the top is a golden brown, and an inserted toothpick comes out clean.
15. Allow to cool in the pan, and then release. Enjoy!

An Even Easier Way...if you have a Food Processor
1. Preheat your oven to moderate 350°F/175°C/gas mark 4 .
2. Mix the baking soda (not baking powder) into the milk. Set aside.
3. Put the flour, baking powder, and the brown sugar into your food processor. Pulse until uniformly mixed.
4. Toss in the cubed butter. Pulse until uniformly mixed into tan-colored crumbs.
5. Pour HALF of the crumbs into your springform (9”/23cm) pan. Press out a crust using your fingers and knuckles.
6. Crack the egg into the food processor with the rest of the crumbs still in it.
7. Grate 1 to 1-1/2 teaspoon of nutmeg. Toss that into the food processor, too. Pulse until well-incorporated.
8. Pour in the milk and baking soda mixture. Continue to mix until a slightly lumpy tan batter is formed.
9. Pour the batter over the crust in the springform pan.
10. Gently sprinkle the walnut pieces over the batter.
11. Bake in a preheated moderate oven for 30-40 minutes. It's ready when the top is golden brown, and when it passes the toothpick test (comes out clean).
12. Cool the cake in the pan, and then dig in. Yum yum!
Freezing/Storage Instructions/Tips: Nazook will keep in an airtight container at room temperature for a couple of weeks, and the Armenian nutmeg cake will keep (covered) at room temperature for 2-3 days. Both taste even better still warm from the oven.
Allow to cool completely before attempting to freeze. Nazook will freeze best if put in a freezer bag with all the air squeezed out. Armenian Nutmeg Cake will also freeze fairly well if completely sealed. Both can be frozen for up to 3 months.
Additional Information:
Both recipes might be able to be adapted to be gluten-free and/or vegan, although I have not tried myself. Gluten-free flour, coconut oil (instead of butter), pureed silken tofu (instead of sour cream), and nut milk (instead of egg yolk) might be useful starting points.
Disclaimer:
The Daring Kitchen and its members in no way suggest we are medical professionals and therefore are NOT responsible for any error in reporting of “alternate baking/cooking”. If you have issues with digesting gluten, then it is YOUR responsibility to research the ingredient before using it. If you have allergies, it is YOUR responsibility to make sure any ingredient in a recipe will not adversely affect you. If you are lactose intolerant, it is YOUR responsibility to make sure any ingredient in a recipe will not adversely affect you. If you are vegetarian or vegan, it is YOUR responsibility to make sure any ingredient in a recipe will not adversely affect you. The responsibility is YOURS regardless of what health issue you’re dealing with. Please consult your physician with any questions before using an ingredient you are not familiar with. Thank you!
.........................................
Daring Bakers March 2012: Dutch Crunch Bread
First, let us introduce ourselves. We are Sara and Erica from Baking JDs. During our first year of law school, we discovered Daring Bakers and decided that monthly baking was just the thing to get us to take a break from our studies and do something that we both already loved. Since we graduated in May 2010, we’ve continued the tradition. As busy attorneys, it hasn’t gotten any easier to find the time, but it’s always worth it.
Both of us live in San Francisco, which is home to all kinds of culinary traditions. Of course, sourdough bread is one of the first things that springs to people’s minds. For our challenge, however, we’ve decided to make Dutch Crunch bread. Sara grew up in the Bay Area, but was dismayed when she moved away for college that Dutch Crunch bread is not usually available outside of Northern California. For many folks from the Bay Area, a sandwich just isn’t complete without Dutch Crunch bread.
Technically, Dutch Crunch doesn’t refer to the type of bread, but rather the topping that is spread over the bread before baking. In Dutch it’s called Tijgerbrood or “tiger bread” after the tiger-like shell on the bread when it comes out of the oven. The final product has a delightful sweet crunch to it that makes it perfect for a sandwich roll. It’s a common option at sandwich shops all over the Bay Area and is often one of the first breads to run out.
Learn more about the history of Dutch Crunch bread, particularly in the Bay Area, here, here, and here.
Therefore, the heart of this challenge is the topping. While we’ve provided a few bread recipes that worked great for us, it is up to you what rolls or loaves you want to turn into Dutch Crunch, which should leave room for vegan and gluten-free options. We’d recommend a nice, soft sandwich-appropriate roll with not too much crust, so the topping can really stand out. Once you have your final loaves, you’re required to use your bread to construct a sandwich of your choice!

Recipe Source: The recipe for the Dutch Crunch topping came from Rose Levy Beranbaum’s The Bread Bible. The recipes for the breads we’ve suggested came from The Bread Bible and an adaptation of a recipe found on bakingbites.com (http://bakingbites.com/2006/09/cooking-school-dutch-crunch-bread/).
Blog-checking lines: Sara and Erica of Baking JDs were our March 2012 Daring Baker hostesses! Sara & Erica challenged us to make Dutch Crunch bread, a delicious sandwich bread with a unique, crunchy topping. Sara and Erica also challenged us to create a one of a kind sandwich with our bread!
Posting Date: March 27, 2012
Download printable file HERE
A Note about Rice Flour: While rice flour is easy to find in San Francisco, we weren’t sure of its availability around the world. If it’s not in your local grocery store, we suggest checking in a specialty shop (somewhere that would sell gluten-free foods) or online (e.g., amazon.com). Be sure not to buy the sweet or glutinous variety, though we’ve found that either white or brown rice flour works just fine.If you are unable to find it, or if you’re just curious about how to make it yourself, it’s not very hard to do at all. There are a number of tutorials online, but the basic idea is to put rice in a spice grinder or something else that can break grains, and grind it until it is a fine flour-like powder. You will likely need to sift the final product through a sieve.

Here are some helpful links, but we encourage you to rely on whatever method you find easiest for making rice flour, if you decide to make it yourself.
Mandatory Items: You must make the Dutch Crunch topping and use it on your choice of bread or roll. You must use your finished bread to construct a sandwich of your choice – the more creative the better!
Variations allowed: You may use any bread or roll recipe. We have provided suggestions but if you use your own recipe we recommend opting for a soft roll or bread. You may buy rice flour or make your own. While you must make a sandwich, the variety is up to you!
Preparation time: Dutch Crunch Topping: 15 minutes active time, 15 minutes passive time; Soft White Roll: 20 minutes active time, 2 hours passive time; Brown Rice Bread: less than 1 hour active time; 2-3 hours passive time.
Equipment required:
Small bowl
2 large bowls, or a large bowl and a stand-mixer bowl
Stand mixer with paddle (or whisk) and dough-hook attachments (optional)
Wooden and regular spoon(s)
Whisk
Knife or dough cutter/scraper (optional, depending on your recipe)
Bread pan(s) or baking tray(s)
Plastic wrap or something else to cover the dough while it rises
Dutch Crunch Topping
Servings: This recipe should make sufficient topping for two 9x5 loaves (23cmx13cm) or 12 rolls. If you make only 6 rolls in the first soft white roll recipe, you can cut the topping recipe in half.We’ve provided this recipe first because it is the mandatory aspect of the challenge. Note, however, that you should not prepare the topping until the bread you’ve selected to bake is almost finished rising (~15 minutes from baking).
Ingredients
2 tablespoons (2 packets) (30 ml) (15 gm/½ oz) active dry yeast
1 cup (240 ml) warm water (105-115º F) (41-46°C)
2 tablespoons (30 ml) (30 gm/1 oz) sugar
2 tablespoons (30 ml) vegetable oil
½ teaspoon (2½ ml) (3 gm) salt
1½ cups (360 ml) (240 gm/8½ oz) rice flour (white or brown; NOT sweet or glutinous rice flour) (increase by 1 cup or more for home-made rice flour)
Directions:
1. Combine all ingredients in a large bowl and beat with a whisk; beat hard to combine. The consistency should be like stiff royal icing – spreadable, but not too runny. If you pull some up with your whisk, as shown below, it should drip off slowly. Add more water or rice flour as necessary. Let stand 15 minutes.

3. Let stand, uncovered, for any additional time your recipe recommends. With the Soft White Roll, you can place the rolls directly into the oven after applying the topping. With the Brown Rice Bread, the loaves should stand for 20 minutes with the topping before baking.
4. When baking, place pans on a rack in the center of the oven and bake your bread as you ordinarily would. The Dutch Cruch topping should crack and turn a nice golden-brown color.
Soft White Roll
Servings: Six sandwich rollsThis recipe approximates the quintessential white sandwich roll found throughout the Bay Area. The recipe is simple, quick, and addictive.
Ingredients
1 tablespoon (1 packet) (15 ml) (7 gm/ ¼ oz) active dry yeast
¼ cup (60 ml) warm water (105-110º F) (41-43°C) (No need to use a thermometer – it should feel between lukewarm and hot to the touch).
1 cup (240 ml) warm milk (105-110º F) (41-43°C) (We’ve tried both nonfat and 2%, with no noticeable difference)
1½ tablespoons (22½ ml) (20 gm/ ⅔ oz) sugar
2 tablespoons (30 ml) vegetable oil (plus additional olive or vegetable oil for greasing bowl during rising)
1½ teaspoons (7½ ml) (9 gm/⅓ oz) salt
Up to 4 cups (960 ml) (600 gm/21oz) all purpose flour
Directions:
1. In the bowl of an electric mixer or large mixing bowl, combine yeast, water, milk and sugar. Stir to dissolve and let sit for about 5 minutes (The mixture should start to bubble or foam a bit and smell yeasty).
2. Add in vegetable oil, salt and 2 cups of flour. Using the dough hook attachment or a wooden spoon, mix at medium speed until the dough comes together. (The photo to below is with the first 2 cups of flour added).


5. Place in a lightly greased bowl and cover with plastic wrap. Let rise for 1 hour, or until doubled (or more) in size (see photo comparison).


7. Cover with plastic wrap and let rise for 15 minutes while you prepare the topping.
8. Coat the top of each roll or loaf with the topping as described above. While the original recipe recommends letting them stand for 20 minutes after applying the topping, I got better results by putting them directly into the oven.
9. Once you’ve applied the topping, bake in a preheated moderately hot 380ºF/190°C/gas mark 5 for 25-30 minutes, until well browned. Let cool completely on a wire rack before eating.
Our finished products: Note the roll in the foreground on the left. This is what happens if you don’t put enough topping on the bread – no cracking! So be sure to load on the topping.

Brown Rice Bread
Servings: Two 9x5 inch (23cmx13cm) loavesIf you’re up for more of a challenge, this recipe creates an interesting bread that incorporates cooked brown rice—something that was new to us. The resulting loaf has, as Hensperger describes, a “nubbly” texture and a very light almost-sweetness to it. Great for toasting.
Ingredients
1 cup (240 ml) warm water (105-115ºF) (41-46°C)
2 tablespoons (2 packets) (30 ml) (15 gm/½ oz) active dry yeast
1 teaspoon (5 ml) (5 gm) sugar or honey (we used sugar, which worked great)
1 cup (240 ml) warm buttermilk (105-115 ºF) (41-46°C)
½ cup (120 ml) honey
¼ cup (60 ml) vegetable oil (plus additional olive or vegetable oil for greasing bowl during rising)
1 tablespoon (15 ml) (20 gm/⅔ oz) salt
2 cups (480 ml) (200 gm/7 oz) cooked and cooled short-grain brown rice
5½ -6 cups (1440 ml) (840 gm/30 oz) unbleached all-purpose flour or bread flour
Directions:
1. Pour the warm water in a small bowl. Sprinkle yeast and sugar over surface. Stir to dissolve and let stand at room temperature until foamy, about 10 minutes.
2. In a large bowl using a whisk or in the work bowl of a heavy-duty mixer fitted with the paddle attachment, combine the buttermilk, honey, oil, and salt. Add the rice and beat until smooth.

4. Add the flour, ½ cup at a time, until a soft, bulky dough that just clears the side of the bowl is formed.
5. Turn the dough out onto a lightly floured work surface and knead until smooth and springy, about 5 minutes, dusting with flour 1 Tbsp. at a time as needed to prevent sticking. This dough will be slightly sticky. (If kneading by machine, switch from the paddle to the dough hook and knead for 4 to 5 minutes, or until the dough is smooth and springy and springs back when pressed. If desired, transfer the dough to a floured surface and knead briefly by hand).
6. Place the dough in a greased deep bowl. Turn the dough once to coat the top and cover with plastic wrap. Let rise at room temperature until doubled in bulk, 1½ to 2 hours.

8. Coat the top of each loaf with the topping as described above, including letting them stand, uncovered, 20 minutes, until dough rises level with the tops of the pans.


Storage & Freezing Instructions/Tips:
Store as you would any bread – in a bread box, a paper bag, or loose plastic wrap. Both varieties suggested are best in the first couple of days. The loaves or rolls can also be frozen in plastic – simply toast to reheat.
Disclaimer: The Daring Kitchen and its members in no way suggest we are medical professionals and therefore are NOT responsible for any error in reporting of “alternate baking/cooking”. If you have issues with digesting gluten, then it is YOUR responsibility to research the ingredient before using it. If you have allergies, it is YOUR responsibility to make sure any ingredient in a recipe will not adversely affect you. If you are lactose intolerant, it is YOUR responsibility to make sure any ingredient in a recipe will not adversely affect you. If you are vegetarian or vegan, it is YOUR responsibility to make sure any ingredient in a recipe will not adversely affect you. The responsibility is YOURS regardless of what health issue you’re dealing with. Please consult your physician with any questions before using an ingredient you are not familiar with. Thank you!
.......................................................................
Daring Bakers February 2012: Quick Breads
Not many of you would know, but it’s been a rough few months for me. My mom has been ill and it’s been a long road to recovery. I’ve let the website slack off to concentrate on her recovery. But I can’t stand it! It looks so forlorn! So I’m begging! If anyone would like to volunteer to write FoodTalk articles, please send me an email at lamiacucina@adelphia.net and I’ll get you on the roster tout de suite!
I’ve also got a couple friends helping me out with the spotlight area so all of those spotlights you lovely people have sent in will be highlighted on the front page very soon! I’m looking forward to sharing with the public what an amazing group of people we’re baking with! 
****DANA MCFARLANE & MARCELLINA - I've been trying to get in contact through emails but they keep getting sent back to me. Would you lovely ladies mind emailing me as soon as you can? Many thanks! xoxoxo ****
xoxoxo ****And now to introduce you to this month’s host…
________________________________________
Hi! It’s me! *grin* Yes, I’m your host this month! Our scheduled host couldn’t be here, so I decided that it was high time I hosted a challenge myself. (Okay not really, I have no business hosting, but there wasn’t enough time to ask someone else! Shhhhh..)
Now keep in mind, I am NOT a baker.. cooking is my bag. I love to play around with baking, but give me some beef to braise, some veggies to roast or some fish to filet and I am in heaven. So your challenge this month is going to rely on your creative skills and not my mad baking skillz. hee! I’ve chosen to go with quick breads! Epicurious’ definition is as follows:
Quick Bread
Bread that is quick to make because it doesn't require kneading or rising time. That's because the leavener in such a bread is usually baking powder or baking soda, which, when combined with moisture, starts the rising process immediately. In the case of double-acting baking powder, oven heat causes a second burst of rising power. Eggs can also be used to leaven quick breads. This genre includes most biscuits, muffins, popovers and a wide variety of sweet and savory loaf breads.
I’d like ya’ll to concentrate on loaves or muffins. I’m going to supply you with a base recipe and a few other recipes that I’ve made over the past few weeks and you can use any of them as written or as a foundation to build upon a new flavor – OR – you can use any quick bread recipe you like.. all I’m asking is that you stick to the same principles that I did:
- No yeast
- Can’t take more than 1.5 hours to prepare and bake through.
- Only loaves or muffins/popovers
Blog-checking lines: The Daring Bakers’ February 2012 host was – Lis! Lisa stepped in last minute and challenged us to create a quick bread we could call our own. She supplied us with a base recipe and shared some recipes she loves from various websites and encouraged us to build upon them and create new flavor profiles.
Posting Date: February 27, 2012
Download printable file HERE
Note: Kids.. I don’t have any specific notes, I’m not kidding when I say I’m not a baker. I don’t have the patience or the skills. My palms sweat when I have to bake. This is why I live vicariously through all of you extremely talented folks. This is why I beg many of you to send me baked goods through the mail. Hee! I’m taking over this month because I had to (and I won’t lie, it sounded fun after I went to my BFFs and told them my predicament & then got all excited while we were talking about it) not because I thought I could share with you any wise baking advice. *grin*So all I can say is, learn from my mistakes:
- Read a recipe twice before even gathering your ingredients.
- Most of the recipes say to check with a toothpick.. When making loaves, I’d use a wooden skewer or a long cake tester if you can get your hands on them.
- Always start checking for doneness a good 5 to 7 minutes before the allotted time the recipe calls for.
- Don’t allow the dogs (especially the wee lil ankle biters) to join you in your baking adventures.. they are very trip-overable.
- Also, pre-heat the oven and grease up your pans before you start getting your hands dirty. My husband yells when I get batter all over the stove, so this will help prevent your spouses from yelling at you.
- Mise en place (having everything ready to cook) is also highly recommended although I can never remember to do it.. therefore I usually have a good 2 inches of flour and butter and other assorted ingredients caked on my counters because I’m fumbling over bags, bottles and cartons to get to what I need.
- And finally, the most important tip/note I can pass along to you is.. DO NOT start cursing the Baking Gods for any mistakes or bad outcomes you may have. They don’t like it.. they don’t stand for it.. and they will cause big, billowy, black smoke clouds to waft through your oven’s door and vents. Then they laugh at you. And point accusingly. It’s embarrassing. So when you get mad (not that anyone will get upset over this challenge.. it’s easy peasy!) leave the room so they can’t hear you and rip them a new one out of earshot. Trust me on this.
- This isn’t a tip but I’m just forewarning you.. I’m as much of a photographer as I am a baker.. so don’t be scrolling below in hopes of finding jaw dropping (in the good way) photos.

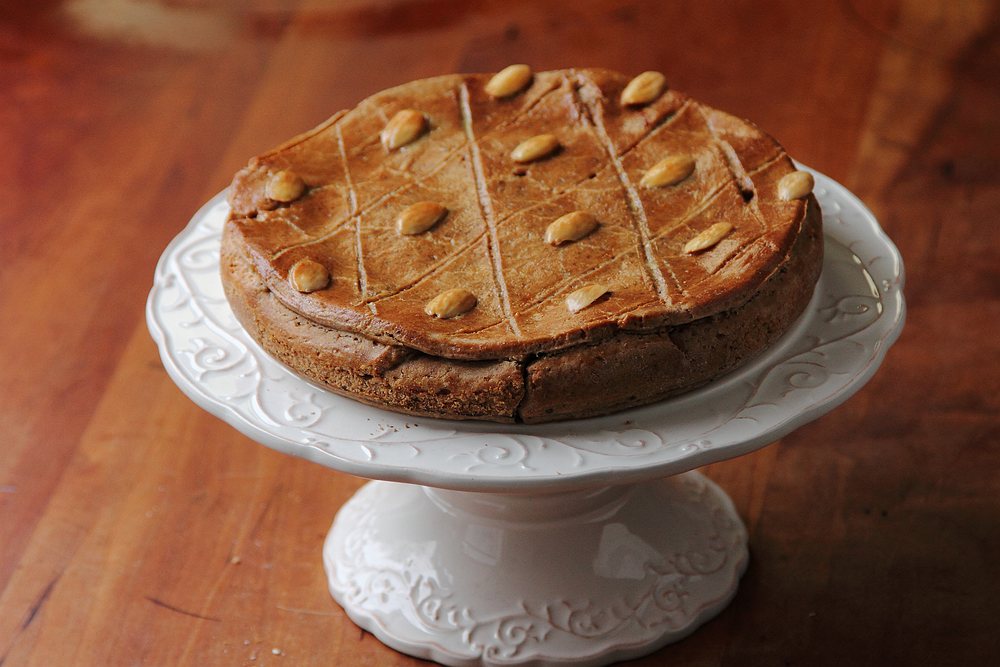
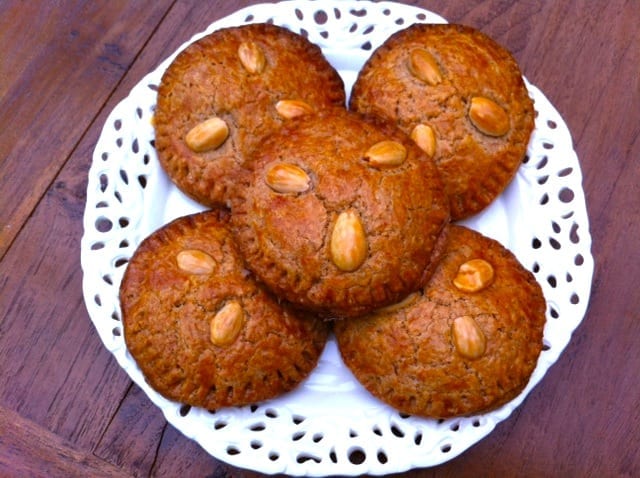
THIS CHALLENGE IS MEANT TO BE FUN – DON’T TAKE ANYTHING TOO SERIOUSLY.. RELAX IN THE KITCHEN.. DON’T START ANY FIRES AND BY ALL MEANS IF YOUR QUICK BREADS TURN OUT BEAUTIFULLY, MAIL ME A LOAF!!!!  xoxoxo
I was feeling that although I firmly believe this challenge should be about fun and creativity (I mean it IS quick bread after all), that it really wasn’t very informative.. and voiced my concern to Aud, who came up with what follows (bless your cotton socks, Aud! xoxo): xoxoxoQuick bread primer
- Quick breads can be sweet or savory, they are a modern innovation they became common after the introduction of baking powder and baking soda.
- Baking powder is a combination of acid and alkaline that reacts together when moistened to form gases that raises the baked quick bread. Usage 1 to 2 teaspoons per cup of flour.
- Baking soda (an alkaline salt, sodium bicarbonate) is used when the liquid is acidic, such as buttermilk, honey, molasses, tomato sauce etc. Usage ½ to 1 teaspoon per cup of acidic liquid.
- Be sure your baking powder and baking soda are fresh.
- Measure ingredients accurately, using the measuring tools and techniques suggested.
- Preheat the oven to the correct baking temperature. Arrange racks so that the bread will bake in the center of the oven which has the best heat distribution in the oven.
- To allow for good air circulation while baking, leave at least 1 inch of space between pans and between pans and sides of oven. Switch pan positions and rotate pans halfway through baking.
- The two top secrets to moist, tender quick bread is 1)in the mixing always use a quick light technique so you don't over-mix the batter 2) don't over-bake since this cause dryness in the final baked product. .
- Quick breads can be created by the following methods:
Creaming method – The butter and sugar are beaten and creamed together until smooth and fluffy. Next, the egg and liquid flavoring are added to the butter and sugar mixture. The dry ingredients and other liquids are folded in last. This method is best when baking cakes since a lot of air pockets are added into the mixture. Folding in the ingredients creates even more air pockets to keep the cakes light and fluffy.
Cutting in method – The chilled fat is cut into the flour. The fat results in a flaky texture since the fat melts while in the oven. This method is best used when baking biscuits, scones or pie crusts.
- Depending on the recipe and the type of quick bread, there are also three different types of batter:
Drop Batter: This batter has a dry:liquid ratio of 3:1. This batter will result in a moist but fluffy baked good.
Stiff Dough: This batter has a dry:liquid ratio of 7:1 This batter will result in a very light and fluffy baked good.
- Lower gluten flours are best to make quick breads you can replace 4 tablespoons in each cup of all-purpose flour with cake flour in most recipes or replace 2 tablespoons in each cup of all-purpose flour with corn flour (cornstarch) if you wish to lower the gluten levels of your flour.
- Flour should be sifted to aerate it which gives more rise therefore a lighter crumb to the final baked goods.
- Add fruit, nuts, etc. after lightly combining the wet and dry ingredients. Then give the batter one more light-handed stir and you're done. Is the batter still thick and lumpy? That's exactly what you want
- If you're adding dried fruit, try soaking it first. This will moisten the fruit, make it tender and juicy, and also preserve the bread's moisture. Don't sprinkle dried fruit on top of quick bread before baking, as it will burn before the loaf is done.
- To lower the fat, for example, you can substitute some (or all) of the oil with an equal amount of almost any fruit puree (apple sauce, plum baby food, pumpkin puree, mashed bananas).
- Glaze your baked quick breads for a nice finishing touch and burst of flavor. Make a simple mixture of confectioners' (icing) sugar and a little milk or fruit juice. Try orange and lemon juices, for their fragrant, tart zing; add curls of zest for extra color and flavor.
- For most quick mix recipes as a general rule – less butter and sugar in a recipe makes it more bread-like, while more butter and sugar produces something closer to cake.
- To prevent moist quick breads from spoiling, let them cool completely after baking. Then wrap them tightly in foil or plastic wrap and store at room temperature for up to 3 days. If your bread is made with cheese, cream cheese or other perishable foods, it should be refrigerated.
- Quick breads such as banana, zucchini and cranberry slice and taste best when served a day after baking. Wrap the cooled bread in foil or plastic wrap; leave at room temperature overnight. Others like cornbread and coffee cakes are best served warm.
- The quick bread is done if a toothpick inserted near the center comes out clean. If it is not done, test again in a few more minutes.
- Cool in the pan for 10 minutes, unless recipe directs otherwise. Turn loaves out onto a wire rack to cool. Most quick bread should be cooled completely before slicing to prevent crumbling.
- Using a sawing motion, cut loaves with a thin sharp knife. Use a serrated knife for quick breads that have fruits and/or nuts.
Bread sticks to pan. Unless you're using high-quality non-stick metal or silicone baking pans, you should always grease the pans before you pour in the batter. The best thing to use for greasing the pan is shortening, because its melting point is higher than any other kind of fat, which helps maintain a "shield" between pan and batter while the bread is baking. A high-quality cooking spray--one that won't bake on to your pans and discolour them--is also a fast, easy fix. You can also prevent sticking by removing the bread from the pan sooner: let the bread cool for at least twenty minutes in order to set (Bundt loaves should cool twice as long) before inverting the pan.
There are big holes and "tunnels" in the bread, and/or the bread is tough. These problems are usually caused by over-mixing.
There's a big crack down the middle of the quick bread loaf. Don't worry--it's normal for quick breads. The crack on top happens when top of the loaf "sets" in the heat of the oven before the bread is finished rising. Drizzle the loaf with icing or dust with confectioners' (icing) sugar.
My blueberry muffins look green! By reacting with the alkaline baking soda, the blueberries' pigments can turn green. Toss the berries with the flour mixture before combining the ingredients; the coating should help. If you're using frozen berries, don't thaw them before using them.
The bread looks done on the outside but it's still raw in the middle. This is one of the most common quick bread problems, and it can be caused by a few different factors. The oven temperature could be too high. (Use an oven thermometer to check: they're cheap and available at most supermarkets.)
Try lowering the oven temperature and/or putting a loose tent of foil over the top of the bread so it won't burn before the middle has time to catch up.
Another cause of "raw center" syndrome could be using a different pan than the recipe calls for. One of the nice things about quick breads is that you can use the same batter to make muffins, mini loaves, jumbo loaves, or rounds. But each size requires different baking times--and some require different baking temperatures. The larger and thicker the loaf, the longer it's going to take to bake. If you're using a different size pan than your recipe calls for, adjust the baking time accordingly and check the bread often.
Mandatory Items: You must make a quick bread in either a loaf shape or muffin/popover shape. You must share your recipe so we can all recreate it after we’re done drooling over it!
You cannot use yeast as leaven.Variations allowed: You can use the recipes I’ve included below or someone else’s or by all means, create your own! Go crazy with flavors, toppings, and fillings!
Preparation time: Each recipe varies, but you shouldn’t need more than 30 minutes in prep and 1 hour to bake (depending on size of loaf/muffin/popover pan).
Equipment required:
- An oven. Duh.
- Bowls
- Spatulas or Spoonulas (my tool of choice.. it’s a spoon! No, it’s a spatula! It’s both!)
- Whisk
- A mixer – stand alone or hand held OR mix all ingredients by hands like our ancestors did!)
- Loaf pans and/or muffin pans and/or popover pans
- Measuring spoons and cups
- Box grater or microplane grater
- Parchment paper
- Toothpicks, or wood skewers for cake testing.

Basic Quick Bread
Makes one 9” x 5” (23×13 cm) loafRecipe from Sara Schewe
2 cups (480 ml) (250 gm/9 oz) all-purpose (plain) flour
1 cup (240 ml) (225 gm/8 oz) granulated sugar
1 teaspoon (5 ml) (5 gm) baking soda
1/2 teaspoon (2½ ml) (3 gm) fine sea salt or table salt
1 cup (240 ml) buttermilk or soured milk*
1 large egg
1/4 cup (60 ml) mild- or non-flavored oil, like canola
1 teaspoon (5 ml) flavored extract, such as vanilla or almond
for the glaze
1/3 cup (80 ml) (35 gm/1-1/3 oz) confectioners’ (icing) sugar
1-2 teaspoons (5-10 ml) milk
Directions:
- Preheat oven to moderate 350ºF/180ºC/gas mark 4. Grease a 9×5 inch (23×13 centimeter) loaf pan with butter and line with parchment paper cut to fit the length and width of the pan, with enough overhang to allow easy removal after baking. Grease the top sheet of parchment.
- In large bowl, whisk flour, sugar, baking soda and salt to combine. Make a well in the center and set aside.
- Lightly whisk (butter)milk, egg, oil, and extract to combine. Pour into well and stir until just mixed into a batter. The batter will be lumpy and may still show a few streaks of flour.
- Pour batter into prepared pan. Bake for 40-50 minutes, or until a cake tester comes out clean. Cool in pan on wire rack for 10 minutes, then remove from pan and cool completely before slicing. Drizzle with glaze, if desired.
- For the glaze: Slowly whisk confectioners’ (icing) sugar and half of the milk, adding more milk as needed to thin the glaze to the desired consistency.
 Pictorial Guide to Making a Quick Bread:
(Photo courtesy of Mandy of What The Fruitcake?!)
1) Put dry ingredients in bowl
2) Mix with wet ingredients
3) Add additional flavorings (cheese, herbs, seeds etc.)
4) Mix to make a very sticky dough
5) Spread into a parchment lined bread tin
6) (Optional) Top with (seeds, herbs etc.)
7) (Optional) Top with (any other flavor used like grated cheese)
8) Baked!
Thank you WP2 *smooch*

Aunty Ann’s Prune Bread
Makes two 8” x 5” (20 x 13 cm) loavesNow I know what you’re thinking.. PRUNE bread? Ewwwwwwwwww. Seriously, it’s not a bad thing! Honestly, you can’t even really taste the prunes, they help with the moistness of the bread. What you get is a moist, sweet and slightly spicy bread that’s perfect plain or with a schmear of butter at breakfast or with afternoon/evening tea or coffee.
Ingredients
2 cups (480 ml) (450 gm/16 oz) granulated sugar
1 cup (240 ml) mild- or non-flavored oil, like canola
3 large eggs
2 small (70 gm/2½ oz) containers of strained prunes baby food – I use Gerber! (a little over ½ cup)
2½ cup (600 ml) (350 gm/12-1/3 oz) all-purpose (plain) flour
½ teaspoon (2½ ml)(1 gm) ground cinnamon (okay, use 1 teaspoon if you like a lil more spice.. My Aunty wouldn’t mind.
2 teaspoons (10 ml) (10 gm/1/3 oz) baking soda
1 teaspoon (5 ml) (6 gm) table salt
1 teaspoon (5 ml) vanilla extract
1 cup (240 ml) well-shaken buttermilk
Directions:
1. Preheat oven to moderate 325ºF/165°C/gas mark 3
2. Dump all ingredients in a bowl.
3. Start to mixin’! Once everything in incorporated stop mixin’!
4. Fill two greased 8” x 5” (20 x 13 cm) loaf pans about ¾ full.
5. Bake for 1 hour or until a toothpick inserted into middle of loaf comes out clean.

Green Onion, Cheddar & Asiago Beer Batter Bread
Makes one 9” x 5” (23 x 13 cm) loafAdapted from Recipe Girl’s Cheddar Chive Beer Batter Bread
Ingredients
1 tablespoon (15 ml) oil
1 cup (240 ml) (100 gm/3½ oz) sliced green (spring) onion
3 cups (720 ml) (420 gm/15 oz) all-purpose (plain) flour
3 tablespoons (45 ml) (45 gm/1½ oz) granulated sugar
2 teaspoons (10 ml) (10 gm) baking powder
1 teaspoon (5 ml) (6 gm) salt
1 cup (240 ml) (115 gm/4 oz) grated sharp cheddar cheese
½ cup (120 ml) (2 oz) grated Asiago cheese
One (12 fl oz/355 ml) (about 1½ cups) bottle beer (such as amber ale)
¼ cup (60 ml) (55 gm/2 oz) butter, melted and divided
Directions:
- Preheat oven to moderately hot 375°F/190°C/gas mark 5. Spray 9”×5″ (23 x 13 cm) loaf pan with cooking spray.
- Heat olive oil in a large nonstick skillet over medium heat. Add green onion and sauté 3-4 minutes or until tender. Cool to room temperature.
- Combine flour, sugar, baking powder and salt in a bowl; make a well in the center of the mixture. Add onion, cheeses, and beer. Stir just until moist.
- Spoon batter into prepared pan. Drizzle evenly with 2 tablespoons of butter. Bake for 35 minutes; brush with remaining 2 tablespoons butter. Bake an additional 23 minutes or until wooden pick inserted in the center comes out clean. Cool 5 minutes in pan on a wire rack; remove from pan. Cool completely on wire rack.

Pumpkin Bread with Maple Cream Cheese Filling
Makes three 8”x 4” (20 x 10 cm) loavesAdapted from Dana Ramsey’s recipe
Ingredients
FILLING
2 (225 gm/8 oz) packages cream cheese, softened
1/4 cup (60 ml) (55 gm/2 oz) white granulated sugar
1 large egg
1 tablespoon (15 ml) milk (can use whole, 1%, 2% or skim.. can even splurge and use cream!)
1 teaspoon (5 ml) maple extract* or 1 tablespoon (15 ml) maple syrup
BREAD
3 cups (720 ml) 675 gm/24 oz)white granulated sugar
1 3/4 cup (420 ml) (425 gm/15 oz) (pumpkin purée (or 1 can (15 oz) solid-packed pumpkin – NOT pumpkin pie filling)
1 cup (240 ml) light- or non-flavored oil, like canola
1 cup (240 ml) water
4 large eggs
4 cup (960 ml) (560 gm/19¾ oz) all-purpose, unbleached flour
2 teaspoons (10 ml) (10 gm/1/3 oz) baking soda
1 teaspoon (5 ml) (5 gm) baking powder
2 teaspoons (10 ml) (4 gm) ground cinnamon
1/2 teaspoon (2½ ml) (1 gm) ground nutmeg
1 teaspoon (5 ml) (6 gm) salt
1/4 teaspoon (1¼ ml) (½ gm) ground cloves (I omitted this)
1/2 cup (120 ml) (115 gm/4 oz) chopped pecans (Optional)
1/2 cup (120 ml) (115 gm/4 oz) chopped walnuts (Optional)
1 cup (240 ml) (100 gm/3½ oz) currants or raisins (Optional)
*Note: I would never ask anyone to buy an ingredient that isn’t 100% necessary for a recipe, but I HIGHLY RECOMMEND buying maple extract. You get a much better maple flavor than using maple syrup. But this bread would be delicious regardless of which maple option you used.. trust me.
Directions:
- Preheat oven to moderate 350°F/180°C/gas mark 4. Spray three 8”×4″ (20 x 10 cm) loaf pans with cooking spray.
- Beat the cream cheese, sugar, egg and milk in a small bowl until creamy, add your maple extract or syrup and blend. Set aside for now.
- In a large bowl, beat the sugar, pumpkin, oil, water and eggs. In another large bowl mix the flour, baking soda, baking powder, salt and spices.
- Now gradually add the dry ingredients to your wet. Stir in the nuts and/or dried fruit if using.
- Pour half of the batter into three flour-greased 8" x 4" (20 x 10 cm) loaf pans.
- Spoon the filling over the batter. Use a spatula to spread it out carefully.
- Add the remaining batter making sure you completely cover the filling.
- Bake for 50 minutes or until a toothpick inserted near the center comes out clean. Cool 10 minutes in the pans before removing the bread to a wire rack to cool completely. Store your bread in the refrigerator wrapped in plastic wrap.
Meyer Lemon Loaf
Makes two 8” x 5” (20 x 13 cm) loavesAdapted from Recipe Girl’s Meyer Lemon Loaf
Ingredients
LOAF:
2 2/3 cups (640 ml) (375 gm/13¼ oz) all-purpose (plain)unbleached flour
¾ teaspoon (3¾ ml) (3¾ gm) baking powder
zest of 3 Meyer lemons (regular old lemons will work just fine)
2 cups (480 ml) (450 gm/16 oz) white granulated sugar
6 large eggs, at room temperature
¾ cup (180 ml) sour cream or creme fraiche, at room temperature
2 tablespoons (30 ml) rum (can omit – I did!)
1½ tablespoons (22½ ml) fresh Meyer lemon juice (again, regular lemons can be used)
pinch of salt
9 tablespoons (135 ml) (125 gm/4½ oz/1 stick + 1 tablespoon) butter, melted and cooled
SIMPLE SYRUP:
½ cup (120 ml) (115 gm/4 oz) granulated sugar
½ cup (120 ml) water
Juice from 1 medium Meyer Lemon (or regular lemon)
Directions:
- Preheat oven to moderate 350°F/180°C/gas mark 4. Butter and flour two 8” x 5” (20 x 13 cm) loaf pans.
- Sift together flour and baking powder; set aside.
- Place sugar, lemon zest, and eggs into a large mixing bowl and beat with a whisk until the mixture is a light lemon color and thickened a bit. This can also be done with a mixer. Whisk in sour cream, then salt, then rum (if using) and lemon juice.
- Gently whisk in the flour in four parts, then whisk in the butter in three parts. You’ll have a thick, pourable batter flecked with lemon zest.
- Pour the batter into the prepared pans and bake for 50 to 55 minutes, or until cake tester inserted in center comes out clean.
- While the loaves are baking, prepare simple syrup. Boil together sugar and water and stir until sugar is dissolved. Remove from heat and add the lemon juice.
- Turn the loaves out of their pans onto a cooling rack and brush liberally with the lemon syrup, repeat brushing as you feel necessary. Let cool.
Loaves can be kept wrapped tightly on the counter or in the fridge for approximately 5 to 7 days. Loaves last 6 months if wrapped tightly and kept air tight in the freezer.
Additional Information:
A popular blogger’s top 10 quick bread recipes
Joy of Baking’s assorted recipes and videos of quick breads
Peach Pie Quick Bread Video – sounds so good!!
A beer batter bread recipe.. doesn’t seem to be special until she pours melted butter all over it!
A great primer on making quick breads from King Arthur's flour website
Disclaimer:
The Daring Kitchen and its members in no way suggest we are medical professionals and therefore are NOT responsible for any error in reporting of “alternate baking/cooking”. If you have issues with digesting gluten, then it is YOUR responsibility to research the ingredient before using it. If you have allergies, it is YOUR responsibility to make sure any ingredient in a recipe will not adversely affect you. If you are lactose intolerant, it is YOUR responsibility to make sure any ingredient in a recipe will not adversely affect you. If you are vegetarian or vegan, it is YOUR responsibility to make sure any ingredient in a recipe will not adversely affect you. The responsibility is YOURS regardless of what health issue you’re dealing with. Please consult your physician with any questions before using an ingredient you are not familiar with. Thank you!
__________________ Getcher Bitchon in the Kitchon!
Rock on Daring Kitchen type people! Rock on!
xoxo
............................................................................................................................................................
The Daring Bakers January 2012 Challenge: Scones/Biscuits
Introduction: Hi my name is Audax from Audax Artifex. Whenever I visit my sister and her family in S.E. Queensland Australia she always welcomes me with a fresh batch of my favourite baked treat which we devour gleefully with cups of tea while we chat and catch up with the events in our lives.


The treat that I'm talking about is the basic scone (also know as baking powder biscuits in North America) my sister really knows how to make them, they are wondrously light with soft sides and a lovely airy crumb – superb with jam and cream. This month I want the Daring Bakers' to share my delight and I invite you to bake a batch of scones to enjoy with friends and family.
For our North American members I wish to clarify what this challenge is all about and try to avoid any confusions. Scones in North American are nearly always triangular in shape have a slightly crisp crust usually covered in sugar and have a soft interior crumb and sometimes are laced with dried fruit (these baked goods in Australia and England are called “rock cakes” since they are usually made to look like “rocky” cakes not wedges), meanwhile biscuits in North American are a round shaped buttery slightly flaky baked good usually eaten with meals (these items in Australia and England are called “scones” and are eaten with butter and jam usually with cups of tea or coffee as a sweet snack). So this challenge (using the North American name) is to make biscuits. Or using the Australian or English name this challenge is to make scones.
To further clarify for our North American bakers this month's challenge is to make biscuits (also called baking powder biscuits) if you choose to make your biscuits using buttermilk as the liquid you are making what are known as “Southern” Biscuits which are one of the most famous examples of home cooking in the Southern States of America (that is they are a baking powder biscuit made with buttermilk). In Australia and England “Southern” Biscuits would be called buttermilk scones. So restating the above, the challenge is to make scones (using the Australian/English name) or to make biscuits (using the North American name). Incidentally if you use cream as your liquid in the challenge recipe the final baked good would be called a cream biscuit in North America or a cream scone in Australia and England.
Scones (biscuits) contain only a small number of ingredients they are fast to make, quick to bake, only cost cents per batch and most importantly are super FUN to eat. In England and Australia scones are eaten with jam and butter usually with cups of tea or coffee mostly as a sweet snack, while in North America they are usually eaten with meals as a savoury side.

Of course scones (biscuits) have a notorious reputation as being difficult for some people to make comments like “hockey pucks”, “These made great door-stops ” and the like fill the comment sections of most recipe websites. You see scones (can be said as a rhyme with cone and also can be said as a rhyme with gone) are a type of quick bread that is a white flour dough that is raised using chemical agents usually baking powder and/or baking soda. Basic scones contain flour, raising agent(s), butter (or shortening or lard), salt, and milk (or buttermilk or soured milk or cream). Most recipes just say to “rub the fat into the flour” then combine the dry and wet ingredients until “gathered together” and then “lightly knead” the gathered mixture until a soft dough forms, then “roll or pat” out this dough and then “cut” out rounds and bake them in a hot oven. Well how hard could it really be I thought uh-mm as you can see below my first batch wasn't the greatest success … they didn't raise at all and the texture was barely OK I thought … I was left wondered what I had done wrong …
My first attempt at scones (really pretty terrible I thought, no height no tenderness and no flakiness)

So after studying many many (288 websites bookmarked) scone/biscuit recipes and the bakers' comments about these recipes and after doing 16 batches! myself I have acquired a lot of information to help you master the techniques involved I hope that at the end of this challenge that you will be able to make a good if not great scone (biscuit).
After much research and many attempts … finally some scones (the 14th, 15th and 16th batches) that I wouldn't mind sharing with my sister.
The Classic Australian scone ring (Aussie Damper) – the crumb is very similar to bread

Cheese and chives scones – a “sky-high” light and tender scone flavoured with cheese and chives

The classic Southern Biscuit (buttermilk scone) a superbly flaky scone made with buttermilk and laminated to form distinct layers when baked

As you can see scones (biscuits) are all about technique since the scones pictured above used the same basic recipe.
Recipe Source: The challenge scone (biscuit) recipe has been especially formulated by Audax Artifex after a large amount of research and experimentation. It is designed to help you master the techniques involved in making scones (biscuits) exactly the way you like them.
Blog-checking lines: Audax Artifex was our January 2012 Daring Bakers’ host. Aud worked tirelessly to master light and fluffy scones (a/k/a biscuits) to help us create delicious and perfect batches in our own kitchens!
Posting Date: January 27, 2012
Download printable file HERE
Challenge Notes:The Ingredients – since scones contain only a small number of ingredients each should be of the highest quality
Flour – lower gluten (i.e. soft) flours (about 9% or less protein) produce taller and lighter scones than normal plain (all-purpose) flour (about 10%+ protein). But to be honest it wasn't that great a difference so long you sifted the dry ingredients thoroughly at least three times. That is always triple sift the dry ingredients this will ensure that the flour is well aerated and the raising agents are evenly distributed so resulting in light scones. I found that finely milled soft “OO” flour gave the best results but don't worry you can get excellent results with sifted plain (all-purpose) flour. You can use self-raising flour if you wish (remember to leave out the raising agents and salt) in the recipe below it is important to triple sift the self-raising flour as well I like to add about ½ teaspoon of extra fresh baking powder per cup of self-raising flour to ensure a good lift in my scones.
Fat – unsalted butter gives the best flavour while lard gives the flakiest texture since it has a much higher melting point than butter so promoting a flaky texture in the final scones. The best compromise is to use a combination of the two in equal measure. I usually use all (unsalted) butter for flavour and health reasons. In most recipes the fat is rubbed into the flour using fingers or a pastry cutter (don't use two knives or forks since it takes too long to cut in the fat using this method). It is best to grate the butter using the coarse side of a box-grater and then freeze it until you need it. Freezing the butter prevents the fat from melting into the flour. The idea is to coat the fat particles with the flour. You are looking for a fat/flour combination that looks like very coarse bread crumbs with a few pieces of butter about the size of peas, the finer you make your fat pieces the more tender the crumb of your final scones. If you want very flaky scones then make the fat pieces large like Lima beans and only lightly coat them in the flour. If your kitchen is very hot you can refrigerate your flour so helping to keep the fat from melting. Don't freeze your flour as this will make it too difficult to rub the fat into the flour. (Typical usage about 1 to 8 tablespoons of fat per cup of flour).
Chemical raising agents – always use fresh raising agents, baking powder deteriorates within two months once the jar is opened, the recommended dose is about 2 teaspoons per cup of flour. Baking powder nowadays is double action – there is an initial release of gas once the dry and wet ingredients are combined and there is another release of gas from the high heat of the oven. If you are using acidic ingredients (such as buttermilk, soured milk, cream, honey, cheese, tomato sauce etc) then use an additional ¼ teaspoon of baking soda per cup of liquid to help neutralise the acid and make the final baked product raise correctly. Baking soda is four times stronger in raising power than baking powder. You can make you own single action baking powder by triple sifting together one part baking soda and two parts cream of tartar store in an airtight container.
Liquid – you can use milk, buttermilk, soured milk, half-and-half, cream, soda water, even lemon-flavoured soda pop (soft drink) or a combination of these as the liquid in your scones. You can sour regular milk with a tablespoon of cider vinegar or lemon juice for every cup. Just stir it in and let it sit for 10 minutes or so to curdle. Use about ½ cup of liquid per cup of flour.
Salt – a small amount of salt (about ¼ teaspoon per cup of flour) helps improve the action of the raising agents and enhances the flavour of the scones.
The Equipment
Baking pans – use dark coloured heavy weight baking pans as these have the best heat distribution and really give a great raise to your baked goods. Many people like to use cast iron skillets for best results.
Measuring cups and spoons – try to accurately measure all ingredients especially if this is your first attempt at making scones (biscuits) remember to scoop the ingredient into the measure and level with a knife. If you can weigh the flour using scales even better.
Scone (biscuit) cutters – use a cutter that is made of sharp thin metal with straight sides and is open at both ends this ensures that the scone will raise straight and evenly and ensures the cut scone is easy to remove from the cutter without compressing the dough. Try to avoid using cutters with wavy sides, thick walled cups, glasses, metal lids, small jars or any cutter with only one opening since it is difficult to remove the cut scones from these without compressing the dough therefore leading to 'tougher' scones. If you cannot get a good cutter you can cut out squares or wedges etc using a sharp knife if you wish.
Rolling pins – most scone doughs are very soft (and wet) so can be easily patted out using your fingers. For a large amount of dough you can use a rolling pin remember to use light pressure from the centre outwards to form an even thickness of dough ready to be cut into scones. Avoid rolling back and forth over the same area as this can overwork the dough.
The Techniques
Triple sift the dry ingredients – sift your dry ingredients from a height this permits plenty of air to be incorporated into the mixture which allows for maximum lightness in your scones and ensures even distribution of all the raising agents and other ingredients.
Rubbing in the fat – this is the stage where you can control how tender or flaky your final scone crumb will be. The more you coat your fat with flour and the smaller the particles of the final mixture, the more tender the end product because you’re retarding gluten formation in the flour (unfortunately the price you pay for this tenderness is that the final dough will be soft and might not raise very well since the gluten isn't developed enough to form a stable structure to trap the gases that are released when the dough is baked). Conversely the larger you leave the pieces of fat (the infamous "pea-sized" direction you always see in scone/biscuit recipes), the flakier the final scones will be (that is the gluten in this case is more developed but you might find that the final baked product is dry and the mouth feel of crumb could be too firm i.e. tough). So summarising the tenderness/flakiness of your scone is achieved in this stage by manipulating the size of the fat particles and how much of the flour is used to coat the fat (the more flour used to coat the fat promotes more tenderness while larger fat pieces promote more flakiness). Either way quickly rub in the grated frozen fat into the dry ingredients using
1)your finger tips – as you lightly rub and pinch the fat into the flour, lift it up high and let it fall back down into the bowl, this means that air is being incorporated all the time, and air is what makes scones light, continue this until you have the desired sized flour/fat particles in the mixture, or
2)a cold pastry cutter – begin by rocking the pastry cutter into the fat and flour mixture continue rocking until all the fat is coated in flour and the desired sized flour/fat particles are obtained.
Moistening and bringing the dough together - add nearly all of the liquid at once to the rubbed-in dry ingredients. When mixing the dough (I use a soft plastic spatula), stir with some vigour from the bottom to the top and mix just until the dough is well-moistened and begins to just come together it will be wet (and sticky). And remember the old saying – the wetter the dough the lighter the scones (biscuits)! Then turn the dough onto a lightly floured board.
Handling the dough – as most people know it is important not to overwork the dough but what isn't appreciated is that under-working is almost as common a mistake as overworking. Look at my first attempt (the first photo in this article) at making the challenge recipe it is crumbly and a bit leaden and the crumb isn't flaky at all this is due to under-working the dough and making the flour/fat particles too small, it took me about six batches to understand this and not be afraid to handle the dough so the scone (biscuit) would raise correctly. Under-working causes as many problems as overworking. Overworking leads to tough, dry and heavy scones while under-working leads to crumbly leaden ones. If you are not happy with your baked goods look carefully at your final scones (biscuits) and decide if you have under- or over-worked your dough.
Kneading or folding/turning the dough – this is the stage where you can control whether or not your scone has distinct layers by 1) only kneading the dough (for no layering effect) or 2) only turning and folding the dough (for a layering effect). As mentioned above given the same amounts of flour and fat, leaving larger pieces of fat equals more gluten formation and, therefore, flakiness. Leaving smaller pieces of fat equals less gluten formation and, therefore, tenderness. Your dough at this stage of the recipe will be a mixture of different gluten strengths since it is almost impossible to make a totally homogeneous dough at home. The major idea at this stage of the process is to exploit these gluten differences to achieve a desired degree of lamination (layering) in the final baked good. That is at this stage your dough (after you have added the liquid and mixed it until it just holds together), will have different layers of relatively gluten-rich (tougher) dough (the more floury parts of the dough), and layers of relatively gluten-free (tender-er) dough with small pieces of fat (the more fatty parts of the dough). So at this point if we only lightly knead the dough these layers will become less distinct which means the dough will become more homogeneous so producing a more even and more tender crumb when baked. But if at this stage you only fold and turn the dough (as shown below in pictures) over itself, these different layers will remain intact but will get thinner and thinner with each fold and turn, so when the fat melts and the liquid turns to steam in the oven, this steam pushes the tougher layers apart, leading to an overall flakiness and a layering effect in the scone crumb (see picture of the buttermilk biscuit above). So if you want an even more tender crumb just lightly knead (much like you would knead bread but with a very very light touch) the turned-out dough a few times until it looks smooth. If you want to form layers (laminations) in your final baked goods do a few folds and turns until it looks smooth. Always do at least one light knead to make the final dough structurally strong enough to raise and hold its shape whether you are aiming for a smooth tender crumb or a flaky layered crumb.
Pat or roll out the dough – since most scone (biscuit) doughs are soft (and sticky) it is best to use your fingers to gently pat out the dough once it has been kneaded or folded and turned. Use a very light touch with little pressure while forming the dough rectangle to be cut into rounds for the scones. If you want tall scones then pat out the dough tall, about 3/4 inch to 1 inch (2 cm to 2½ cm) thick is about right.
Cutting out your scones – use a well-floured scone (biscuit) cutter for each round that you stamp out from the dough. That is dip your cleaned cutter into fresh plain flour before each separate cut. Do not twist the cutter while stamping out the scone, push down firmly until you can feel the board then lift the cutter the round should stay inside the cutter then gently remove it from the cutter and place the round onto the baking dish. You can use a sharp knife to cut out other shapes if you wish from the dough, also the knife should be floured before each cut as well.
Baking your scones – always preheat your oven when baking scones. Place each scone almost touching onto the baking dish this encourages the scones to raise and also keeps the sides soft and moist. If you want crisp sides widely space your scones on the baking dish.
Extra comments about resting the dough – I found in my researches that a number of respected sources mentioned resting the dough in various stages in the recipe. Surprisingly this advice is sound. I found that if you rested the just mixed dough (in the fridge) for 20 minutes there was a huge improvement in the dough's handling qualities and the final scones height, lightness and crumb were outstanding. Also I found that if you rest your patted out dough covered in plastic for 10 minutes in the fridge that the rounds are easier to stamp out and the final baked goods raise higher and have a better crumb. Also you can rest your stamped out rounds in the fridge for a couple of hours without harm so you can make your scones place them into the fridge and then at your leisure bake them later great for dinner parties etc. This is possible because modern baking powder is double action, i.e. there is another release of gas when you bake the rounds in the heat of the oven.
Mandatory Items: You must make one batch of basic scones (i.e. basic biscuits using the North American name). The challenge recipe has been designed to be fast, very cheap and easy to follow so allowing for multiple attempts to be made until you can achieve your desired result. I encourage you to make a couple of batches to see how small changes in technique can obtain vastly different final baked products. I estimate all of my 16 experimental batches cost less than $4 and took about four hours, so please do take this opportunity to explore the possibilities of the different techniques and advice that have been presented here in this challenge. I have included a number of links to the most popular scone (biscuit) recipes (and variations) in a number of countries feel free to use these if you can make a good basic scone (biscuit) already.
Variations allowed: A number of variations (cheese and chives, herb, etc) on the basic challenge recipe are included use them if you wish.
Preparation time: Scones: Preparation time less than 10 minutes. Baking time about 10 minutes.
Equipment required:
Large mixing bowl
Baking dish
Measuring cups and spoons (optional)
Flour Sifter (optional)
Board (optional)
Scone (biscuit) cutter (optional) or knife (optional)
Dough scraper (optional)
Spatula (optional)
Weighing scale (optional)
Cooling rack (optional)
Pastry brush (optional)
Basic Scones (a.k.a. Basic Biscuits)
Servings: about eight 2-inch (5 cm) scones or five 3-inch (7½ cm) scones
Recipe can be doubled
Ingredients:
1 cup (240 ml) (140 gm/5 oz) plain (all-purpose) flour
2 teaspoons (10 ml) (10 gm) (⅓ oz) fresh baking powder
¼ teaspoon (1¼ ml) (1½ gm) salt
2 tablespoons (30 gm/1 oz) frozen grated butter (or a combination of lard and butter)
approximately ½ cup (120 ml) cold milk
optional 1 tablespoon milk, for glazing the tops of the scones
Directions:
1. Preheat oven to very hot 475°F/240°C/gas mark 9.
2. Triple sift the dry ingredients into a large bowl. (If your room temperature is very hot refrigerate the sifted ingredients until cold.)
3. Rub the frozen grated butter (or combination of fats) into the dry ingredients until it resembles very coarse bread crumbs with some pea-sized pieces if you want flaky scones or until it resembles coarse beach sand if you want tender scones.
4. Add nearly all of the liquid at once into the rubbed-in flour/fat mixture and mix until it just forms a sticky dough (add the remaining liquid if needed). The wetter the dough the lighter the scones (biscuits) will be!
5. Turn the dough out onto a lightly floured board, lightly flour the top of the dough. To achieve an even homogeneous crumb to your scones knead very gently about 4 or 5 times (do not press too firmly) the dough until it is smooth. To achieve a layered effect in your scones knead very gently once (do not press too firmly) then fold and turn the kneaded dough about 3 or 4 times until the dough has formed a smooth texture. (Use a floured plastic scraper to help you knead and/or fold and turn the dough if you wish.)
6. Pat or roll out the dough into a 6 inch by 4 inch rectangle by about ¾ inch thick (15¼ cm by 10 cm by 2 cm thick). Using a well-floured 2-inch (5 cm) scone cutter (biscuit cutter), stamp out without twisting six 2-inch (5 cm) rounds, gently reform the scraps into another ¾ inch (2 cm) layer and cut two more scones (these two scones will not raise as well as the others since the extra handling will slightly toughen the dough). Or use a well-floured sharp knife to form squares or wedges as you desire.
7. Place the rounds just touching on a baking dish if you wish to have soft-sided scones or place the rounds spaced widely apart on the baking dish if you wish to have crisp-sided scones. Glaze the tops with milk if you want a golden colour on your scones or lightly flour if you want a more traditional look to your scones.
8. Bake in the preheated very hot oven for about 10 minutes (check at 8 minutes since home ovens at these high temperatures are very unreliable) until the scones are well risen and are lightly coloured on the tops. The scones are ready when the sides are set.
9. Immediately place onto cooling rack to stop the cooking process, serve while still warm.
Variations on the Basic recipe
Buttermilk – follow the Basic recipe above but replace the milk with buttermilk, add ¼ teaspoon of baking soda, increase the fat to 4 tablespoons, in Step 3 aim of pea-sized pieces of fat coated in flour, in Step 5 fold and turn the dough, rounds are just touching in the baking dish, glaze with buttermilk.
Australian Scone Ring (Damper Ring) – follow the Basic recipe above but decrease the fat to 1 tablespoon, in Step 3 aim of fine beach sand sized pieces of fat coated in flour, in Step 5 knead the dough, in Step 7 form seven rounds into a ring shape with the eighth round as the centre, glaze with milk.
Cream – follow the Basic recipe above but replace the milk with cream, add ¼ teaspoon of baking soda, in Step 3 aim of beach sand sized pieces of fat coated in flour, in Step 5 knead the dough, rounds are just touching in the baking dish, glaze with cream.
Cheese and Chive – follow the Basic recipe above but add ¼ teaspoon of baking soda, after Step 2 add ½ teaspoon sifted mustard powder, ¼ teaspoon sifted cayenne pepper (optional), ½ cup (60 gm/2 oz) grated cheese and 2 tablespoons finely chopped chives into the sifted ingredients, in Step 3 aim of beach sand sized pieces of fat coated in flour, in Step 5 knead the dough, rounds are widely spaced in the baking dish, sprinkle the rounds with cracked pepper.
Fresh Herb – follow the Basic recipe above but after Step 3 add 3 tablespoons finely chopped herbs (such as parsley, dill, chives etc).
Sweet Fruit – follow the Basic recipe above but after Step 3 add ¼ cup (45 gm) dried fruit (e.g. sultanas, raisins, currents, cranberries, cherries etc) and 1 tablespoon (15 gm) sugar.
Wholemeal – follow the Basic recipe above but replace half of the plain flour with wholemeal flour.
Wholemeal and date – follow the Basic recipe above but replace half of the plain flour with wholemeal flour and after Step 3 add ¼ cup (45 gm) chopped dates and 1 tablespoon (15 gm) sugar.
Pictorial guide to the challenge recipe
I was at my brother's house and we had a hankering for a baked treat so I decided to make the challenge recipe also I needed some photos of the challenge recipe being made for this posting. My brother isn't a cook, all he had to hand as equipment was concerned was a mixing bowl,a thin walled 20 cm (8 inch) cake tin and a knife, he didn't even have a cup measure only mugs so I improvised.
As you can see in the collage below I roughly chopped some butter (I eye-balled about 2 tablespoons) and froze it. Then I throw the frozen cubed butter onto one mug of cold self-raising flour I couldn't sift the flour since my brother doesn't own a sifter. Then I proceeded to rub in the butter with my fingers until I got pea-sized fat pieces coated in flour.

I added the liquid (½ mug of cold lite-milk) to the rubbed-in fat/flour mixture until I got a sticky dough I turned this out onto a floured board, I lightly floured the top of the sticky dough then I kneaded it once then I patted it out into a rectangular shape then I proceeded to fold and turn the dough. Notice that you fold 1/3 of the dough over itself then the other 1/3 over that and turn it 90° degrees. Notice the lines on the broad this will help you understand how to do the folding and the turning.

I did a couple more folds and turns and used a well-floured knife to cut out squares of prepared dough.

Here is a close-up of the finish patted-out dough notice how you can see the fat particles in the dough this is what causes flakiness in the final baked scone.

I used the inverted cake tin as my baking dish and baked the scones in a very hot oven for 10 minutes they worked out really well I thought. Notice the nice central lamination in the scone and the great crumb and how well they rose in height.

I placed two unbaked scones in the fridge to test whether resting them for 20 minutes helped improve the raise of the final baked product. As you can see the left scone and the middle scone are taller than the right scone which was baked immediately after it was cut out from the dough. So don't worry if you cannot bake the scones straight away they do better with a little resting time.

Videos of my sister making scones (baking powder biscuits) – using a very popular Australian recipe
(http://www.taste.com.au/recipes/8163/basic+scones)
Part 1 – my sister making the scones (baking powder biscuits)
(http://www.youtube.com/watch?v=ZF9YJiHZ1K0)
Part 2 – my sister showing off her scones (baking powder biscuits)
http://www.youtube.com/watch?v=GorStLKSoMo)
Pictures of my sister's scones

Storage & Freezing Instructions/Tips:
Scones are best eaten warm. Scones (biscuits) are really easy to store – bag the cooked and cooled scones and freeze until needed then reheat in a moderate hot for a few minutes.
Additional Information:
Australia’s most popular scone recipe uses lemon-flavoured soda pop and cream as the liquid
(http://figjamandlimecordial.com/2010/08/08/lemonade-scones/)
A great English scone recipe this uses more sugar and fat and has an egg
(http://www.instructables.com/id/Perfect-English-Scones/)
Classic Southern Buttermilk Biscuits recipe by Alton Brown
(http://www.foodnetwork.com/recipes/alton-brown/southern-biscuits-recipe/...)
An index of North American recipes
(http://allrecipes.com/Recipes/Bread/Biscuits-and-Scones/Biscuits/Top.asp...)
Another index of North American recipes
(http://www.breadexperience.com/biscuit-recipes.html)
Three great Australian recipes
(http://www.smh.com.au/lifestyle/homestyle/blogs/tried-and-tasted/how-to-...)
An index of Irish recipes
(http://www.littleshamrocks.com/Irish-Bread-Scone-Recipes.html)
An interesting discussion on “what makes a scone a scone”
(http://chowhound.chow.com/topics/810928)
Videos of Alton Brown making biscuits (scones) with his granny (super cute to watch)
Episode one ( http://www.youtube.com/watch?v=d3QuQSdjMVE)
Episode two (http://www.youtube.com/watch?v=Qcz4JQUwY9Q)
Disclaimer:
The Daring Kitchen and its members in no way suggest we are medical professionals and therefore are NOT responsible for any error in reporting of “alternate baking/cooking”. If you have issues with digesting gluten, then it is YOUR responsibility to research the ingredient before using it. If you have allergies, it is YOUR responsibility to make sure any ingredient in a recipe will not adversely affect you. If you are lactose intolerant, it is YOUR responsibility to make sure any ingredient in a recipe will not adversely affect you. If you are vegetarian or vegan, it is YOUR responsibility to make sure any ingredient in a recipe will not adversely affect you. The responsibility is YOURS regardless of what health issue you’re dealing with. Please consult your physician with any questions before using an ingredient you are not familiar with. Thank you!
__________________
,,,,,,,,,,,,,,,,,,,,,,,,,,,,,,,,,,,,,,,,,,,,,,,,,,,,,,,,,,,,,,,,,,,,,,,,,,,,,,,,,,,,,,,,,,,,,,,,,,,,,,,,,,,,,,,,,,,,,,,,,,,,,,,,,,,,,,,,,,,,,,,,,,,,,,,,,,,
The Daring Bakers October 2011 Challenge
Hello! My name is Jenni, and I am The Gingered Whisk. I am so excited to be your host this month, and I really hope that you enjoy the challenge that I have prepared for you guys!
I was first introduced to Povitica from a friend of mine. We happened to be at the Farmer’s Market and when we passed a particular booth selling specialty breads, and she just went ecstatic. She and her family have been buying these loaves of bread every holiday season, and she was very excited to see them in the middle of the summer. I didn’t know what the excitement was about, but the loaves of bread were beautiful, and when sliced, had delicate circular designs on each slice. Each loaf is filled with a sweet filling and rolled, and weighs an amazing 2.5 pounds! It was amazing, delicious, and I promptly bought one.
Povitica (pronounced po-va-teet-sa) is traditional Eastern European dessert bread that is traditionally served during the holiday season. It is also known as Nutroll, Potica, Kalachi, Strudia, just to name a few. Family recipes, and the secrets on how to roll the bread so thin, was passed down through generations of families. However, the tradition of baking this type of bread has become somewhat of a dying art form, and I thought it would be a wonderful opportunity for us to learn to make this wonderful sweet bread.
After tasting the wonderful bread we had bought at the Farmer’s Market, I knew I needed to learn how to make this myself. Especially since that one single loaf cost an arm and a leg ($25! Really! For one loaf!) I spent days and days trying to find recipes online, but I didn’t have any luck (however I just did a search the other day and it seems that a few recipes have sprung up in the meantime). After much research, I created my own recipe for Povitica that I think is a very close match to the delicious loaf of bread I splurged on at the Farmer’s Market.
The traditional filling for this bread is an English walnut filling, but other typical fillings also include apple/cinnamon, apricot preserves, and a sweet cheese (like cream cheese).

Recipe Source: I have actually put this recipe together myself!
Blog-checking lines: The Daring Baker’s October 2011 challenge was Povitica, hosted by Jenni of The Gingered Whisk. Povitica is a traditional Eastern European Dessert Bread that is as lovely to look at as it is to eat!
Posting Date: October 27, 2011
Download printable file HERE
Notes:• You do not need to use an electric mixer for this recipe, but you can prepare the dough in one in you prefer.
• Scalded milk is an important step. It used to be used to pasteurize milk, so if your milk is raw, please make sure you do this step. If your milk has been pasteurized, scalding the milk will help to make the bread tender.
• The recipe calls for using a sheet on top of your workspace. This is not necessary, but I did find that it was easier to roll out my dough with one. The dough is very sticky, and using the lightly floured sheet helps to keep the dough from sticking too badly. It also helps that you can move the sheet around as you work, and you can also move to a clean area of the sheet for each loaf that you roll out. I also found that I was able to roll my dough out thinner with the use of a sheet. The sheet is also used for rolling the Povitica up, but again, it is not necessary. And all my dough and filling goo washed out perfectly, so no problems there! If you decide not to use a sheet, a pastry scrapper will come in very handy when you roll up your dough.
• There are two ways that you can roll the dough up. If you watch the video under “Additional Information” you can see that the sheet is lifted and used as momentum for rolling the dough up. This technique takes a bit of finesse, but I encourage you to try it out. However, the dough can be rolled up by hand, like you would if you were making cinnamon rolls.
• There are several different ways that you can finish off your loaves before baking it. If you do not want to finish your loaf off with the cold coffee/sugar mixture that is provided, you can use either egg whites or melted butter.
Mandatory: You must make a traditional Povitica loaf, in a bread pan. It must be rolled out by hand, filled, and wound up as directions show.
Variations allowed: Since this recipe makes 4 loaves, I’m allowing creativity in the option of your fillings. I would like you to try the traditional Walnut filling (except for in the cases of allergies, etc), but the other loaves may be whatever filling you wish.
Preparation time:
To make Dough: 40 minutes
Rising: 1 hour and 30 minutes
Rolling and Assembly: 20 minutes per loaf, a generous total of 1 hour
Baking: 1 hour
Cooling: 30 minutes
To Make the Filling: 15 minutes, including the grinding of the nuts
Equipment required:
• A large work space, like a 4-person table or large kitchen island
• 4 large bowls to rise dough
• Plastic Wrap
• 4 Kitchen/Tea Towels
• 4 bread loaf pans (or as many as you own, and re-use them)
• Rolling Pin
• A Sheet or Cloth (the better the thread count and the softer they are, the less likely the dough will stick)
• Measuring Cups and Spoons
• Wooden Spoons
• Pastry Brush
• Medium Saucepan
• Candy Thermometer
• Small Bowl
• Small Saucepan
• Nut Grinder
• Rubber Spatula
• Pastry scrapper

Povitica (makes 4 loaves)
Ingredients
To activate the Yeast:
2 Teaspoons (10 ml/9 gm) Sugar
1 Teaspoon (5 ml/3 gm) All-Purpose (Plain) Flour
½ Cup (120ml) Warm Water
2 Tablespoons (30ml/14 gm/½ oz/2 sachets) Dry Yeast
Dough:
2 Cups (480ml) Whole Milk
¾ Cup (180 ml/170gm/6 oz) Sugar
3 Teaspoons (15 ml/18 gm/2/3 oz) Table Salt
4 Large Eggs
½ Cup (120ml/115 gm/one stick/4 oz) Unsalted Butter, melted
8 cups (1.92 l/1.12 kg/39½ oz/2½ lb) All-Purpose Flour, measure first then sift, divided
Walnut Filling:
7 Cups (1.68 l/1.12 kg/2.5 lbs) Ground English Walnuts
1 Cup (240ml) Whole Milk
1 Cup (240ml/225 gm/2 sticks/8 oz) Unsalted Butter
2 Whole Eggs, Beaten
1 Teaspoon (5ml) Pure Vanilla Extract
2 Cups (480ml/450 gm/16 oz) Sugar
1 Teaspoon (5 ml/4 gm) Unsweetened Cocoa Powder
1 Teaspoon (5 ml/3 gm) Cinnamon
Topping:
½ Cup (120 ml) Cold STRONG Coffee
2 Tablespoons (30 ml/28 gm/1 oz) Granulated Sugar
Melted Butter
Directions:

To Activate Yeast:
1. In a small bowl, stir 2 teaspoons sugar, 1 teaspoon flour, and the yeast into ½ cup warm water and cover with plastic wrap.
2. Allow to stand for 5 minutes
To Make the Dough:
3. In a medium saucepan, heat the milk up to just below boiling (about 180°F/82°C), stirring constantly so that a film does not form on the top of the milk. You want it hot enough to scald you, but not boiling. Allow to cool slightly, until it is about 110°F/43°C.
4. In a large bowl, mix the scalded milk, ¾ cup (180 gm/170 gm/6 oz) sugar, and the salt until combined.
5. Add the beaten eggs, yeast mixture, melted butter, and 2 cups (480 ml/280 gm/10 oz) of flour.
6. Blend thoroughly and slowly add remaining flour, mixing well until the dough starts to clean the bowl.

7. Turn dough out onto floured surface and knead, gradually adding flour a little at a time, until smooth and does not stick. Note: I did not use all 8 cups of flour

8. Divide the dough into 4 equal pieces (they will each weight about 1.25 pounds/565 grams)
9. Place dough in 4 lightly oiled bowls, cover loosely with a layer of plastic wrap and then a kitchen towel and let rise an hour and a half in a warm place, until doubled in size.

To Make the Filling
10. In a large bowl mix together the ground walnuts, sugar, cinnamon and cocoa.
11. Heat the milk and butter to boiling.
12. Pour the liquid over the nut/sugar mixture.
13. Add the eggs and vanilla and mix thoroughly.
14. Allow to stand at room temperature until ready to be spread on the dough.
15. If the mixture thickens, add a small amount of warm milk.

To Roll and Assemble the Dough:
16. Spread a clean sheet or cloth over your entire table so that it is covered.
17. Sprinkle with a couple of tablespoons to a handful of flour (use flour sparingly)
18. Place the dough on the sheet and roll the dough out with a rolling pin, starting in the middle and working your way out, until it measures roughly 10-12 inches (25½ cm by 30½ cm) in diameter.

19. Spoon 1 to 1.5 teaspoons (5ml to 7 ½ ml/4 gm to 7 gm) of melted butter on top.
20. Using the tops of your hands, stretch dough out from the center until the dough is thin and uniformly opaque. You can also use your rolling pin, if you prefer.
21. As you work, continually pick up the dough from the table, not only to help in stretching it out, but also to make sure that it isn’t sticking.
22. When you think it the dough is thin enough, try to get it a little thinner. It should be so thin that you can see the color and perhaps the pattern of the sheet underneath.

23. Spoon filling (see below for recipe) evenly over dough until covered.

24. Lift the edge of the cloth and gently roll the dough like a jelly roll.

25. Once the dough is rolled up into a rope, gently lift it up and place it into a greased loaf pan in the shape of a “U”, with the ends meeting in the middle. You want to coil the dough around itself, as this will give the dough its characteristic look when sliced.


26. Repeat with remaining three loaves, coiling each rope of dough in its own loaf pan.
27. Brush the top of each loaf with a mixture of ½ cup (120 ml) of cold STRONG coffee and 2 tablespoons (30ml/28 gm/1 oz) of sugar. If you prefer, you can also use egg whites in place of this.

28. Cover pans lightly will plastic wrap and allow to rest for approximately 15 minutes.
29. Preheat oven to moderate 350°F/180°C/gas mark 4.
30. Remove plastic wrap from dough and place into the preheated oven and bake for approximately 15 minutes.
31. Turn down the oven temperature to slow 300°F/150°C/gas mark 2 and bake for an additional 45 minutes, or until done.
32. Remove bread from oven and brush with melted butter.
33. Check the bread at 30 minutes to ensure that the bread is not getting too brown. You may cover the loaves with a sheet of aluminum foil if you need to.
34. Remove from the oven and allow to cool on a wire rack for 20-30 minutes, still in the bread pan. Remember, the bread weighs about 2.5 and it needs to be able to hold its own weight, which is difficult when still warm and fresh out of the oven. Allowing it to cool in the pan helps the loaf to hold its shape.
35. It is recommended that the best way to cut Povitica loaves into slices is by turning the loaf upside down and slicing with a serrated knife.

Smaller batch measurements courtesy of Audax
Half Batch Dough Ingredients (Makes two loaves each 1.25 lbs/565 grams)
To activate the Yeast:
1 Teaspoon (5 ml/4 ½ gm) Sugar
½ Teaspoon (2½ ml/1½ gm) All-Purpose (Plain) Flour
¼ Cup (60 ml) Warm Water
1 Tablespoon (15 ml/7 gm/¼ oz/1 sachet) Dry Yeast
Dough:
1 Cup (240 ml) Whole Milk
6 Tablespoons (90 ml/85 gm/3 oz) Sugar
1½ Teaspoons (7½ ml/9 gm/1/3 oz) Table Salt
2 Large Eggs
¼ Cup (60 ml/60 gm/½ stick/2 oz) Unsalted Butter, melted
4 cups (960 ml/560 gm/19¾ oz/1¼ lb) All-Purpose Flour, measure first then sift, divided
Topping:
¼ Cup (60 ml) Cold STRONG Coffee
1 Tablespoon (15 ml/14 gm/½ oz) Granulated Sugar
Melted Butter
Half Batch Filling Ingredients (enough filling for the two loaves(
3½ Cups (840 ml/560 gm/1¼ lb/20 oz) Ground English Walnuts
½ Cup (120 ml) Whole Milk
½ Cup (120 ml/115 gm/1 stick/4 oz) Unsalted Butter
1 Whole Egg, Beaten
½ Teaspoon (2½ ml) Pure Vanilla Extract
1 Cup (240 ml/225 gm/8 oz) Sugar
½ Teaspoon (2½ ml/2 gm) Unsweetened Cocoa Powder
½ Teaspoon (2½ ml/1½ gm) Cinnamon
Quarter Batch Dough Ingredients (Makes one loaf 1.25 lbs/565 grams)
To activate the Yeast:
½ Teaspoon (2½ ml/2¼ gm) Sugar
¼ Teaspoon (1¼ ml/¾ gm) All-Purpose (Plain) Flour
2 Tablespoons (30 ml) Warm Water
1½ Teaspoons (7½ ml/3½ gm/0.125 oz/½ sachet) Dry Yeast
Dough:
½ Cup (120 ml) Whole Milk
3 Tablespoons (45 ml/43 gm/1½ oz) Sugar
¾ Teaspoon (3¾ ml/9 gm/0.17 oz) Table Salt
1 Large Egg
1 tablespoon (30 ml/30 gm/¼ stick/1 oz) Unsalted Butter, melted
2 cups (480 ml/280 gm/10 oz/0.62 lb) All-Purpose Flour, measure first then sift, divided
Topping:
2 Tablespoons (30 ml) Cold STRONG Coffee
1½ Teaspoons (7½ ml/7 gm/¼ oz) Granulated Sugar
Melted Butter
Quarter Batch Filling Ingredients (enough filling for one loaf)
1¾ Cups (420 ml/280 gm/10 oz) Ground English Walnuts
¼ Cup (60 ml) Whole Milk
¼ Cup (60 ml/58 gm/½ stick/2 oz) Unsalted Butter
1 Egg Yolk From A Large Egg, Beaten
¼ Teaspoon (1¼ ml) Pure Vanilla Extract
½ Cup (120 ml/115 gm/4 oz) Sugar
¼ Teaspoon (1¼ ml/1 gm) Unsweetened Cocoa Powder
¼ Teaspoon (1¼ ml/¾ gm) Cinnamon
Storage:
There are several options for storing (and eating) your four loaves of Povitica:
• The Povitica will keep fresh for 1 week at room temperature.
• The Povitica will keep fresh for 2 weeks if refrigerated.
• The Povitica can be frozen for up to three months when wrapped a layer of wax paper followed by a layer of aluminum foil. It is recommended to not freeze Povitica with cream cheese fillings as it doesn’t hold up to being thawed really well – it crumbles.
Additional Information:
Video:
Povitica from Strawberry Hill - http://www.youtube.com/watch?v=_W6pmqzVJ4c
This is a promotional video from a company that makes it, Strawberry Hill, but it shows them rolling the Povitica.
Disclaimer:
The Daring Kitchen and its members in no way suggest we are medical professionals and therefore are NOT responsible for any error in reporting of “alternate baking/cooking”. If you have issues with digesting gluten, then it is YOUR responsibility to research the ingredient before using it. If you have allergies, it is YOUR responsibility to make sure any ingredient in a recipe will not adversely affect you. If you are lactose intolerant, it is YOUR responsibility to make sure any ingredient in a recipe will not adversely affect you. If you are vegetarian or vegan, it is YOUR responsibility to make sure any ingredient in a recipe will not adversely affect you. The responsibility is YOURS regardless of what health issue you’re dealing with. Please consult your physician with any questions before using an ingredient you are not familiar with. Thank you!
,,,,,,,,,,,,,,,,,,,,,,,,,,,,,,,,,,,,,,,,,,,,,,,,,,,,,,,,,,,,,,,,,,,,,,,,,,,,,,,,,,,,,,,,,,,,,,,,,,,,,,,,,,,,,,,,,,,,,,,,,,,,,,,,,,,,,,,,,,,,,,,,,,,,,,,,,,,,,
THE DARING BAKERS AUGUST 2011 CHALLENGE
Hi everyone! Welcome to the Daring Bakers version of Candyland! This month me, Lisa of Parsley, Sage, Desserts and Line Drives, and Mandy of What the Fruitcake?! will be showing you two methods for tempering chocolate and providing you with a plethora of recipes for various candies. Mandy will be showing you how to temper chocolate using the marble slab method, and Lisa will be showing you how to temper chocolate using the seeding method. You will not be required to temper chocolate for any of the recipes, but it's a really great skill to learn and have on hand when it comes to candy making and chocolate dipped anything. When you temper chocolate, you get a thin, quick setting, snappy and shiny coating, whereas when you just melt chocolate, you end up with a thick, slightly dull, slower setting coating. The choice is yours, we just want you to have fun and enjoy your candy making!
Mandy had a love/hate relationship with chocolate. She loved chocolate but hated working with it! She just found it to be so temperamental it could put a teenage girl to shame on the moodiness scale. With the usual Internet education (that is, reading everything & anything about chocolate via Google) she decided to do a one day chocolate course at Dublin’s Cook’s Academy which helped to iron out those annoying chocolate snags. Lisa learned by reading, observing, and practicing on her own.
At first glance, this challenge looks MASSIVE, but in fact it’s really simple. You need to make two candies, one with chocolate, and one of your choice. We’ve provided you with a lot of recipes to give you a lot of ideas, but, YOU DO NOT NEED TO MAKE ALL THE RECIPES, they’re just ideas for you to use/adapt/change. We’ve also provided you with various methods & basic recipes that you can change and flavor as you like, like a basic ganache recipe for truffles.
Before we get started, yes, most candy recipes do require a candy thermometer, but we've provided some that do not, like truffles . If you do not have a candy thermometer you can use what is called the cold water test, which I'm going to map out for you below. This won't work for chocolate tempering or any pure chocolate preparations, but may work for the paté de fruits, and will definitely work for the sponge candy and most other sugar syrup based candies.
One non-chocolate candy recipe that's really exciting is the French jelly candy called Paté de Fruit, which Lisa will be showing you how to make. For the paté de fruits you also need a thermometer, so we're not requiring you make a paté de fruit.
You can make filled or dipped bonbons using non-tempered, melted chocolate, but as stated above, the results won't be as lovely and velvety on the palate, but still delicious of course, it's chocolate!
So, what's it take to qualify for the competition that Lis mentioned? We're looking for the most creative and delicious flavours in a chocolate candy. The winner will get a $250 gift voucher to use at Chocoley.com.
A few specifics:
- Your chocolate candy must use tempered chocolate (either dark, milk or white).
- You can choose to make either a dipped truffle, a filled chocolate (bonbon) or a cut & dipped chocolate (bonbon).
- And as Lis mentioned, this competition sponsored by Chocoley is open to residents of the US (including Puerto Rico) and Canada
- Enter by posting a photo and a brief description of what your flavors are in the “August 2011 - Share Your Completed Daring Bakers Challenge Here” thread in the private Daring Bakers’ forums
- PLEASE MAKE SURE YOUR EMAIL ADDRESS ENTERED INTO YOUR PROFILE IS CURRENT!!!
There is also a second prize which all Daring Bakers around the world have the chance to win!
We'll be sending a small hamper to the runner up which includes a $30 Visa card & fantastic desserts recipe book and some other fun goodies to the second best candy creation, also to be judged on creativity & flavour with the same requirements as stated above (choice of 3 chocolates: dipped truffle, filled or dipped bonbon, using tempered chocolate).
Don't be surprised if you find a stash of gold coins in there, it's possible Mandy's been hunting rainbows!
You will find a recipe for all three chocolate candies in the recipes below.
You can make them in any shape you like, but the winner will be the person that makes the most delicious sounding chocolate with creative flavour combinations.
We hope you have fun with our candy-tastic challenge!
Recipe Source:
So, here are the candies we've made for you:Mandy:
Milk Chocolate & Hazelnut Praline Truffles
Candied Orange & Pistachio Marzipan White Chocolates aka Bonbons
Chocolate Bark
Lisa:
Sponge Candy / Honeycomb
Paté de Fruits
Passion Fruit Caramel Filled Chocolates aka Bonbons.
• Strawberry Paté de Fruit is from About.com, author Elizabeth LaBau
• The Citrus Paté de Fruit is from the October 2010 issue of O, The Oprah Magazine
• The Milk Chocolate & Hazelnut Praline Truffle & the White Chocolate Citrus & Pistachio Marzipan Bonbons are adapted from the Dublin Cook’s Academy curriculum, as is both methods of chocolate tempering.
• Lisa’s Passion Fruit Caramel Bonbons was adapted from CandyBarLab.com
• The Sponge Candy / Honeycomb recipe is adapted from Christine Cushing’s Sponge Toffee Recipe.
• The Chocolate Bark is of Mandy’s own doing.
Blog-checking lines:
The August 2011 Daring Bakers’ Challenge was hosted by Lisa of Parsley, Sage, Desserts and Line Drive and Mandy of What the Fruitcake?!. These two sugar mavens challenged us to make sinfully delicious candies! This was a special challenge for the Daring Bakers because the good folks at http://www.chocoley.com offered an amazing prize for the winner of the most creative and delicious candy!Posting Date:
August 27, 2011Download printable file HERE
Mandatory Items:
• You must make TWO candies• The first candy must be ONE of the following CHOCOLATE candies:
a. A truffle, dipped or not dipped in chocolate OR
b. A cut (square) dipped chocolate/bonbon OR
c. A filled chocolate/bonbon using a chocolate mold
• The other candy can be any CHOCOLATE OR NON-CHOCOLATE candy you like
Variations allowed:
• If you choose to make a chocolate dipped cut/square bonbon, they can have a filling of your choice. You can fill them with ganache, marzipan, nut paste, fudge, caramel, brownie bites, nougat or anything else solid enough to be cut into squares and/or hold their shape.• If you choose to make a truffle, you can flavor the ganache with anything you like and can choose whether or not you’d like to dip it in chocolate or just roll it in something like cocoa powder, crushed nuts, praline powder etc.
• You can go wild and have fun with flavors. Use spices, liqueurs, teas or anything you can think of to flavor your candy fillings.
• If you choose to make a filled chocolate/bonbon, you may fill them with whatever you like, some ideas are caramel, butterscotch or soft ganache.
• If you choose to make Paté de Fruit, you can make any flavor you like. Cut them into different shapes or even use molds.
• You can use dark, milk or white chocolate for your dipping and your truffles.
• Although we are providing recipes for you to use, feel free to use your own if you have preferred recipes for fillings and Paté de Fruit
Preparation time:
See each recipe for prep times, please.Equipment required:
Tempered Chocolate:• Chocolate or Instant Read Thermometer (Chocolate & instant read thermometers go below 38ºC / 100ºF and your basic candy thermometer does not, so you cannot use a basic candy thermometer for chocolate tempering.)
• Medium to Large Heat Proof Bowls
• Saucepan or Double Boiler
• Rubber Spatula
• Large palette knife or bench scraper (for method 1 of tempering)
• Marble Slab (for method 1 of tempering)
• Spoons or Parchment Paper (for checking the temper)
• Hot Towel (to keep the tempered chocolate warmer for longer)
Filled Chocolate Bonbons:
• A small brush (for painting the molds with colors, optional)
• Chocolate molds
• Bench or plastic scraper
• A Ladle
• OR A small brush or spoon
• Silicon Mat or Parchment Paper
• Trays / Baking Sheets
• Pastry Bag fitted with Small to Medium Plain Tip
• OR Ziploc Bag with corner cut off
• OR a plastic squeeze bottle
• OR A Teaspoon
Dipped Chocolate Bonbons:
• Forks (either a normal fork or specialized Chocolate Dipping Fork)
• Parchment Paper
• Trays / Baking Sheets
• Teaspoon or Melon Baller (for round truffles)
• Large Knife (for cut truffles)
• Rubber Spatula
• Rolling Pin (for cut truffles)
• Shallow Tray or Jelly/Swiss Roll Pan/Sheet pan
• Clingfilm aka Plastic or Saran Wrap
• Food Processor or Mortar & Pestle (if making praline)
Chocolate Bark:
• Palette Knife or Spatula
• Knife / Food Processor / Mortar & Pestle (for chopping or grinding ingredients)
• Parchment Paper or Silicon Mat
• Trays / Sheet Pans
Paté de Fruit:
• Medium to Large Bowl (Stainless steel, ceramic or glass)
• Saucepan
• OR An actual Double Boiler
• Measuring Cups & Spoons
• Heat Proof Spatula or Wooden Spoon
• Candy Thermometer
• 8”x8” Square Pan
• OR Silicon Molds
• Parchment Paper or Plastic Wrap
• Sharp Knife
Sponge Candy:
• 10” Round Spring Form Cake Pan
• OR 8”x8” Square Pan
• Parchment Paper
• Deep Medium Saucepan
• Measuring Cups & Spoons
• Candy Thermometer
• Heat Proof Spatula or Wooden Spoon
Notes:
What is tempering?“Tempering is a method of heating and cooling chocolate in order to use it for coating or dipping.
Proper tempering gives chocolate a smooth and glossy finish. Tempered chocolate will have a crisp snap and won't melt on your fingers as easily as improperly tempered chocolate.
Properly tempered chocolate is also great for molding candies because the candies will release out of the molds more easily and still retain a glossy finish.” - Ghirardelli
Why is it necessary?
If you simply melt chocolate and let it cool it will set with unattractive grey streaks or spots, called blooming. If eaten, the texture will be grainy and it won’t melt smoothly in the mouth.
When you temper chocolate the end result is shiny when used in a chocolate mould, even colored, smooth melting and with a crisp snap. Basically, tempered chocolate is what you want because it’s better in every way.
The reason for the difference is a bit complicated, it has to do with different types of crystals forming in the cocoa butter at different times, to understand it fully you’d have to learn about the behavior of the chocolate crystals at a molecular level.
For our purposes all that we need to know is that with tempered chocolate the crystals have formed in a uniform way which gives us great looking and tasting chocolate.
What is couverture chocolate?
“Couverture chocolate is a very high quality chocolate that contains extra cocoa butter (32-39%). The higher percentage of cocoa butter, combined with proper tempering, gives the chocolate more sheen, firmer "snap" when broken, and a creamy mellow flavor.
The total "percentage" cited on many brands of chocolate is based on some combination of cocoa butter in relation to cocoa solids (cacao). In order to be properly labeled as "couverture", the percentage of cocoa butter must be between 32% and 39%, and the total percentage of the combined cocoa butter plus cocoa solids must be at least 54%. Sugar makes up the remainder, and up to 1% may be made up of vanilla, and sometimes soy lecithin.
Couverture is used by professionals for dipping, coating, molding and garnishing.
The term "couverture chocolate" should not be confused with "confectionery chocolate", "compound chocolate" or "summer coating": these products have a lower percentage of solids, and they may also contain vegetable oil, hydrogenated fats ("trans fats"), coconut and/or palm oil, and sometimes artificial chocolate flavoring.
Some brands of couverture chocolate are packaged tempered, and others are packaged un-tempered. Subsequent tempering may or may not be required, depending on the usage and the desired characteristics of the final product.” - Wikipedia
Why is it important to use couverture for chocolate making?
It is by far a superior product to the average chocolate bar like Cadbury’s etc. which may also contain ingredients like vegetable/coconut/palm oil, hydrogenated fats and sometimes artificial chocolate flavoring which can have unpredictable results when tempering and used to make your own chocolates.
As far as flavor, couverture chocolate is also superior in this regard as manufacturers like Valrhona, Callebaut etc. are very strict with sourcing their cocoa pods and only buy the best.
Make sure that if you’re using chocolate chips or callets that they are also couverture and specifically meant for chocolate making. For the above reasons as well as that normal chocolate chips have other additives in them that help them maintain their shape in baked goods like cookies. These additives stop the chocolate from tempering properly. If you’re not sure, rather buy your couverture in bars or slabs.
Basically, to get a great end result you need to use the best ingredients that you can get. That applies to all baking and cooking, and especially to chocolate making.
If you can’t get couverture or a higher end chocolate and would simply prefer to get your chocolate at the local market, choose brands like Lindt, Ghiradelli or Green & Blacks. Just remember, don’t get ordinary chocolate chips, they have additives in them that will hinder the tempering process. One thing, Ghiradelli does not liquefy as much as couverture chocolate when in temper, so you’ll have to do a lot of tapping off to get a thin, even coating.
There are other methods of tempering that don’t require a thermometer and can either be melted in a double boiler or in the microwave (we’ve included links at the end for some of these other methods), but we’ve provided you with two methods of tempering that use a thermometer for very accurate tempering.
Tempering Methods:
Method 1: On marble or granite

Marble slab, chocolate or bench scraper, dipping forks and chocolate thermometer
Tempering Ranges:
Celcius
Dark: 45°C-50°C > 27°C > 32°C
Milk: 45°C > 27°C > 30°C
White: 45°C > 27°C > 29°C
Fahrenheit
Dark: 113°F-122°F > 80.6°F > 89.6°F
Milk: 113°F > 80.6°F > 86°F
White: 113°F > 80.6°F > 84.2°F
Chocolate is melted and heated until it reaches 45°C / 113°F. It is then poured onto a marble surface and moved around the surface with a scraper until it has thickened and cools to 27°C / 80.6°F. Once cooled it is then put back into the bowl and over heat to bring it back up to 32°C/30°C/29°C /// 89.6°F/86°F/84.2°F depending on the chocolate you’re tempering. It is now ready for using in molds, dipping and coating.

Tempering using a marble surface
• Finely chop chocolate if in bar/slab form.
• Place chocolate in a heatproof bowl.
• Place bowl over a saucepan of simmering water (make sure the bowl does not touch the water).
Tip: Make sure that your bowl fits snuggly into the saucepan so that there’s no chance of steam forming droplets that
may fall into your chocolate. If water gets into your chocolate it will seize!
• Using a rubber spatula, gently stir the chocolate so that it melts evenly
• Once it’s melted, keep an eye on the thermometer, as soon as it reaches 45°C / 113°F remove from heat (between 45°C-50°C / 113°F-122°F for dark chocolate)
• Pour ¾ of the melted chocolate onto a marble or granite slab or worktop
• Using a scraper or large palette knife move the chocolate around the surface to help it cool
Tip: Keep the motions neat and tidy, if you’re not working with a lot of chocolate you don’t want to spread it too far otherwise you may end up with chocolate that begins to cool too quickly and start to set as well as drops below
• the necessary temperature. Use a motion that folds the chocolate on itself
• Check temperature regularly with a thermometer
• Once it reaches 27°C / 80°F put the chocolate back into the heatproof bowl with the remaining chocolate
• Gently stir together with a rubber spatula
• Check the temperature to see if it’s risen back up to the working temperature of the chocolate (milk, dark or white) as seen in the above chart
• If the temperature has not risen to its working temperature, put the bowl back over the simmering water, stirring gently
• IMPORTANT: You really need to keep an eye on the temperature as it can rise quicker than you think, so as soon as it’s up to its working temperature, remove from heat
• It’s now tempered and ready to use
Tip: If you’re using the chocolate to dip a lot of truffles etc. which means the chocolate will be sitting off heat for a while it will naturally start to thicken as it cools. To keep it at an ideal viscosity for even coating, put the bowl over steam for 30sec-1min every 5-10mins, just do not let the temperature go over the working temperature!
Tip: Having the chocolate in a warmed glass bowl and wrapped in hot kitchen towel can also help keep the chocolate at its working temperature for longer
Tip: It is also easier to keep the heat if you work with larger amounts of chocolate rather than small amounts. Any leftover chocolate can be kept to be used later and then re-tempered
Tip: Remember, don’t let any water get into your chocolate at any stage of the tempering process!
Method 2: With tempered chocolate pieces, also called “seeding”
Tempering Ranges:Celsius
Dark: 45°C-50°C > 27°C > 32°C
Milk: 45°C > 27°C > 30°C
White: 45°C > 27°C > 29°C
Fahrenheit
Dark: 113°F-122°F > 80.6°F > 89.6°F
Milk: 113°F > 80.6°F > 86°F
White: 113°F > 80.6°F > 84.2°F
Chocolate is melted and heated until it reaches 45°C / 113°F. Tempered un-melted chocolate is then stirred and melted in until it brings the temperature down to 27°C/80.6°F. It is then put back over heat and brought up to its working temperature of 32°C/30°C/29°C /// 89.6°F/86°F/84.2°F depending on the chocolate you’re using. It is now ready for using in molds, dipping and coating.

Tempering using the seeding method with couverture callets
• Finely chop chocolate if in bar/slab form (about the size of almonds).
• Place about ⅔ of the chocolate in a heatproof bowl
• Set aside ⅓ of the chocolate pieces
• Place bowl over a saucepan of simmering water (make sure the bowl does not touch the water)
Tip: Make sure that your bowl fits snuggly into the saucepan so that there’s no chance of steam forming droplets that may fall into your chocolate. If water gets into your chocolate it will seize!
• Using a rubber spatula, gently stir the chocolate so that it melts evenly
• Once it’s melted, keep an eye on the thermometer, as soon as it reaches 45°C / 113°F remove from heat (between 45°C-50°C / 113°F-122°F for dark chocolate)
• Add small amounts of the remaining ⅓ un-melted chocolate (seeds) and stir in to melt
• Continue to add small additions of chocolate until you’ve brought the chocolate down to 27°C/80.6°F (You can bring the dark chocolate down to between 80°F and 82°F)
• Put it back on the double boiler and bring the temperature back up until it reaches its working temperature of the chocolate (milk, dark or white) as seen in the above chart. (32°C/89.6°F for dark, 30°C/86°F for milk and 29°C/84.2°F for white)
• If you still have a few un-melted bits of chocolate, put the bowl back over the simmering water, stirring gently and watching the thermometer constantly.
• IMPORTANT: You really need to keep an eye on the temperature so that it doesn’t go over its working temperature
It’s now tempered and ready to use
Tip: Another way of adding the "seed" is by dropping in one large chunk of tempered chocolate (the seed). That way you only need to fish out one piece of unmelted chocoalte and don't need to fish out several small bits of unmelted chocolate once the chocolate has reached temper.
Other Tips
• If you’re using the chocolate to dip a lot of truffles etc. which means the chocolate will be sitting off heat for a while it will naturally start to thicken as it cools. To keep it at an ideal viscosity for even coating, put the bowl over steam for 30sec - 1min every 10 - 15mins, just do not let the temperature go over the working temperature!• Having the chocolate in a warmed glass bowl and wrapped in hot kitchen towel can also help keep the chocolate at its working temperature for longer
• It is also easier to keep the heat if you work with larger amounts of chocolate rather than small amounts. Any leftover chocolate can be kept to be used later and then re-tempered
• Remember, don’t let any water get into your chocolate at any stage of the tempering process!
• Unless you’ve been working with chocolate for a while and have developed a feel for the tempering process and can tell the chocolate’s temperature by touching it to your lower lip like a pro, it’s imperative that you use a thermometer to determine the temperature, as going a few degrees either way can ruin the temper.
• If at any stage you do make a mistake with the tempering process you can simply start again from the beginning.
• While a marble or granite top is ideal for cooling the chocolate in the first method, you can also cool it on a countertop that’s laminated, glass or steel. It will take longer to cool, but it’s possible! (but I definitely wouldn’t recommend a wood or rough textured counter top
)• Any chocolate left over after making your molded or dipped chocolate can be stored away in a cool place and then re-tempered before using again. There’s no need to ever waste good chocolate!
• Wooden spoons can retain moisture so it’s best to use a rubber spatula while tempering
Truffles
Servings: Makes +- 30 truffles, recipe easily doubled or halvedFor the best tasting truffles, a high quality chocolate is ideal, especially one that is 62% cacao or higher
Ingredients
1 ¾ cup (9 oz/250 gm) Dark/Bittersweet Chocolate, finely chopped
2/3 cup (5 oz / 160 ml) Double/Heavy Cream (36% - 48% butterfat)
OR
1 ¾ cup (9 oz/250 gm) Milk Chocolate, finely chopped
1/2 cup (4 oz / 120 ml) Double/Heavy Cream (36% - 48% butterfat)
OR
1 ¾ cup (9 oz/250 gm) White Chocolate, finely chopped
¼ cup (2 oz / 60 ml) Double/Heavy Cream (36% - 48% butterfat)
Flavor Ideas:
Add to taste (Approximately 1 teaspoon – 3 Tablespoons)
The amount of flavorings are dependent on either the recipe you use, the amount of chocolate and cream, and frankly, your own taste. Start by adding a teaspoon, try it, then add more to taste, up to as much as 3 tablespoons.
Various Spices (Chili Powder, Cardamom, Wasabi Paste or Powder, Ginger, Cinnamon etc.)
Instant Coffee Granules or Espresso
Matcha, Chai and Various Teas
Liqueurs (Amaretto, Chambord, Kahlua, Frangelico, Rum, Brandy, Vodka etc.)
Zests (Orange, Lemon, Lime etc.)
Herbs (Basil, Thyme, Mint, etc.)
Malted Milk Powders
Nut Pastes or Butters
Other Tips
• If you are using fresh or whole/solid flavorings such as fresh herbs, cardamom pods, cinnamon sticks, vanilla pods etc... simmer it in the cream then remove from heat and let steep for an hour. After steeping, strain away solids, return the cream to a simmer, and proceed with recipe.
• When using liqueurs or alcohol to flavor, don’t add more than 3Tbsp for the given quantities in the recipe given. Too much alcohol can inhibit the ganache from setting properly.

Making ganache with milk chocolate and cream
Ganache can either be used to make rolled truffles or cut into squares and then dipped in chocolate, which is called a bonbon.
Making the ganache
1. Finely chop or grate the chocolate2. Place in a heatproof bowl
3. In a saucepan, heat cream until just about to boil (it will start bubbling around the edges of the pot)
4. Pour the cream over the chocolate
5. Gently stir the mixture until all the chocolate has melted and it is smooth
Tip: If you end up with pieces of chocolate that won’t melt, put the bowl over simmering water (but not touching the water) and stir gently until it’s all melted
Tip: Be careful if you do need to heat it over simmering water, if the mixture gets too hot it will split and you’ll end up with gooey chocolate swimming in oil, so don’t overheat the ganache, steam from a gentle simmer is all you need.
6. Stir in your desired flavorings
For rolled truffles
1. Allow the ganache to firm up in a container of choice, preferably deep rather than shallow
2. Using a teaspoon or melon baller, scoop up room temperature ganache
3. With gloved hands, roll the balls between your palms to round them off
4. Dip in tempered chocolate or roll in various ingredients like cocoa or chopped nuts as desired
Tip: If dipping in chocolate, it’s best to refrigerate the ganache balls before dipping so that they’re firm and don’t melt from the warm chocolate
Tip: For a thicker chocolate shell, dip once in tempered chocolate and allow to set. Then do a second dipping or smear a small amount of chocolate over the truffle and roll in desired ingredients
5. Place on parchment paper until set
For cut chocolate
1. Double line a shallow tray with cling film
2. Pour the ganache into the tray and smooth the top
3. Once set, warm a knife with hot water then wipe dry
4. Cut into squares
5. Dip each square in tempered chocolate
6. Place on parchment paper
7. Decorate and allow to set
8. Trim off any feet with a sharp knife
Coating Ideas
Rolling them in something that compliments and gives a hint to their flavor makes for a beautiful truffle
1. Melted, Tempered Chocolate
2. Cocoa Powder
3. Confectioner’s Sugar
4. Chopped or Ground Nuts
5. Chocolate Sprinkles
6. Flaked, Shredded or Desiccated Coconut
7. Cacao Nibs
8. Ground Praline
9. Grated Chocolate

Enrobing/dipping cut marzipan squares
How to dip or enrobe with tempered chocolate
1. Temper the chocolate using either the marble top or seeding method2. Once the chocolate is in temper, gently lower your truffle or candy into the tempered chocolate with your dipping fork
3. Gently remove the candy once it’s been fully submerged
Tip: It’s best to use a bowl that’s deep rather than shallow so that the truffle is easily covered
4. Tap fork on the side of the bowl to remove excess chocolate
5. Scrape off excess chocolate from under the dipping fork on the side of the bowl
6. Place dipped truffle/candy on parchment paper, decorate as you wish and allow to set
7. Once the chocolate has hardened, trim off any “feet” with a sharp knife
Tip: Try to handle the chocolate as little as possible or wear food safe gloves to that you don’t leave fingerprints on the chocolate
Tip: To help the chocolate to harden faster, you can place the chocolate into the fridge for 15-20mins, but avoid leaving them in for longer than that so as to avoid any “sweating” (water droplets forming on the chocolate)
How to make filled chocolate with molds
Tempered ChocolateVarious Colored Cocoa Butters (optional)
OR Food Grade Cocoa Butter colored with powdered food coloring
Other Equipment:
A small brush
Chocolate molds
A Ladle
Bench or plastic scraper
OR
A small brush or spoon
Directions:
1. If using colored cocoa butter and plastic molds, paint designs at the bottom of the wells in each mold. Let dry. You can also use lustre dusts mixed with a bit of extract or vodka, instead of colored cocoa butters for a nice sheen. Let painted molds dry.
2. When coating the molds with the tempered chocolate, I like to do it how the chocolate pro’s do it (much faster and a lot less tedious). While holding mold over bowl of tempered chocolate, take a nice ladle of the chocolate and pour over the mold, making sure it cover and fills every well. Knock the mold a few times against a flat surface to get rid of air bubbles, then turn the mold upside down over the bowl of chocolate, and knock out the excess chocolate. Turn right side up and drag a bench or plastic scraper across so all the chocolate in between the wells is scraped off cleanly, leaving you with only chocolate filled wells. Put in the fridge to set, about 5 to 10 minutes. Alternatively, you could take a small brush and paint the tempered chocolate into each mold, or spoon it in if you’d like.
3. Remove from refrigerator and fill each well with the filling of your choice. Again take a ladle of chocolate and pour it on top of the filled chocolate wells, knocking against a flat surface to settle it in. Scrape excess chocolate off the mold with the bench scraper then refrigerate until set.
4. When set, pop your beautiful filled chocolates out of each well and enjoy!
Chocolate Candies
Below are a few recipe ideas for you to use as is or change as you like. We know there are a lot of recipes listed, but we thought we’d give you a lot of ideas!
Hazelnut praline truffles
Milk Chocolate & Hazelnut Praline Truffles
Servings: Makes +- 30 truffles, recipe easily doubled or halvedAdapted from the Cook’s Academy Curriculum, Dublin
Active Time: 1 - 2hrs
Ganache Setting Time: 2 - 4hrs or Overnight
Praline Ingredients:
½ cup (2 oz/60 gm) hazelnuts, shelled & skinned
½ cup (4 oz/115 gm) granulated white sugar
2 tablespoons (30 ml) water

Making the praline and ganache. Once set, making balls of the set ganache then rolling in crushed hazelnuts
Directions:
1. Preheat oven to moderate 180°C / 160°C Fan Assisted (convection oven); 350°F / 320°F convection / Gas Mark 4
2. Place whole hazelnut on a non-stick baking tray and dry roast for 10mins
3. Allow to cool
4. Place hazelnuts in a clean dry kitchen towel and rub to remove the skins
5. Line a baking tray with parchment paper or a silicon mat
6. Place the skinned hazelnuts onto the prepared tray
7. Combine the sugar and water in a saucepan over medium low heat, stirring until the sugar is dissolved
8. Turn the heat up and bring to the boil (do not stir), brushing down the sides of the pot with a pastry brush dipped in water to remove any sugar crystals
9. Boil until the mixture turns amber (160°C - 170°C / 320°F- 340°F on a candy thermometer)
10. Remove from heat immediately and pour the syrup over the hazelnuts
11. Allow to cool completely
12. Break into small pieces
13. Transfer pieces to a food processor and process until desired texture, either fine or rough
14. Set aside
Ganache Ingredients
1¾ cup (9 oz. / 255 g) Milk chocolate, finely chopped
½ cup (4 oz. / 125 ml) Double/Heavy Cream (36% - 46% butterfat content)
2-3 Tablespoons (1-1 ½ oz. / 30ml – 45 ml) Frangelico Liqueur, optional
½ - 1 cup Crushed or Ground Roasted Hazelnuts for coating
Directions:
1. Finely chop the milk chocolate
2. Place into a heatproof medium sized bowl
3. Heat cream in a saucepan until just about to boil
4. Pour the cream over the chocolate and stir gently until smooth and melted
5. Allow to cool slightly, about 10 minutes
6. Stir in the praline and (optional) liqueur
7. Leave to cool and set overnight or for a few hours in the fridge
8. Bring to room temperature to use
Forming the truffles:
1. Using teaspoons or a melon baller, scoop round balls of ganache
2. Roll them between the palms of your hands to round them off
Tip: Handle them as little as possible to avoid melting
Tip: I suggest wearing food safe latex gloves, less messy and slightly less heat from your hands
3. Finish off by rolling the truffle in the crushed roasted hazelnuts
Tip: You can also roll them in hazelnut praline
4. Place on parchment paper and leave to set
Tip: They look great when put into small petit four cases and boxed up as a gift!
Passion Fruit Caramel Chocolates aka Bonbons
Servings: 16 large (1.5” – 2” molds) or 20 to 25 medium bonbons
Painted passion fruit caramel filled bonbons
Ingredients, sans passion fruit, From CandyBarLab.com, with my revisions
Ingredients
Dark or milk chocolate melted, preferably tempered, about 1 lb / 450g
1 cup (225g / 8oz) Granulated White Sugar
1/2 cup (125ml / 4 fluid oz) Light Corn Syrup
1/2 cup (125ml / 4 fluid oz) Water
4 Tbsp (60g / 2 oz) Unsalted Butter
2 Tbsp (30ml / 1 fluid oz) Heavy Cream
1/4 cup (60ml / 2 fluid oz) Passion Fruit Puree
1/2 Tbsp salt
Equipment
2 or 3 quart, heavy-bottomed pot
Candy thermometer
Whisk

Painting the moulds with coloured cocoa butter. Pouring in the chocolate, filling with caramel and finishing off with chocolate
Directions:
1. Place the sugar, corn syrup and water in a medium saucepan.
2. Set over medium-high heat and stir to combine.
3. Bring the mixture to a boil and cook until dark amber in color 310°F-315°F / 155°C-158°C, about 5 minutes.
4. Use a pastry brush, dipped in water, to wash down sides of pan to prevent crystallization as the mixture boils.
5. Remove saucepan from the heat and gradually whisk in the passion fruit puree, heavy cream and butter.
6. Transfer to a medium bowl and let cool.
7. Transfer cooled caramel to a pastry bag fitted with a medium plain tip or a squeeze bottle.
8. Coat the molds with chocolate using the method mentioned above.
9. Fill chocolate coated molds with caramel. You can use a spoon too but it’s less messy and goes a lot quicker with either of the two aforementioned methods.
10. Finish off with a layer of chocolate as mentioned in the method above for making filled chocolates with molds
11. Once fully set, carefully knock the chocolates out of the mold
White Chocolate Dipped Candied Orange & Pistachio Marzipan Bonbons
Servings: Makes about 40 chocolates, recipe easily halved or quarteredMarzipan Prep Time: 1 - 1½ hrs
Tempering & Dipping Time: 1 - 2 hrs
Setting Time: 20-40mins

Citrus & pistachio marzipan white chocolate cut bonbons
Ingredients
1½ cups (17½ oz/500gm) Marzipan
1/2 cup (2 oz/60gm) Pistachios, shelled & peeled, whole or roughly chopped
1/2 cup (3 oz/90gm) Candied Orange Peel, Finely cut
2 tablespoons (1 oz / 30ml) Cointreau or Grand Marnier Liqueur, optional
1¾ cups (9 oz/250 gm) white chocolate

Cointreau soaked candied orange peels and pistachios kneaded into the marzipan. Rolling out and cutting into squares. Marzipan squares dipped in tempered white chocolate
Directions:
1. (If using liqueur) Pour the Cointreau or Grand Marnier over the candied orange peel, place into a covered dish and allow to soak overnight
2. Knead the soaked peel & pistachios into the marzipan until well distributed
3. Using a small amount of icing sugar to stop the marzipan from sticking, roll out to a height of about 2cm
4. Cut into squares
5. Temper the white chocolate
6. Carefully lower each square of marzipan into the chocolate with a dipping fork
7. Tap the fork on the side of the bowl to remove excess chocolate
8. Place chocolate on parchment paper
9. Decorate as you like
Tip: You can use transfers or sprinkle crushed pistachio or candied peel. You can also wait for the chocolate to be semi set then use your dipping fork to mark the top of the chocolate
10. Once fully set, cut off any feet with a sharp knife
11. Enjoy!
12. Tip: Your dipped bonbons won't have a glossy shine on them as the shine comes from using chocolate moulds, but so long as your dipped chocolates have a lovely snap to them and have a smooth feel on the tongue, that's the sign of tempered chocolate
Chocolate Bark (Base Recipe)
Chocolate bark is really fun & easy to make (kids love making this stuff!). You can also decorate it with almost anything you like, nuts, dried fruits, seeds, crushed candies, honeycomb etc. The whole idea of chocolate bark is that it’s rough in texture and look, just like bark. You can cut it in neat squares, or my favorite, break it up in rough pieces. It’s also great to use up left over tempered chocolate, either plain or if you’ve mixed in crushed nuts to use for coating truffles. It won't have a glossy shine to it as the gloss on chocolate comes from using chocolate moulds, but so long as your bark has a good snap to it and is smooth on the tongue, that's the sign of tempered chocolate.
Roasted pecan nut, dried cranberry & gold leaf milk chocolate bark
Ingredients
Milk/Dark/White Chocolate, tempered (any amount, from 7 oz. (200g) to 14 oz. (400g)
Various nuts, seeds, candies, dried fruits or anything you like in any quantity you like

Spreading out the chocolate and sprinkling on the various additions
Directions:
1. Line a baking tray with parchment paper
2. Temper your chocolate using your preferred method
3. Once tempered, spread the chocolate over the parchment paper
4. Sprinkle your ingredients over the chocolate
5. Leave to set
Tip: To help speed up the setting, you can put it in the fridge for about 15-30min. Don’t leave it in the fridge to avoid the chocolate from sweating (water droplets will form on the chocolate)
6. Either break or cut into pieces
7. Store at room temperature in an airtight container
The combinations I made were:
1) White chocolate bark with cashews, banana chips & crystallised ginger
2) Milk chocolate bark with dried apricots, roasted hazelnuts & crushed coffee beans
3) Milk chocolate bark with roasted pecan nuts, dried cranberries & gold leaf

Non-Chocolate Candies
Don’t Have a Basic Candy Thermometer? Try the Cold Water TestChart Copied from wikibooks
Keep a cup of cold, NOT ice water, next to the pot your cooking the candy in. With a spoon, or if you have asbestos hands like Lisa, remove some of the hot candy syrup and drop into the water. You will probably have to do this several times throughout the cooking process until you’ve reached the stage you’re looking for.
Soft Ball
235°F-240°F / 113°C-115°C
Sugar Concentration at approximately 85%
At this point the syrup dropped in to cold water can be formed in to a soft and flexible ball. At this point the candy cannot easily support itself and will begin to run if left out.
This stage is proper for making items such as Fudge.
Firm Ball
245°F-250°F / 118°C-121°C
Sugar Concentration at approximately 87%
A little syrup at this temperature dropped in to a cold water bath will create a firm chewy ball that can support its own weight and will remain chewy.
This stage is appropriate for making candies such as Caramel, but please note this in not the same thing as Caramelizing.
Hard Ball
250°F-255°F / 121°C-124°C
Sugar Concentration at approximately 92%
At this stage the syrup solution will form thick ropy threads when quenched in cooled water. If a large enough quantity is cooled it will form a hard ball with little moisture.
This temperature is best suited for recipes such as Rock Candy
Soft Crack
270°F-290°F / 132°C-143°C
Sugar Concentration at approximately 95%
When the solution reaches this stage the bubbles will become obviously smaller and more concentrated. The candy at this stage has a low moisture point and will create small flexible threads when dropped in the cold water.
This stage is optimal for recipes such as Taffy
Hard Crack
300°F-310°F / 149°C-155°C
Sugar Concentration at approximately 99%
At this point the moisture levels are nearly non-existent, it is also the highest recipe that will be used in a standard candy recipe, after this point you enter the region of caramelizing. A small amount of syrup, when dropped in to cold water, will become brittle threads and easily break when bent or dropped.
This final stage is used for creating Toffee and Hard Candy
Sponge Candy (also called Honeycomb or Sea Foam candy)
Adapted from Christine Cushing’s Sponge Toffee RecipeFull photo tutorial Here

Pieces of the sponge candy / honeycomb dipped into tempered dark chocolate and the end result
Ingredients
2½ cups (20oz/560gm) Granulated White Sugar
2/3 cup (160 ml) Light corn syrup
6 tablespoons (90 ml) Water
1 tablespoon (0.5 oz/ 15g) Baking Soda
2 teaspoons (10 ml) Vanilla extract
Vegetable oil for greasing pan
Directions:
1. Liberally grease a 10-inch round spring form cake pan with vegetable oil. Trace the bottom of the pan on a piece of parchment paper. Line the bottom of the pan with the parchment paper circle. Line the sides of the pan with a parchment paper so that the parchment paper creates a collar that sits 1 to 2-inches above the pan. Liberally grease the parchment paper.
2. In a deep medium saucepan add sugar, corn syrup, water, and vanilla. Over medium-high heat bring the mixture to a boil (without stirring) and cook until hard crack stage, i.e. until temperature reads 285°F / 140°C on a candy thermometer (if using light corn syrup, it will be light amber, if using dark corn syrup it will be the color of maple syrup). This should take about 10 minutes. If sugar crystals form on the sides of the pan during the cooking process, brush the sides of the pan with a clean pastry brush dipped in water.
3. Remove from heat. Working quickly, add the baking soda and quickly blend to incorporate the soda into the sugar mixture, about 5 seconds. The mixture will bubble up when you add the baking soda. Be very careful not to touch the hot mixture.
4. Immediately pour the hot toffee into the prepared pan. Let set completely before touching. Cut into pieces. It makes a huge mess. But the messy little crumbs can be saved to top ice cream. Leave candy as is and enjoy, or dip pieces in tempered chocolate and let set.
Recipe for Sponge Candy / Honeycomb with less baking soda
Alternative and slightly easier Sponge Candy recipe
Paté de Fruit
You may use any of the various methods and flavors you like for your Paté de FruitServings: Makes 20-40 squares depending on size cut, recipe easily doubled or halved

Set Paté de Fruit cubes rolled in sugar
When most of us see photos of or encounter Paté de Fruits (pronounced pat de fwee, which translates to fruit pastes), we think of the sugared, overly sweet orange slices and artificially flavored jelly candies we grew up on. Paté de Fruits couldn't be further from that.
They are bite-sized pieces of real fruit puree jellies (sometimes with the addition of jam and/or dried fruit) rolled in sugar. When you bite into one, it tastes like what I called ‘jellied jam’. The texture is jam like, and the taste, so intensely fruity. Technically, you’re making a jam with your puree, but cooking it close to or at the soft ball stage to solidify it.
Some recipes call for liquid pectin to set the jellies, some call for powdered pectin, some call for apple or yellow pectin, and some call for powdered or leaf gelatin. There are even some that require none of the above, as the natural pectin in some fruits, plus sugar, are all that's needed to set the jellies when cooked to temperature, but this must be done without caramelizing or scorching the paste. There are also recipes that call for tartaric acid and glucose, but it’s entirely up to you and the ingredients you have easy access to.
Try combining different fruit purees, add jam (Jacques Pepin’s recipes, linked below, use jam and puree, along with pureed dried fruits), juice, dried fruits, liqueurs, extracts, citric acid for a sour bite, etc to the puree(s). Cut into shapes other than squares (aspic and miniature cookie cutters are great for this), or pour into molds. Let your creativity soar! You'll love these sugary crisp, sweet and/or tart bites of bright, fruit jam/jellies!
We've supplied you with two recipes for Paté de Fruits, one base recipe for citrus Paté de Fruits, since you can plug in any citrus juice and zest. We don’t have a base recipe for fruits that are pureed, since the amount of pectin or setting agents vary with each fruit due to how much natural pectin that fruit already contains. However, we’ve supplied you with one simple Strawberry Paté de Fruit recipe, and added links to various flavors of pate de fruits to help you on your way. You can use any recipe you'd like, the setting method and ingredients, your choice. There’re lots and lots to choose from all over the web. You can also find Paté de Fruit recipes using the search term ‘fruit jellies“. You’ll know if it’s an actual Paté de Fruit recipe by the ingredients and method.
Note
Some recipes you encounter call for temperatures on the candy thermometer you may not be able to reach, no matter how long you cook it (Some fruits seem to resist going higher than 205°F - 210°F / 95°C - 100°C without burning). As long as your paste looks to be thickening and gelling it should be ok, so take it off the heat pour it into the parchment lined pan, and it should set fine.
Warning (also, see note by Elizabeth LaBau following her recipe) - You could be stirring and cooking for a while (30 minutes to sometimes an hour) with some fruits.
Strawberry Paté de Fruits
Recipe by Elizabeth LaBau, About.com GuideMakes about 40-64 squares depending on size cut, recipe easily doubled or halved
Ingredients:
3 cups (16 oz/450 gm) Strawberries, fresh or defrosted from frozen
1 tablespoon (15 ml) Lemon juice, fresh
2 cups (16 oz/ 450 gm) Granulated White Sugar
2½ tablespoons (38 ml) Liquid Pectin

Making the strawberry purée then combining with the other ingredients and cooking until ready to pour into the pan
Directions:
1. Prepare an 8”x8” (20cmx20xm) pan by lining it with aluminium foil or parchment paper and spraying it with non-stick cooking spray.
2. Place the strawberries in a blender or food processor and process until very well pureed.
3. Pour them through a mesh strainer into a medium saucepan, discarding any remaining fruit chunks. Stir in the lemon juice and 1/2 cup of the sugar, place the pan over medium-high heat, and insert a candy thermometer.
4. Cook the mixture, stirring constantly, until it is hot, around 140°F/60°C. Add the remaining 1.5 cups of sugar and the liquid pectin, and lower the heat to medium.
5. Continue to cook, stirring frequently, until the mixture registers 200°F/93°C. At this point, turn the heat to low and hold it at 200°F/93°C for 2-3 minutes. After this, return the heat to medium and bring it up to 225°F/107°C. This process will take some time, especially with the heat on medium, so have patience and be diligent in stirring frequently so the bottom doesn't scorch.
6. Once the fruit paste reaches 225°F/107°C, turn the heat to low and keep it at that temperature for an additional 2-minutes.
7. Remove the pan from the heat and scrape (Note from Lisa: I poured it in, it should still be quite liquid) the strawberry pate de fruit mixture into the prepared pan, smoothing it into an even layer.
8. Allow the pate de fruit mixture to set at room temperature for several hours, until completely cool and firm. Use a sharp knife to cut it into very small squares, and roll the individual pieces in granulated sugar.
9. The strawberry pate de fruits can be served immediately, or refrigerated in an airtight container for up to a week. If refrigerated, the pieces may need to be re-rolled in granulated sugar before serving.
Note:
"Some paté de fruits take quite a long time to cook. If you think about what's happening, you're cooking all of the liquid out of the fruit puree and reducing it to a very thick paste. The exact amount of time depends on a lot of factors, like how much water was in your puree to begin with, the capabilities of your stove, and the quality of the pan you use. But you can expect the process to take at least 30 minutes and sometimes up to an hour. I do want to add that this is easier on a gas range, but can absolutely be done on an electric stove - in fact, I use a very old electric stove at home and it works fine." - Elizabeth LaBau
Citrus Paté de Fruits (Base Recipe)
Recipe created by Jen King and Liz GutmanOprah.com | From the October 2010 issue of O, The Oprah Magazine
Active time: 30 minutes
Total time: 30 minutes plus overnight
Ingredients:
½ cup (120 ml) Citrus Juice (orange, lemon, lime, grapefruit, etc.)
1½ cups (360 ml) Applesauce, plain (no sugar added)
2 teaspoons (10ml/10 g) powdered pectin
2½ cups (600 ml/20oz/560gm) Granulated White Sugar
Zest – use 2 small (lemon or limes), or 1 medium to large citrus (like oranges or tangerines)
Gel or paste food colouring, yellow green or orange depending on the citrus you're using, optional
Directions:
1. Lightly oil (or line with parchment paper) an 8”x8” (20cmx20xm) square pan; set aside.
2. Combine citrus juice and applesauce in a medium, deep saucepan. In a small bowl, whisk together the pectin and 1/2 cup sugar, and blend into the lime mixture. Clip a candy thermometer onto the side of the saucepan and bring mixture to a boil. Add remaining sugar and boil, stirring, until mixture reaches 225°F / 107°C (you may need to stir constantly toward the end to prevent burning). Remove from heat and stir in lime zest and colouring (optional).
3. Pour into prepared pan. When slightly cool, sprinkle sugar on top, and allow to set, about 2 hours. Cut into 1-inch (25 mm) squares, or use a lightly oiled cutter to make other shapes. Dredge in sugar and dry on a cooling rack overnight. Scraps can be re-melted and reset.
4. Store in a box or paper bag at room temperature for up to two weeks
Peanut Butter Fudge
Prep Time: 15 minsTotal Time: 20 mins
Yield: 64 squares
Ingredients:
1/2 cup (115g / 4oz.) Unsalted Butter
2 1/4 cups (450g / 16oz.) firmly packed Brown Sugar
1/2 cup (120ml) Milk
3/4 cup (200g / 7oz.) smooth Peanut Butter
1 teaspoon (5ml) Vanilla Extract
3 1/2 cups (425g / 15oz.) Confectioners' (Icing) Sugar
Directions:
1. Place butter into a medium saucepan and melt it over medium heat.
2. Add brown sugar and milk, stirring.
3. Boil for 2 minutes, stirring frequently.
4. Remove from heat.
5. Mix in peanut butter and vanilla.
6. Place confectioners' sugar into a large mixing bowl.
7. Pour hot peanut butter mixture over confectioners’ sugar and beat until smooth.
8. Pour fudge into an 8 by 8 inch (20cm by 20cm) pan.
9. Chill until firm, about 1 hour.
10. Cut into 1-inch (25 mm) squares.
Storage & Freezing Instructions/Tips:
Candies can be kept refrigerated for up to 3 weeks. Take filled chocolates out of the fridge about 15 – 30 minutes before serving so they can come to room temperature. Candies can also be kept out at room temp if stored in an airtight container for approximately 3 weeks. You can freeze candies for 3 months up to a year if packaged tightly and not stored in the door or at the front of the freezer where they could get freezer burnt.Paté de Fruits can be kept refrigerated or kept out at room temperature if stored in an airtight container for approximately 3 weeks. Freezing Paté de Fruits depends on which fruit you use. Some fruits will sweat and separate in a freezing environment.
Additional Information:
More Paté de Fruit recipes:http://www.foodandwine.com/recipes/apricot-pate-de-fruit
http://www.foodandwine.com/recipes/raspberry-pate-de-fruit
http://oggi-icandothat.blogspot.com/2007/11/p-de-fruits-and-fruit-leathe...
http://candy.about.com/od/fruitcandy/r/mangopates.htm
Paté de Fruit information:
http://pastrychefonline.com/blog/2009/01/20/pastry-gems-pate-de-fruits/
http://forums.egullet.org/index.php?/topic/100545-pate-de-fruit-fruit-pa...
http://butterbadge.wordpress.com/category/candy/pate-de-fruit-candy/
Couverture Chocolate Supplies Online: UK
http://chocolatefalls-scotland.co.uk/choccart/index.php?main_page=index&...
http://www.squires-shop.com/ibf/index.php?p=product&id=530&parent=59
http://www.cakescookiesandcraftsshop.co.uk/acatalog/Chocolate-Making.htm...
https://www.vantagehouse.com/chocolate-ingredients
Couverture Chocolate Supplies Online: US
http://chocoley.com/
http://www.chocosphere.com/
http://www.worldwidechocolate.com/
Equipment & Moulds Online: UK
http://www.squires-shop.com/ibf/index.php?p=catalog&parent=76&pg=1
http://www.squires-shop.com/ibf/index.php?p=catalog&parent=74&pg=1
Equipment & Molds Online: US
Everything and anything you need chocolate related:
http://chocoley.com/
More places to purchase:
Thermometers
http://www.amazon.com/CK-Products-81-178-Ateco-Dipping/dp/B0000E2OF1
http://www.amazon.com/s/ref=nb_sb_noss?url=search-alias%3Dgarden&field-k...
Molds
http://www.amazon.com/s/ref=nb_sb_noss?url=search-alias%253Dgarden&field...
Colored Cocoa Butters
http://www.thebakerskitchen.net/colored-cocoa-butter.aspx
Ghirardelli Video on Tempering Chocolate
http://www.ghirardelli.com/bake/videos/temper.aspx
More on tempering
http://chocolatetempering.net/abouttempering.htm
Good Seeding Temper Video
http://video.about.com/candy/How-to-Temper-Chocolate.htm
66 Recipes using chocolate, from Valrhona
http://espace-pro.valrhona.com/recettes/liste
Great photo demo for filled Chocolates..Start at #13
http://forums.egullet.org/index.php?/topic/77246-demo-transfer-sheets-on...
Great Filling Chocolate Mould Video
http://www.youtube.com/watch?v=xR8NGifirNA
Photos of painted, filled chocolates
http://www.tomric.com/teamcenter/plugins/sitecontent/media/3pralines.jpg
http://www.exportvirginia.org/assets/uploads/calendar_winners/2011/choco...
Disclaimer:
The Daring Kitchen and its members in no way suggest we are medical professionals and therefore are NOT responsible for any error in reporting of “alternate baking/cooking” ingredients. If you have issues with digesting gluten, then it is YOUR responsibility to research the ingredient before using it. If you have allergies, it is YOUR responsibility to make sure any ingredient in a recipe will not adversely affect you. If you are lactose intolerant, it is YOUR responsibility to make sure any ingredient in a recipe will not adversely affect you. If you are vegetarian or vegan, it is YOUR responsibility to make sure any ingredient in a recipe will not adversely affect you. The responsibility is YOURS regardless of what health issue you’re dealing with. Please consult your physician with any questions before using an ingredient you are not familiar with. Thank you!
__________________ I saw a subliminal advertising executive the other day, but only for a second... .
What The Fruitcake?!
,,,,,,,,,,,,,,,,,,,,,,,,,,,,,,,,,,,,,,,,,,,,,,,,,,,,,,,,,,,,,,,,,,,,,,,,,,,,,,,,,,,,,,,,,,,,,,,,,,,,,,,,,,,,,,,,,,,,,,,,,,,,,,,,,,,,,,,,,,,,,,,,,,,,,,,,,,,,,,,,,,,,,,
THE DARING BAKERS' JUNE 2011 CHALLENGE: FROM PHYLLO TO BAKLAVA
Hello Daring Bakers! I am Erica, from Erica’s Edibles. First off I must say how honored I was to be asked to step into host the June Challenge! It was kind of short notice so I hope things go smoothly. I have been a Daring Baker since March 2009 and have loved every minute of it. I must tell you I am quite nervous to be hosting and I pray that all goes well.
This month we will be making Baklava, a sweet rich pastry made with layers of phyllo dough and nuts sweetened with simple syrup. Baklava is widely knows as a Greek dessert, but it’s origin has really never been pinpointed as many Middle Eastern countries also name it as their own.
I have been fascinated with Baklava for a very long time and knew if I ever got the chance to host a challenge it was definitely going to be the recipe. I had my first baklava at a local Greek restaurant called The Original Greek; they have, in my opinion, the best baklava.
If you’re thinking baklava is easy, just layering phyllo, you’re right, but not so fast. We will be making our own homemade phyllo; we are, after all, the Daring Bakers. Phyllo, which means, "leaf" in Greek, is tissue paper-thin like sheets of dough. Homemade phyllo is a lot of work to roll out but is worth it, its delicious! Baklava is quite simple to make but is a little time consuming. Give yourself at least half a day for the prep, rolling and layering and it does need to sit overnight.
I am really looking forward to see that everyone comes up with.
Recipe Source:
· Phyllo Dough Recipe - Kaffeehaus – Exquisite Desserts from the Classic Cafés of Vienna, Budapest and Prague” by Rick Rodgers; Baklava - Adapted from Alton Brown, Food Network
Blog-checking lines: Erica of Erica’s Edibles was our host for the Daring Baker’s June challenge. Erica challenged us to be truly DARING by making homemade phyllo dough and then to use that homemade dough to make Baklava.
Posting Date: June 27, 2011
Download printable file HERE
Note: As much as I wanted to have baklava as the challenge I was a little worried about our Alterative Bakers. I am happy to say I did some searching and this seems to be a very versatile recipe that can work for just about anyone!· For those who are worried about nuts, I looked and there are a ton of recipes for nut free baklava, choose a filling that works for you
· Gluten-free Bakers, I have also seen recipes for gluten free phyllo
· Vegan Bakers, I have seen many recipes out there for you as well
· **See in Additional information for suggestions**
Mandatory Items: This month you must make your own phyllo dough and turn it into a Baklava.
Variations allowed: This is where you can get to be creative,
· I have looked and there are many recipes for gluten free dough, nut free and vegan bakers
· If you don’t like the spices used in the recipe pick ones you enjoy
· If you prefer different nuts use them!
· If you prefer not to use butter for layering oil will work
· You don’t have to make the traditional cake form of baklava, I have included links for rolls and cups, or if you have another idea try it!
· If you have a phyllo dough that works for you and prefer it to this one, use your recipe, as long as it is from scratch.
Preparation time: The recipe may seem simple but it is a little time consuming
Phyllo Dough Mixing/Kneading: 15-25 minutes
Resting time: 30-90 minutes (longer is better)
Rolling Phyllo: varies, approx. 2 minutes per sheet
Syrup: 15 minutes plus cooling
Baklava: 30 minutes
Resting: Overnight
Equipment required:
Measuring spoons
Wooden dowel or rolling pin
Sharp knife
Measuring cups
Towels
Spatula
Stand mixer (can knead by hand)
Baking dishes – 9” x 9” is recommended
Strainer
Plastic wrap
Medium pot
Pastry brush
Food processor /blender
Bowls
Phyllo Dough:
*Note 1: To have enough to fill my 9” x 9” baking dish with 18 layers of phyllo I doubled this recipe.*Note 2: Single recipe will fill a 8” x 5” baking dish.
*Note 3: Dough can be made a head of time and froze. Just remove from freezer and allow to thaw
and continue making your baklava
Ingredients:
1 1/3 cups (320 ml) (185 gm/6½ oz) unbleached all purpose (plain) flour
1/8 teaspoon (2/3 ml) (¾ gm) salt
1/2 cup less 1 tablespoon (105 ml) water, plus more if needed
2 tablespoons (30 ml) vegetable oil, plus additional for coating the dough
1/2 teaspoon (2½ ml) cider vinegar, (could substitute white wine vinegar or red wine vinegar, but could affect the taste)
Directions:
1. In the bowl of your stand mixer combine flour and salt
3. Combine water, oil and vinegar in a small bowl.

Too dry:


7. Shape the dough into a ball and lightly cover with oil

Rolling your Phyllo
** Remove all rings and jewelry so it does not snag the dough**
Use whatever means you have to get the dough as thin as you can. I have included a fantastic video at the end of the post on how to roll out your phyllo dough, using a wooden dowel, which worked perfectly for me. You may also use a pasta machine if you have one, or a normal rolling pin whatever works for you.
1. Unwrap your dough and cut off a chunk slightly larger then a golf ball. While you are rolling be sure to keep the other dough covered so it doesn’t dry out.

3. Roll out the dough a bit to flatten it out.


Baklava Recipe
Adapted from Alton Brown, The Food Network
30 servings
Ingredients
For the syrup:
· 1 1/4 cups (300 ml) honey
· 1 1/4 cups (300ml) water
· 1 1/4 cups (300 ml) (280 gm/10 oz) sugar
· 1 cinnamon stick
· 1 (2-inch/50 mm) piece fresh citrus peel (lemon or orange work best)
· a few cloves or a pinch or ground clove
When you put your baklava in the oven start making your syrup. When you combine the two, one of them needs to be hot, I find it better when the baklava is hot and the syrup has cooled
Directions
1. Combine all ingredients in a medium pot over medium high heat. Stir occasionally until sugar has dissolved


Ingredients for the Filling:
1 (5-inch/125 mm piece) cinnamon stick, broken into 2 to 3 pieces or 2 teaspoons (10 ml) (8 gm) ground cinnamon15 to 20 whole allspice berries ( I just used a few pinches)
3/4 cup (180 ml) (170 gm/6 oz) blanched almonds
3/4 cup (180 ml) (155 gm/5½ oz) raw or roasted walnuts
3/4 cup (180 ml) (140 gm/5 oz) raw or roasted pistachios
2/3 cup (160 ml) (150 gm/ 5 1/3 oz) sugar
phyllo dough (see recipe above)
1 cup (2 sticks) (240 ml) (225g/8 oz) melted butter ** I did not need this much, less then half**
Directions:
1. Preheat oven to moderate 350°F/180°C/gas mark 4.
2. Combine nuts, sugar and spices in a food processor and pulse on high until finely chopped. If you do not have a food processor chop with a sharp knife as fine as you can. Set aside


6. Sprinkle 1/3 of the nut mixture on top

8. Sprinkle 1/3 of the nut mixture on top
9. Continue layering phyllo and buttering repeating 4 times
10. Sprinkle 1/3 of the nut mixture on top
11. Continue layering and buttering phyllo 5 more times. On the top layer, make sure you have a piece of phyllo with no holes if possible, just looks better.
12. Once you have applied the top layer tuck in all the edges to give a nice appearance.


17. Serve at room temperature

Additional Information: I have included some videos and links to help you through the process
How to roll the phyllo dough -
http://www.youtube.com/watch?v=vvNzAi9w6TU&feature=related
Excellent 3 part video showing the whole process -
http://www.youtube.com/watch?v=MLV7W-KUME8&feature=related
http://www.youtube.com/watch?v=z8pzyKgxuF4&feature=related
http://www.youtube.com/watch?v=aJgotI69pXY&feature=related
Making Hollow Baklava Rolls- http://www.youtube.com/watch?v=6FvM8cWzjKI
Making Baklava Rolls - http://www.youtube.com/watch?v=H51egHWv0sQ
Nut Free Baklava –
http://hubpages.com/hub/nut-free-baklava-recipe
http://tzk-design.com/recipe/nut-free-baklava
Gluten Free Baklava
http://glutenfreepastry.org/gluten-free-baklava-recipe-demonstration/
http://gluten-free.mobi/gluten-free-baklava.php
Vegan Baklava
http://www.veganchef.com/baklava.htm
http://www.care2.com/greenliving/nutty-vegan-baklava.html#
Disclaimer:
The Daring Kitchen and its members in no way suggest we are medical professionals and therefore are NOT responsible for any error in reporting of “alternate baking/cooking”. If you have issues with digesting gluten, then it is YOUR responsibility to research the ingredient before using it. If you have allergies, it is YOUR responsibility to make sure any ingredient in a recipe will not adversely affect you. If you are lactose intolerant, it is YOUR responsibility to make sure any ingredient in a recipe will not adversely affect you. If you are vegetarian or vegan, it is YOUR responsibility to make sure any ingredient in a recipe will not adversely affect you. The responsibility is YOURS regardless of what health issue you’re dealing with. Please consult your physician with any questions before using an ingredient you are not familiar with. Thank you!
__________________ http://ericasedibles.wordpress.com
,,,,,,,,,,,,,,,,,,,,,,,,,,,,,,,,,,,,,,,,,,,,,,,,,,,,,,,,,,,,,,,,,,,,,,,,,,,,,,,,,,,,,,,,,,,,,,,,,,,,,,,,,,,,,,,,,,,,,,,,,,,,,,,,,,,,,,,,,,,,,,,,,,,,,,,,,,,,,,,,,,
THE DARING BAKERS’ APRIL 2011 CHALLENGE: MAPLE MOUSSE SERVED IN AN EDIBLE CONTAINER
In my native province of Quebec (Canada) many families, friends and co-workers organize group outings to our quintessential spring event: the sugar shack pilgrimage. Yes it is almost sacrilegious if one who lives in Quebec does not make their way at least once during March or April to a traditional “Cabane à Sucre”. This huge feast of eggs, ham, pea soup, pork rinds, beans, pancakes, bacon and pies – all drizzled in maple syrup – is enjoyed in the middle of the woods outside the big cities in a large dining hall. Once the meal is over everyone heads back outside to enjoy maple taffy served on a clean bed of snow.So I, Evelyne of the Cheap Ethnic Eatz blog, wanted to share a bit of my maple syrupy home with you for this months’ Daring Bakers’ challenge. Now the dish I am offering up for preparation is not at all a traditional recipe but rather my own creative inspiration which includes some of the “Cabane à Sucre” elements. Since Lisa and Ivonne challenged me to include an edible container I decided to make a Maple Mousse served in a baked Bacon Cup. No worries bacon fearers, we have alternatives for you.
This challenge will really please those with both a sweet and salty tooth as the combination of bacon and maple syrup is flabbergastingly good. I played around with 3 different bacon cup sizes and each one was different when it came to the sweet/salty balance ratio. I have a strong sweet tooth and surprisingly my winner was the largest bacon cup because it held more mousse. Feel free to experiment with your presentation as well: add a meringue, add melted chocolate, nuts, etc, and drizzle more maple syrup on top of your creations. Have fun and I can’t wait to see what you will all come up with.

Bacon cups where inspired by not martha and 59kilos
Nut Crust were taught to me by a friend, no source, but posted at Cheap Ethnic Eatz
Maple mousse is adapted from Jaime Oliver is not my boyfriend
Vegan maple mousse was inspired by this recipe at Suite 101
Meringue, finally, was adapted from Woman and Home
Blog-checking lines: The April 2011 Daring Bakers’ challenge was hosted by Evelyne of the blog Cheap Ethnic Eatz. Evelyne chose to challenge everyone to make a maple mousse in an edible container. Prizes are being awarded to the most creative edible container and filling, so vote on your favorite from April 27th to May 27th at http://thedaringkitchen.com!
Posting Date: April 27, 2011
Download the printable .pdf file HERE
Notes:• Putting aluminum foil on the muffin pan heat-proof bowls is essential or they will be stuck to the form. Be gentle when removing the aluminum foil from bacon cups.
• Bacon shrinks a lot so make sure weave is tight on the form. Tuck the ends of the bacon strips inside otherwise they will curl while cooking. A good idea is to insert 4 toothpicks where the crisscrossed bacon meets in the weave.
• For the nut bowls, use about 1 cup of whole nuts to get 3/4 cups of crushed.
• In the maple mousse recipe, after the gelatine has bloomed (softened) in the cold whipping cream, the gelatine MUST be heated to melt completely…contrary to popular belief. Follow the directions as described and never let gelatine boil or it will become stringy and unusable.
• If you make the meringues let them cool in the oven once they are baked… just don’t forget to turn off the oven when they are done. This cooling process will help then dry out nicely and be crispier.
• the taste of maple syrup cannot be substituted but yes there are substitutes for the recipes if really obliged. At least you can do the challenge with it. For 1 cup (240 ml) Maple Syrup try:
- 3/4 cup (180 ml) corn syrup plus 1/4 cup (57 grams) butter plus 1/2 teaspoon maple extract (optional)
- 1 cup (240 ml) Honey but totally different taste
- 1/2 cup granulated sugar, 1 cup brown sugar, firmly packed, 1 cup boiling water, 1 teaspoon butter, 1 teaspoon maple extract or vanilla extract. Place granulated sugar in a heavy skillet. Heat until the sugar melts and turns brown. Meanwhile, place brown sugar into a heavy saucepan. Pour water over brown sugar and bring to a boil without stirring. Add caramelized white sugar to the melted brown sugar in the saucepan. Simmer, stirring often, until syrup is thickened. Remove from heat, and whisk in butter and maple or vanilla extract. Yield: about 1 cup
Mandatory Items: There are 2 mandatory components to this challenge. You must make one of the 2 maple mousse recipes listed below and you must make an edible container in which to place your mousse for presentation.
Variations allowed: If you have health issues and restrictions of course adapt as necessary. There is a regular maple mousse recipe and a totally vegan one. For the edible container you can let your imagination run wild, the recipes I have included are suggestions. I have listed a couple of other ideas in the Additional Information section. The meringue recipe is optional.


Bacon cups: preparation 15 minutes, bake 25-40 minutes depending on cup size, cooling 1 hour.
Nut Crust: preparation 30 minutes, baking about 15 minutes, cooling 1 hour.
Maple mousse: preparation 15 minutes, cooling 1 hour, refrigeration 1 hour.
Vegan maple mousse: preparation 10 minutes, refrigeration 1hour.
Meringue Time preparation 15 minutes, baking 45 minutes, cooling 2-3 hours.
Equipment required:
• muffin pan or 6 small ½ cup capacity heat-proof bowls
• heat proof shot glasses for smaller bacon cups
• aluminum foil
• scissors
• knife
• toothpicks
• baking tray
• food processor or zip-lock bag and a rolling pin
• various sizes of mixing bowls
• wooden mixing spoon
• rubber spatulas
• whisk
• small pan
• blender or hand mixer
• baking parchment or silicone mat
• piping bag or large zip-lock bag
Bacon Cups:
Ingredients:
• 24 thin slices good quality bacon
Directions:
1. Pre-heat the oven to 400 degrees F/200 degrees C.
2. Take a muffin pan or 6 small ½ cup capacity heat-proof bowls, turn upside down and carefully form aluminum foil covers on the back of 6 muffin cups or the bowls.
3. Taking 2 strips of bacon at a time crisscross the strips over the backs of the muffin cups and cut to size a tad longer then the bottom part of the cup. Now use 1 to 2 more strips to cover the sides of the muffin cups in a weaving fashion. You want a full tight weave because bacon shrinks a lot. For smaller cups I used a shot glass with a square of bacon for the bottom and I wrapped 1 strip around the side.
4. Tuck the ends of the bacon strips inside otherwise they will curl while cooking. A good idea is to insert 4 toothpicks where the crisscrossed bacon meets in the weave.
5. Place muffin pan in a cookie tray to catch drippings. Bake in oven for about 25 to 40 minutes, or until the bacon is golden and crisp but not burned.
6. Cool completely, a good hour, before removing your cups delicately from the foil.


Ingredients:
• 1 1/2 cups crushed nuts of your choice such as almonds, hazelnuts or walnuts
• 1 egg, beaten, at room temperature
• 2 tbsp sugar
• 1/2 cup dark chocolate pieces
Directions:
1. Use a food processor or a zip-lock back with a rolling pin to crush your nuts if whole, use about 1 cup of whole nuts to get 3/4 cups crushed. You want it somewhat coarse.
2. In a bowl mix the nuts with the beaten egg and the sugar.
3. Take 6 small ½ cup capacity Pyrex cups or a similar container and line the inside with aluminum foil. Spread ¼ cup of the mixture in the bowl, all the way up to the sides making sure you have a thin and even clean layer all around.
4. Bake at 350 degrees F/175 degrees C. until the nuts are golden and fragrant (about 15 minutes). Let cool completely before unmolding.
5. Melt chocolate (either in the microwave or over a double boiler). Dip the rims of the cooled nut bowls in the chocolate. Place in the freezer for at least 15 minutes or until the chocolate has hardened and is set.


Ingredients:
• 1 cup (240 ml/ 8 fluid oz.) pure maple syrup (not maple-flavoured syrup)
• 4 large egg yolks
• 1 package (7g/1 tbsp.) unflavoured gelatine
• 1 1/2 cups (360 ml. g/12 fluid oz) whipping cream (35% fat content)
Directions:
1. Bring maple syrup to a boil then remove from heat.
2. In a large bowl, whisk egg yolks and pour a little bit of the maple syrup in while whisking (this is to temper your egg yolks so they don’t curdle).
3. Add warmed egg yolks to hot maple syrup until well mixed.
4. Measure 1/4 cup of whipping cream in a bowl and sprinkle it with the gelatine. Let it rest for 5 minutes. Place the bowl in a microwave for 45 seconds (microwave for 10 seconds at a time and check it in between) or place the bowl in a pan of barely simmering water, stir to ensure the gelatine has completely dissolved.
5. Whisk the gelatine/whipping cream mixture into the maple syrup mixture and set aside.
6. Whisk occasionally for approximately an hour or until the mixture has the consistency of an unbeaten raw egg white.
7. Whip the remaining cream. Stir 1/4 of the whipped cream into the maple syrup mixture. Fold in the remaining cream and refrigerate for at least an hour.
8. Remove from the fridge and divide equally among your edible containers.


Ingredients:
• 1 package (12 oz.) soft silken tofu
• ¾ cup (14 fluid oz.) pure maple syrup
• 2 tsp agar-agar
Directions:
1. Let tofu come to room temperature. Using a food processor, blender, or hand mixer, blend tofu until just smooth.
2. Sprinkle agar-agar on the maple syrup and let it rest for 10 minutes. Heat maple syrup on the stove to a boil and then let it simmer 5 minutes until the agar-agar has dissolved.
3. In a food processor, blender, or a large bowl, blend the tofu with the maple syrup until creamy.
4. Refrigerate for at least one hour. Remove from the fridge and divide among your edible containers.
Meringue (optional):
Ingredients:
• 3 large egg whites at room temperature
• ¾ cup (165 g./5.5 oz) sugar
Directions:
1. Preheat the oven to 300 degrees F/150 degrees C.
2. Put the egg whites in a large bowl. Using an electric mixer beat for a few minutes until the whites become stiff. Now add the sugar, a little at a time, whisking until the mixture is stiff and glossy. You should be able to turn the bowl upside down and the mixture won’t fall out.
3. Place baking parchment on to a clean baking sheet. Using a spoon or a piping bag, dollop the meringue into circles that fit inside the rim of your edible cups. (See mine, I wanted height but they fell a bit...which is OK...freeform art)
4. Put the tray in the oven, then immediately turn the oven down to 250 degrees F/130 degrees C. and bake for 45 minutes.
5. Turn off the oven and allow the meringues to cool in the oven for a few hours.
6. Place meringues as decoration on your maple mousse which has already be spooned into your edible containers.


You can try microwaving your bacon, not tested.
For vegetarians and vegans you could try this Tofu Bacon recipe and make a bowl with it, not tested.
Tuile Bowls would be a great other edible container option.
About Maple Syrup:
Here is a Food Talk article I wrote about the Quebec Sugar Shack season.
I found a great video on Making Maple Syrup on You Tube
Disclaimer:
*Note: The Daring Kitchen and its members in no way suggest we are medical professionals and therefore are NOT responsible for any error in reporting of gluten-free ingredients. If you have issues with digesting gluten, then it is YOUR responsibility to research the ingredient before using it. If you have allergies, it is YOUR responsibility to make sure any ingredient in a recipe will not adversely affect you. If you are lactose intolerant, it is YOUR responsibility to make sure any ingredient in a recipe will not adversely affect you. If you are vegetarian or vegan, it is YOUR responsibility to make sure any ingredient in a recipe will not adversely affect you. Please consult your physician with any questions before using a product you are not familiar with. Thank you!
__________________ Evelyne at http://www.cheapethniceatz.com
,,,,,,,,,,,,,,,,,,,,,,,,,,,,,,,,,,,,,,,,,,,,,,,,,,,,,,,,,,,,,,,,,,,,,,,,,,,,,,,,,,,,,,,,,,,,,,,,,,,,,,,,,,,,,,,,,,,,,,,,,,,,,,,,,,,,,,,,,,,,,,,,,,,,,,,,,,,,,,,,,
THE DARING BAKERS' MARCH 2011 CHALLENGE: Mets la main à la pâte! YEASTED MERINGUE COFFEE CAKE
Thank you so much for a fabulous creamy, dreamy, crunchy, sweet February, Mallory! The silky, decadent Panna Cotta was heaven!! And the crispiness of the Florentine cookies was the perfect accompaniment to the luscious Panna Cotta! I think I can speak for all of us when I say, “who knew how good Panna Cotta could be!?” Thanks for showing many of us how to make a really great Panna Cotta and for allowing us to let our creativity go wild in flavoring it and giving it our own twists. A job well done!!As for you – you amazing Daring Bakers you! Every single version of the Panna Cotta I saw was breath taking and completely drool-worthy. Bravo! Ya’ll just keeping WOWing me month after month after month! Bless your cotton socks!
Okay well I’m going to take a break from BEGGING ya’ll to send in your filled in Spotlight Questionnaires (but if you feel a new DB month isn’t a new DB month without a little begging.. then you can find it HERE – fill it out and send to lamiacucina AT Adelphia DOT net. Hee!) and in letting you know although the FoodTalk article roster is filling up nicely, I do still have quite a few openings from August – December. (A quick email letting me know you’re interested is all it would take to fill up one of those spots! *grin*) No, I’m not going to bore you with the same old same old.. instead I’m going to let ya’ll in on a little secret! Next month, the April DB challenge will be part of a dual challenge with the Daring Cooks! Now I can’t exactly say what it is because I don’t want to ruin the surprise, but I will tell you that there will be prizes for the Most Creative (insert awesome challenge name here) and the 1st runner up in Most Creative (insert awesome challenge name here) for the Daring Bakers AND the Daring Cooks – so two grand prizes and two 1st runner up prizes will be given away. So on April 1st (and NO this is not an April Fools’ Day joke, I promise!) put those thinking caps on and let the creativity start flowing, because YOU could win a really nice prize package!
Details will be given in the April challenge announcement. (Those of you who belong to the Daring Cooks as well as the Daring Bakers will find out all the details on March 17th for the April DC Challenge).Okay handing it over to our lovely hosts, Jamie & Ria.. have fun ya’ll!
Lis
xoxo
________________________________________
Mets la main à la pâte! It’s time to roll up your sleeves and put your hands wrist deep in some smooth, silky dough and create something oh-so sweet! Jamie of Life’s a Feast and Ria of Ria’s Collection are thrilled to invite you to bake along with them this month!
We just want to get a little rise out of all of our wonderful, talented fellow Daring Bakers so decided to bring you into our warm cozy kitchen to make one fabulous yeast-risen coffee cake. A gorgeous brioche-like dough is rolled jellyroll style around a whipped meringue and whatever filling you choose, shaped into a wreath and baked. More often than not, yeast and non-yeast baking are seen as two separate things and we have often found that even the most passionate and seasoned bakers don’t have a lot of experience or confidence with yeast baking. This is a very easy and fun recipe to make and will make all of you non-yeasties fall in love with one of our favorite pastimes!
Beautiful to put together and gorgeous out of the oven, the cake is light and fluffy, barely sweet, the meringue miraculously melts into the dough as it bakes leaving behind just a hint of sweetness and adding to the perfect moistness of the cake. Don’t scrimp on either the chopped nuts or chocolate or whatever filling additions you choose as the crunch and the flavors are the focal point of this tender, moist, outrageously delicious coffee cake. We were each inspired to flavor the basic coffee cake – the brioche-type sweet yeast dough and the meringue filling – with our own personal national twist, Jamie going all-American and Ria adding Indian flavors. We have given you both variations, allowing you to choose. Or go creative, let your imagination flow and create your own personal flavor variation. Why not let your own national cuisine inspire you?

Blog-checking lines: The March 2011 Daring Baker’s Challenge was hosted by Ria of Ria’s Collection and Jamie of Life’s a Feast. Ria and Jamie challenged The Daring Bakers to bake a yeasted Meringue Coffee Cake.
Posting Date: March 27, 2011
Download the printable .pdf of the challenge HERE!
Mandatory Items: Sweet Yeast Dough for the Coffee Cake and the meringueVariations allowed: We have presented you with two variations of this delicious coffee cake: Jamie’s All-American versions with cinnamon, chopped pecans and chocolate chips or chopped chocolate and Ria’s Indian-inspired version with saffron added to the sweet yeast bread dough and **garam masala and cashews flavoring the filling. Let your imagination flow; you could add cardamom to the dough, drizzle a bit of rose or orange water over the meringue and chopped pistachios to the filling for another Indian version, or sweet, tangy dried fruits along with the nuts and whatever spice you choose in the
place of our choice for fillings.
Preparation time:
For the dough:
10 - 15 minutes preparation of the dough
8 – 10 minutes kneading
45 – 60 minutes first rise
10 – 15 minutes to prepare meringue, roll out, fill and shape dough
an additional 45 – 60 minutes for second rising.
Baking time: approximately 30 minutes
Equipment required:
Measuring cups for dry ingredients
Measuring cup for liquid
Measuring spoons
Cutting board and sharp knife for chopping nuts & chocolate if using
2 large mixing bowls
1 small mixing bowl
1 medium mixing bowl for beating egg whites, preferably plastic or metal
1 medium saucepan
Electric mixer or stand mixer
Wooden spoon
Rolling pin
Spatula
Clean kitchen scissors or sharp knife
Plastic wrap & clean kitchen towel
Parchment paper
2 medium-sized baking trays (or 1 large if your oven is large enough)
Cooling racks
Serving platter
Vegetable oil to grease bowl

Makes 2 round coffee cakes, each approximately 10 inches in diameter
The recipe can easily be halved to make one round coffee cake
Ingredients
For the yeast coffee cake dough:
4 cups (600 g / 1.5 lbs.) flour
¼ cup (55 g / 2 oz.) sugar
¾ teaspoon (5 g / ¼ oz.) salt
1 package (2 ¼ teaspoons / 7 g / less than an ounce) active dried yeast
¾ cup (180 ml / 6 fl. oz.) whole milk
¼ cup (60 ml / 2 fl. oz. water (doesn’t matter what temperature)
½ cup (135 g / 4.75 oz.) unsalted butter at room temperature
2 large eggs at room temperature
10 strands saffron for Ria’s version (Saffron might be hard to find and it’s expensive, so you can substitute with ½ - 1 teaspoon of ground cardamom or ground nutmeg. Or simply leave it plain like Jamie’s version)
For the meringue:
3 large egg whites at room temperature
¼ teaspoon salt
½ teaspoon vanilla
½ cup (110 g / 4 oz.) sugar
For the filling:
Jamie’s version:
1 cup (110 g / 4 oz.) chopped pecans or walnuts
2 Tablespoons (30 g / 1 oz.) granulated sugar
¼ teaspoon ground cinnamon
1 cup (170 g / 6 oz.) semisweet chocolate chips or coarsely chopped chocolate
Ria’s version:
1 cup (130 g / 5 oz.) chopped cashew nuts
2 Tablespoons (30 g / 1 oz.) granulated sugar
½ teaspoon garam masala (You can make it at home – recipe below - or buy from any Asian/Indian grocery store)
1 cup (170g / 6 oz.) semisweet chocolate chips ( I used Ghirardelli)
Egg wash: 1 beaten egg
Cocoa powder (optional) and confectioner’s sugar (powdered/icing sugar) for dusting cakes
**Garam (means “hot”) masala (means “mixture”) is a blend of ground spices and is used in most Indian savory dishes. It is used in limited quantities while cooking vegetables, meats & eggs. There is no “one” recipe for it as every household has a recipe of their own. Below, I am going to share the recipe which I follow.
4 or 5 sticks (25 g) Cinnamon Sticks (break a stick and open the scroll)
3 ½ tablespoons (25 g / less than an ounce) Cloves, whole
100 g. (3.5 oz.) Fennel seeds
4 tablespoons (25 g / less than an ounce) Cumin seeds
1 ½ tablespoons (10 g / less than half an ounce) Peppercorns
25 g (less than half an ounce) Green Cardamom pods
In a small pan on medium heat, roast each spice individually (it hardly takes a minute) until you get a nice aroma. Make sure you stir it throughout so that it doesn’t burn. As soon as each spice is roasted, transfer it to a bowl to cool slightly. Once they are all roasted, grind into a fine powder by using a coffee grinder, or pestle & mortar. Store in an airtight container and use as needed.
Directions:
Prepare the dough:
In a large mixing bowl, combine 1 ½ cups (230 g) of the flour, the sugar, salt and yeast.
In a saucepan, combine the milk, water and butter and heat over medium heat until warm and the butter is just melted. Ria’s version: add the 10 saffron threads to the warmed liquid and allow to steep off of the heat for 10 minutes. This will give the mixture a distinct aroma and flavor and a yellowish-orange hue.
With an electric mixer on low speed, gradually add the warm liquid to the flour/yeast mixture, beating until well blended. Increase mixer speed to medium and beat 2 minutes. Add the eggs and 1 cup (150 g) flour and beat for 2 more minutes.


Prepare your filling:In a small bowl, combine the cinnamon and sugar for the filling if using. You can add the chopped nuts to this if you like, but I find it easier to sprinkle on both the nuts and the chocolate separately.

In a clean mixing bowl – ideally a plastic or metal bowl so the egg whites adhere to the side (they slip on glass) and you don’t end up with liquid remaining in the bottom – beat the egg whites with the salt, first on low speed for 30 seconds, then increase to high and continue beating until foamy and opaque. Add the vanilla then start adding the ½ cup sugar, a tablespoon at a time as you beat, until very stiff, glossy peaks form.
Assemble the Coffee Cakes:
Line 2 baking/cookie sheets with parchment paper.


Now, roll up the dough jellyroll style, from the long side. Pinch the seam closed to seal. Very carefully transfer the filled log to one of the lined cookie sheets, seam side down. Bring the ends of the log around and seal the ends together, forming a ring, tucking one end into the other and pinching to seal.
Using kitchen scissors or a sharp knife (although scissors are easier), make cuts along the outside edge at 1-inch (2 ½ cm) intervals. Make them as shallow or as deep as desired but don’t be afraid to cut deep into the ring.
Repeat with the remaining dough, meringue and fillings.
Cover the 2 coffee cakes with plastic wrap and allow them to rise again for 45 to 60 minutes.
Preheat the oven to 350°F (180°C).
Brush the tops of the coffee cakes with the egg wash. Bake in the preheated oven for 25 to 30 minutes until risen and golden brown. The dough should sound hollow when tapped.


Just before serving, dust the tops of the coffee cakes with confectioner’s sugar as well as cocoa powder if using chocolate in the filling. These are best eaten fresh, the same day or the next day.
Additional Information:
The recipe calls for active dried yeast. An excellent source for yeast conversions and substitutes is http://www.thefreshloaf.com/node/19314/re-yeast-conversion-fresh-dry-and...
Or
http://www.foodsubs.com/LeavenYeast.html
Here is a great explanation of yeast: http://www.joyofbaking.com/Yeast.html
Yeast is a living organism. Think of the dry version as yeast in a state of sleep. In order for it to work as a rising agent, it must be activated and this is done by blending it with a bit of sugar (on which it feeds) and a warm liquid which is called proofing. The water must be lukewarm (100°F to 115°F/37°C to 46°C); too cool and the yeast will not activate, too hot and the yeast will be killed! If you stick the back of your hand under the running tap and you don’t feel it (it feels neither cold nor hot) or it feels comfortably lukewarm, then it should be good!
Disclaimer:
*Note: The Daring Kitchen and its members in no way suggest we are medical professionals and therefore are NOT responsible for any error in reporting of alternative baking ingredients. If you have issues with digesting gluten, then it is YOUR responsibility to research the ingredient before using it. If you have allergies, it is YOUR responsibility to make sure any ingredient in a recipe will not adversely affect you. If you are lactose intolerant, it is YOUR responsibility to make sure any ingredient in a recipe will not adversely affect you. If you are vegetarian or vegan, it is YOUR responsibility to make sure any ingredient in a recipe will not adversely affect you. Please consult your physician with any questions before using a product you are not familiar with. Thank you!
__________________ *~Ria~ *
Hunger is the best sauce in the world - Ceravntes
I blog at http://riascollection.blogspot.com/
,,,,,,,,,,,,,,,,,,,,,,,,,,,,,,,,,,,,,,,,,,,,,,,,,,,,,,,,,,,,,,,,,,,,,,,,,,,,,,,,,,,,,,,,,,,,,,,,,,,,,,,,,,,,,,,,,,,,,,,,,,,,,,,,,,,,,,,,,,,,,,,,,,,,,,,,,,,,,,,,,,,
February 2011 Daring Bakers Challenge: Panna Cotta
Hello to all my lovely fellow Daring Bakers out there! I'm Mallory from A Sofa in the Kitchen. First off, I have to admit to all of you that I have been incredibly nervous to host this challenge! I'm not entirely sure why, exactly. Perhaps I was worried I would choose the wrong dessert, something you would all abhor, or that I may lead you astray with the recipe I chose. That being said, I'm incredibly excited to be hosting our February challenge. We'll be making something that I think is oh-so February *cough* and Valentines *cough* appropriate. Panna Cotta. Creamy desserts are definitely on the top of my favorites list. Silky, smooth, and downright dreamy. I especially adore Panna Cotta because it's simple, low on the ingredient list, and can be dressed up to pair with any season or holiday. It's fancy enough to serve on a Holiday, yet, laid back enough to whip up for a weeknight dinner with friends. I'm going to give you a base recipe, one I've used for quite some time now that has been no fail for me. But Panna Cotta is pretty simple, and because we're daring bakers, not daring “whisk-then-chillers”, I'm also going to challenge you to bake a batch of Florentine Cookies as well. This pair, creamy Panna Cotta and caramelized chocolaty oat cookies, is a dream team made in heaven. I want you to have fun with the Panna Cotta, play with flavors, make a fruit or coffee glee, layer it, keep it in a pretty glass or unmold it. Most of all I hope you all enjoy the sweets I have in store for you this month! - Thank you to Lis & Ivonne for asking me to host, and thank you to all you bakers out there for letting me be your challenger this month! I look forward to seeing what you all come up with!! Recipe Source: I'm going to be completely honest, I'm not the biggest Giada De Laurentiis fan, but I adore this simple recipe of hers for Panna Cotta. It's well reviewed, simple, delicious and has been my go to for quite some time. I hope you enjoy it. http://www.foodnetwork.com/recipes/giada-de-laurentiis/Panna-Cotta-with-...
Blog-checking lines: The February 2011 Daring Bakers’ challenge was hosted by Mallory from A Sofa in the Kitchen. She chose to challenge everyone to make Panna Cotta from a Giada De Laurentiis recipe and Nestle Florentine Cookies.
Posting Date: February 27, 2011
Download the printable .pdf of the challenge HERE!
Note: A few tips.- First, when you sprinkle your gelatin over your milk, be sure that it's a thin even layer of gelatin, no clumps. When you heat it up after it's soaked a bit, you'll be less likely to get any lumps of gelatin in the finished product.
- Second, if you would like to unmold your Panna Cotta from a ramekin simply run a knife along the edge, dip the ramekin in a bit of hot water, then invert onto your serving platter. Viola! Unmolded Panna Cotta. (Be aware though, Panna Cotta is not Jell-o, it's got a much softer texture so it does not keep its shape in the same way as Jell-o)
- If you cannot find powdered gelatin/only have access to sheet gelatin this can be used. Please follow the directions on the package for conversions.
- Milk substitutes, such as skim, almond, or even coconut milk can be used in the vanilla Panna Cotta in place of the whole milk, but cream is important. In order to get the right texture there needs be a certain percentage of cream fat! There are lower fat recipes out there that use yogurts in place of milk, but the recipes I've chosen are full fat, sorry guys!!
- The Florentine cookie and chocolate Panna Cotta are quite sweet, maybe too sweet for some. To lessen the sweetness factor consider using a dark chocolate, or bittersweet in both recipes. In regards to the Panna Cotta, I would reduce the sugar to 1/4 or 1/3 of a cup, and perhaps pair it with a more bitter element like coffee gelée or a tart fruit.
Variations allowed: If the vanilla does not appeal to you, I am also giving you a recipe for chocolate Panna Cotta. You have a choice between the two. However, the vanilla can be modified, I generally add vanilla bean, you could also add a bit of matcha (powdered green tea), or fruit. Speaking of fruit, I'm going to give you one recipe for strawberry, and another for coffee gelée, essentially homemade Jell-o. Gelée can be poured on the bottom, top, or layered in with your Panna Cotta (though it takes a few extra steps to do this). So make the vanilla or chocolate recipe, but feel free to play with this it. I just want you to start with a base recipe. What you top it with, or garnish with is also up to you. Have fun, and get creative. In regards to the cookie, if you want to add nuts, or use a different chocolate, go for it.
Preparation time:
• 20-25 minutes to prepare the Panna Cotta - at least 6 hours to chill
• 20-25 minutes to prepare the cookies 6-8 minutes to bake
Equipment required:
• Small mixing bowl
• Two medium sized heavy bottom pot or saucepan
• Wooden spoon and/or whisk
• Glasses or ramekins - something to pour and serve your Panna Cotta in
• Measuring cups
• Measuring spoons
• Silpat or wax paper or parchment paper
• Baking sheet
• Small bowl
Giada's Vanilla Panna Cotta

1 cup (240 ml) whole milk
1 tablespoon (one packet) (15 ml) (7 gm) (¼ oz) unflavored powdered gelatin
3 cups (720 ml) whipping cream (30+% butterfat)
1/3 cup (80 ml) honey
1 tablespoon (15 ml) (15 gm) (½ oz) granulated sugar
pinch of salt
Directions:
- Pour the milk into a bowl or pot and sprinkle gelatin evenly and thinly over the milk (make sure the bowl/pot is cold by placing the bowl/pot in the refrigerator for a few minutes before you start making the Panna Cotta). Let stand for 5 minutes to soften the gelatin.
- Pour the milk into the saucepan/pot and place over medium heat on the stove. Heat this mixture until it is hot, but not boiling, about five minutes. (I whisk it a few times at this stage).
- Next, add the cream, honey, sugar, and pinch of salt. Making sure the mixture doesn't boil, continue to heat and stir occasionally until the sugar and honey have dissolved 5-7 minutes.
- Remove from heat, allow it to sit for a few minutes to cool slightly. Then pour into the glass or ramekin.
- Refrigerate at least 6 hours or overnight. Add garnishes and serve.

Chocolate Panna Cotta
Recipe adapted from Bon AppetitIngredients:
1 cup (240 ml) whole milk
1 tablespoon (15 ml) (7 gm) (¼ oz) unflavored powdered gelatin
2 cups (480 ml) whipping cream (30+% butterfat)
½ cup (115 gm) (4 oz) sugar
¾ cup (145 gm)(5 oz) bittersweet or semisweet chocolate
½ teaspoon (2½ ml) vanilla extract
Directions:
- Pour milk into a small bowl, sprinkle gelatin over the top, set aside for 2-5 minutes.
- Place a medium saucepan over medium heat, stir in cream, sugar and vanilla. Bring to a low boil.
- Add chocolate and whisk until melted. Whisk the milk/gelatin mixture into chocolate cream mixture. Whisk until gelatin has dissolved.
- Transfer to ramekins, or nice glasses for serving.
- Cover and chill at least 8 hours, or overnight
Nestle Florentine Cookies
Recipe from the cookbook “Nestle Classic Recipes”, and their website.
2/3 cup (160 ml) (150 gm) (5.3 oz) unsalted butter
2 cups (480 ml) (160 gm) (5 2/3 oz) quick oats
1 cup (240 ml) (230 gm) (8 oz) granulated sugar
2/3 cup (160 ml) (95 gm) (3⅓ oz) plain (all purpose) flour
1/4 cup (60 ml) dark corn syrup
1/4 cup (60 ml) whole milk
1 tsp (5 ml) vanilla extract
pinch of salt
1½ cups (360 ml) (250 gm) (9 oz) dark or milk chocolate
Directions:
Preheat oven to moderately hot 375°F (190°C) (gas mark 5). Prepare your baking sheet with silpat or parchment paper.
- Melt butter in a medium saucepan, then remove from the heat.
- To the melted butter add oats, sugar, flour, corn syrup, milk, vanilla, and salt. Mix well. Drop a tablespoon full, three inches (75 mm) apart, onto your prepared baking sheet. Flatten slightly with the back of your tablespoon, or use a spatula.
- Bake in preheated oven for 6-8 minutes, until cookies are golden brown. Cool completely on the baking sheets.
- While the cookies are cooling melt your chocolate until smooth either in the microwave (1 1/2 minutes), or stovetop (in a double boiler, or a bowl that fits atop a saucepan filled with a bit of water, being sure the water doesn't touch the bottom of the bowl).
- Peel the cookies from the silpat or parchment and place face down on a wire rack set over a sheet of wax/parchment paper (to keep counters clean).
- Spread a tablespoon of chocolate on the bottom/flat side of your cookie, sandwiching another (flat end) cookie atop the chocolate.


Note: The next two recipes are just examples – If you want gelée to go with your Panna Cotta, feel free to use them, or find other gelée recipes to use.
Coffee Gelée
Adapted from this recipe in Gourmet MagazineIngredients:
2 cups (480 ml) good quality brewed coffee
1/4 cup (60 ml) hot water + 2 tablespoons (30 ml) cold water
1/2 cup (120 ml) (115 gm) (4 oz) granulated sugar
1½ teaspoons (7½ ml) (3½ gm) (1/8 oz) unflavored powdered gelatin
2 teaspoons (10 ml) vanilla extract
Directions:
- Place granulated sugar and 1/4 c. hot water in a small saucepan. Bring to a boil, stir until the sugar has dissolved.
- Sprinkle gelatin over 2 Tablespoons cold water and let it soften 2 minutes or so.
- Stir the coffee, sugar, hot water, and vanilla into a small metal bowl, add gelatin mixture and stir well until gelatin has dissolved. If pouring over Panna Cotta, be sure that this mixture is no longer hot, it will melt Panna Cotta if it is, let it come to room temperature.
Fruit Gelée
Recipe by MalloryIngredients:
1 cup (240 ml) (230 gm) (8 oz) fruit (strawberries, raspberries, mango, blackberry, etc.)
*Note: Certain fruits interact with gelatin and stop it gelling like pineapple and kiwi etc.
3 tablespoons (45 ml) water
1/4 cup (60 ml) (60 gm) (2 oz) granulated sugar
1½ teaspoons (7½ ml) (3½ gm) (1/8 oz) unflavored powdered gelatin
Directions:
- Sprinkle gelatin over water.
- Place fruit and sugar in a small saucepan and simmer until sugar has dissolved. Now mix the gelatin into the strawberry mixture and stir until gelatin has dissolved.
- Remove from heat and allow to cool (close to room temp, again, if you're planning on layering on pouring on top of your Panna Cotta, a hot mixture will also heat up your chilled Panna Cotta).
Desserts for Breakfast : Honey, Lavendar & Pomegranate Panna Cotta
Cafe Lynnylu: Panna Cotta w/ Coffee Syrup
Tell Me What You Saw (flickr) : Honey Jelly Panna Cotta
A video showing you how Panna Cotta is made (not our exact recipe mind you)
Disclaimer:
*Note: The Daring Kitchen and its members in no way suggest we are medical professionals and therefore are NOT responsible for any error in reporting of “alternate baking/cooking” ingredients. If you have issues with digesting gluten, then it is YOUR responsibility to research the ingredient before using it. If you have allergies, it is YOUR responsibility to make sure any ingredient in a recipe will not adversely affect you. If you are lactose intolerant, it is YOUR responsibility to make sure any ingredient in a recipe will not adversely affect you. If you are vegetarian or vegan, it is YOUR responsibility to make sure any ingredient in a recipe will not adversely affect you. Please consult your physician with any questions before using a product you are not familiar with. Thank you!
,,,,,,,,,,,,,,,,,,,,,,,,,,,,,,,,,,,,,,,,,,,,,,,,,,,,,,,,,,,,,,,,,,,,,,,,,,,,,,,,,,,,,,,,,,,,,,,,,,,,,,,,,,,,,,,,,,,,,,,,,,,,,,,,,,,,,,,,,,,,,,,,,,,,,,,,,,,,,
December 2010 Daring Baker Challenge: Stollen
Hi Everyone...My name is Penny from Sweet Sadie's Baking and I am sooo excited to be hosting a challenge...and a little nervous too....especially since it is the Christmas one! I finally decided on Stollen - a very traditional German Christmas bread that tastes fabulous and looks pretty. We are going to create it in the shape of a wreath so it won’t exactly be traditional, as the shape of the cake was originally meant to represent the baby Jesus wrapped in swaddling clothes. It looks spectacular though!!! Since this is such a busy time of the year, I kept it pretty straightforward so you will get great results…but it is bread and I know bread can sometimes be intimidating. Some versions are made with starters but not this one. Creating a starter takes a little time which we don’t have a lot of in December and we don’t need any more stress right now. Some have Marzipan in the middle and others have Quark, a type of cheese. This version is simple and doesn’t have an overwhelming amount of fruit or nuts in it
This month I am inviting you to make this wonderful Christmas Stollen.Stollen is a bread-like fruitcake made with yeast, water and flour, and usually with zest added to the dough. Candied orange peel and candied citrus is often also added.
Over the centuries, the cake changed from being a simple, fairly tasteless "bread" to a sweeter cake with richer ingredients. The Advent season was a time of fasting, and bakers were not allowed to use butter, only oil, and the cake was tasteless and hard.
Recipe Source:
I used a combination of recipes: • A recipe from a German friend who bakes Stollen every year.
• Part from Peter Reinhart – I love his techniques – Bread Baker’s Apprentice
• Part from Martha Stewart where she demonstrated (along with her mother) a stollen in a wreath design
And of course, a lot of support, testing and ideas from someone I consider a friend and who many of you have got to know in his posts, Audax Artifex. Thanks Audax! And thanks also to Ivonne and Lis who work so hard in the Daring Kitchen.
Blog-checking lines:
The 2010 December Daring Bakers’ challenge was hosted by Penny of Sweet Sadie’s Baking. She chose to challenge Daring Bakers’ to make Stollen. She adapted a friend’s family recipe and combined it with information from friends, techniques from Peter Reinhart’s book.........and Martha Stewart’s demonstration.Posting Date:
Because of the holidays you can post any time between December 23 thru December 27, 2010Mandatory Items:
You must make the recipe as provided with the exception of the variations below.I encourage you after you make the first one to make some variations.
Download the printable .pdf of the challenge HERE!
Variations allowed:
You can substitute the raisins with cranberries or other dried fruit. You can substitute the lemon and orange zests for other zests example lime. Fresh yeast is difficult to find but if you can get it, you will notice the difference. Fresh yeast has good rising qualities and produces excellent tasting bread. If you are using fresh yeast: use double the weight of the active dry yeast that is in the original recipe. Example: if the recipe calls for 1/2 oz of active dry yeast use 1 oz of fresh yeast and you will have similar rising times as the original recipe.Since this would make a great Christmas gift, whether it would be a whole one or a half, it would be fun to see how you would creatively package it!
Preparation time:
The following times are approximate. I suggest you gather and scale/weigh/measure (mise en place) all your ingredients before you begin mixing.• Approximately 1 hour first stage – then rest overnight or up to 3 days
• 2 hours to warm up after refrigeration
• 15 minutes shaping
• 2 hours proofing
• 30-45 minutes baking
Equipment required:
• Mixer with dough hook or strong arms and hands• Mixing bowl
• Bowl to soak raisins
• Small saucepan
• Sheet of plastic or plastic wrap to cover when proofing
• Bench or pastry scraper (very handy for cutting dough and also cleaning work surface)
• Rolling pin
• Dough whisk can be handy but not necessary
• Pastry Brush
• A scale is really important to have when making bread so I strongly advise you to get one. You do not have to have one though. (would make a good Christmas gift!)
• Sheet Pan or round Pizza pan
• Parchment Paper
Stollen Wreath
Makes one large wreath or two traditional shaped Stollen loaves. Serves 10-12 people
Ingredients
¼ cup (60ml) lukewarm water (110º F / 43º C)2 packages (4 1/2 teaspoons) (22 ml) (14 grams) (1/2 oz) active dry yeast
1 cup (240 ml) milk
10 tablespoons (150 ml) (140 grams) unsalted butter (can use salted butter)
5½ cups (1320 ml) (27 ozs) (770 grams) all-purpose (plain) flour (Measure flour first - then sift- plus extra for dusting)
½ cup (120 ml) (115 gms) sugar
¾ teaspoon (3 ¾ ml) (4 ½ grams) salt (if using salted butter there is no need to alter this salt measurement)
1 teaspoon (5 ml) (6 grams) cinnamon
3 large eggs, lightly beaten
Grated zest of 1 lemon and 1 orange
2 teaspoons (10 ml) (very good) vanilla extract
1 teaspoon (5 ml) lemon extract or orange extract
¾ cup (180 ml) (4 ¾ ozs) (135 grams) mixed peel (link below to make your own)
1 cup (240 ml) (6 ozs) (170 gms) firmly packed raisins
3 tablespoons (45ml) rum
12 red glacé cherries (roughly chopped) for the color and the taste. (optional)
1 cup (240 ml) (3 ½ ozs) (100 grams) flaked almonds
Melted unsalted butter for coating the wreath
Confectioners’ (icing) (powdered) sugar for dusting wreath
Note: If you don’t want to use alcohol, double the lemon or orange extract or you could use the juice from the zested orange.
Directions:
Soak the raisinsIn a small bowl, soak the raisins in the rum (or in the orange juice from the zested orange) and set aside. See Note under raisins.

To make the dough
Pour ¼ cup (60 ml) warm water into a small bowl, sprinkle with yeast and let stand 5 minutes. Stir to dissolve yeast completely.
In a small saucepan, combine 1 cup (240 ml) milk and 10 tablespoons (150 ml) butter over medium - low heat until butter is melted. Let stand until lukewarm, about 5 minutes.
Lightly beat eggs in a small bowl and add lemon and vanilla extracts.
In a large mixing bowl (4 qt) (4 liters) (or in the bowl of an electric mixer with paddle attachment), stir together the flour, sugar, salt, cinnamon, orange and lemon zests.
Then stir in (or mix on low speed with the paddle attachment) the yeast/water mixture, eggs and the lukewarm milk/butter mixture. This should take about 2 minutes. It should be a soft, but not sticky ball. When the dough comes together, cover the bowl with either plastic or a tea cloth and let rest for 10 minutes.
Add in the mixed peel, soaked fruit and almonds and mix with your hands or on low speed to incorporate. Here is where you can add the cherries if you would like. Be delicate with the cherries or all your dough will turn red!
Sprinkle flour on the counter, transfer the dough to the counter, and begin kneading (or mixing with the dough hook) to distribute the fruit evenly, adding additional flour if needed. The dough should be soft and satiny, tacky but not sticky. Knead for approximately 8 minutes (6 minutes by machine). The full six minutes of kneading is needed to distribute the dried fruit and other ingredients and to make the dough have a reasonable bread-dough consistency. You can tell when the dough is kneaded enough – a few raisins will start to fall off the dough onto the counter because at the beginning of the kneading process the dough is very sticky and the raisins will be held into the dough but when the dough is done it is tacky which isn't enough to bind the outside raisins onto the dough ball.
Lightly oil a large bowl and transfer the dough to the bowl, rolling around to coat it with the oil. Cover the bowl with plastic wrap.
Put it in the fridge overnight. The dough becomes very firm in the fridge (since the butter goes firm) but it does rise slowly… the raw dough can be kept in the refrigerator up to a week and then baked on the day you want.
Shaping the Dough and Baking the Wreath
1. Let the dough rest for 2 hours after taking out of the fridge in order to warm slightly.
2. Line a sheet pan with parchment paper.
3. Preheat oven to moderate 350°F/180°C/gas mark 4 with the oven rack on the middle shelf.
4. Punch dough down, roll into a rectangle about 16 x 24 inches (40 x 61 cms) and ¼ inch (6 mm) thick.

Starting with a long side, roll up tightly, forming a long, thin cylinder.

Transfer the cylinder roll to the sheet pan. Join the ends together, trying to overlap the layers to make the seam stronger and pinch with your fingers to make it stick, forming a large circle. You can form it around a bowl to keep the shape.

This was before I pinched it together
Using kitchen scissors, make cuts along outside of circle, in 2-inch (5 cm) intervals, cutting 2/3 of the way through the dough.

Twist each segment outward, forming a wreath shape. Mist the dough with spray oil and cover loosely with plastic wrap.

Proof for approximately 2 hours at room temperature, or until about 1½ times its original size.
Bake the stollen for 20 minutes, then rotate the pan 180 degrees for even baking and continue to bake for 20 to 30 minutes. The bread will bake to a dark mahogany color, should register 190°F/88°C in the center of the loaf, and should sound hollow when thumped on the bottom.
Transfer to a cooling rack and brush the top with melted butter while still hot.
Immediately tap a layer of powdered sugar over the top through a sieve or sifter.
Wait for 1 minute, then tap another layer over the first.
The bread should be coated generously with the powdered sugar.
Let cool at least an hour before serving. Coat the stollen in butter and icing sugar three times, since this many coatings helps keeps the stollen fresh - especially if you intend on sending it in the mail as Christmas presents!
When completely cool, store in a plastic bag. Or leave it out uncovered overnight to dry out slightly, German style.


The stollen tastes even better in a couple of days and it toasts superbly…. so delicious with butter and a cup of tea….mmmmm
Storage
The more rum and the more coatings of butter and sugar you use the longer it will store.
The following is for the recipe as written and uses the 45 mls of rum and two coatings of butter and icing sugar
1. Stollen freezes beautifully about 4 months
2. The baked stollen stores well for 2 weeks covered in foil and plastic wrap on the counter at room temperature and
3. One month in the refrigerator well covered with foil and plastic wrap.

Additional Information:
Here is a link to recipes to make your own candied citrus peelhttp://www.harvestwizard.com/2006/12/candied_citron_recipe.html
http://video.about.com/candy/Make-Candied-Citrus-Peel.htm
http://userealbutter.com/2007/10/09/candied-orange-peels-recipe/
Kneading Bread
http://www.youtube.com/watch?v=dWj8oHMPFm0
Martha Stewart’s wreath
http://www.marthastewart.com/recipe/stollen-wreath-bread-with-mrs-kostyra
Host’s Note:
I hope you like the challenge and feel free to use any of the photos! We would love to see pics of the Stollen packaged as gifts!
Disclaimer:
*Note: The Daring Kitchen and its members in no way suggest we are medical professionals and therefore are NOT responsible for any error in reporting of gluten-free ingredients. If you have issues with digesting gluten, then it is YOUR responsibility to research the ingredient before using it. If you have allergies, it is YOUR responsibility to make sure any ingredient in a recipe will not adversely affect you. If you are lactose intolerant, it is YOUR responsibility to make sure any ingredient in a recipe will not adversely affect you. If you are vegetarian or vegan, it is YOUR responsibility to make sure any ingredient in a recipe will not adversely affect you. Please consult your physician with any questions before using a product you are not familiar with. Thank you! ..........................................................................................................................................................................
November 2010 Daring Baker Challenge: Crostata
Hello everybody / Ciao a tutti (the Italian way). I am Simona from briciole and I have the honor of being your hostess for the November edition of the Daring Bakers' Challenge.
This month, I am inviting you to make crostata (tart), an Italian dessert. The base of a crostata is pasta frolla (or pastafrolla), sweet short crust pastry (or sweet tart dough) made of flour, sugar, butter and eggs. Pasta frolla is versatile: it provides the base to make crostata with fruit preserves, pastry cream, fresh fruit, ricotta, and other ingredients, and, by itself, it makes very nice cookies.
As a child in Italy, my favorite crostata variation was that with pastry cream. Nobody I knew made it, so when I wanted a slice; I got it from a bakery. My aunt Lucia made tarts with her homemade jam and baked them in oversize pans (which originally were metal film cans). My father and my cousins loved them, while I preferred the crostatine (cookie-size crostate, or tartlets) that she made with the leftover dough. I never asked my aunt for her recipe, so my version does not rely on her wisdom.
My intention with this challenge is to introduce you to pasta frolla and make you experiment with it in preparing a crostata of your choice.
Recipe Source:
There are many recipes for pasta frolla and different ideas about how to make it. I will give you two versions that I have been using for some time. They have been inspired by those in the book La scienza in cucina e l’arte di mangiare bene by Pellegrino Artusi (1820-1911). The book was first published in 1891, and is available in English translation as Science in the Kitchen and the Art of Eating Well (further details are given in the Additional Information section).
Blog-checking lines:
The 2010 November Daring Bakers’ challenge was hosted by Simona of briciole. She chose to challenge Daring Bakers’ to make pasta frolla for a crostata. She used her own experience as a source, as well as information from Pellegrino Artusi’s Science in the Kitchen and the Art of Eating Well.
Posting Date:
November 27, 2010
Download the printable .pdf of the challenge HERE!
Mandatory Items:You must make the pasta frolla using either one of the recipes (Version 1 or Version 2) that I have provided here and use it as the base layer for a crostata.
Variations allowed:
You can make a crostata with fruit preserves (traditional) or pastry cream or any other filling of your choice. I have provided some ideas for fillings to help you. Here's where you can be creative!
Preparation time:
The following times are approximate, as the time depends on your dexterity to cut the butter and work the dough (which should not be overworked) and your familiarity with the rolling pin.
- Preparing pasta frolla with a food processor takes 10-15 minutes
- Preparing pasta frolla without a food processor takes 20-25 minutes
- Allow the pasta frolla to chill thoroughly. I recommend at least two hours.
- Rolling the pasta frolla and assembling the crostata takes 25-30 minutes, if you use fruit preserves.
- Baking the crostata takes about 35 minutes, if you use fruit preserves.
Equipment required:
- bowls, as needed
- fork
- knife
- bench (or pastry) scraper
- rolling pin
- pastry brush
- 9 or 9.5-inch [23-24 cm] fluted round tart pan with removable bottom, about 1 inch [2.5 cm] high. (Note: If you don't have a tart pan with a removable bottom, don’t worry! You can make crostata using a 9-inch cake pan or even a 9-inch pie plate. See the Additional Information section for information on using different pans.
- a food processor is useful, but not required

Version 1 of pasta frolla
Ingredients:- 1/2 c. minus 1 tablespoon [105 ml, 100 g, 3 ½ oz] superfine sugar (see Note 1) or a scant 3/4 cup [180ml, 90g, 3 oz] of powdered sugar
- 1 and 3/4 cup [420 ml, 235 g, 8 1/4 oz.] unbleached all-purpose flour
- a pinch of salt
- 1 stick [8 tablespoons / 4 oz. / 115 g] cold unsalted butter, cut into small pieces
- grated zest of half a lemon (you could also use vanilla sugar as an option, see Note 2)
- 1 large egg and 1 large egg yolk, lightly beaten in a small bowl
Note 2: There are different ways of making vanilla sugar. I keep vanilla beans in a jar half-filled with sugar until I need to use them, for example, to make vanilla ice cream. After I remove the split bean from the custard that will go into the ice cream maker, I rinse it, dry it and put it back in the jar with sugar.
Making pasta frolla by hand:
- Whisk together sugar, flour and salt in a bowl.
- Rub or cut the butter into the flour until the mixture has the consistency of coarse crumbs. You can do this in the bowl or on your work surface, using your fingertips or an implement of choice.
- Make a well in the center of the mounded flour and butter mixture and pour the beaten eggs into it (reserve about a teaspoon of the egg mixture for glazing purposes later on – place in the refrigerator, covered, until ready to use).
- Add the lemon zest to your flour/butter/egg mixture.
- Use a fork to incorporate the liquid into the solid ingredients, and then use your fingertips.
- Knead lightly just until the dough comes together into a ball.
- Shape the dough into a flat disk and wrap in plastic wrap. Place the dough in the refrigerator and chill for at least two hours. You can refrigerate the dough overnight.


Making pasta frolla with a food processor:
- Put sugar, flour, salt, and lemon zest in the food processor and pulse a few times to mix.
- Add butter and pulse a few times, until the mixture has the consistency of coarse meal.
- Empty food processor's bowl onto your work surface
- See step 3 above and continue as explained in the following steps (minus the lemon zest, which you have already added).
If you want, you can make the pasta frolla using a combination of all-purpose flour and whole-wheat pastry flour.
If you choose to try this variation, use 1 cup [240 ml, 135 g, 4 3/4 oz.] unbleached all-purpose flour and 3/4 cup [180 ml, 100 g, 3.5 oz.] whole-wheat pastry flour.
Version 2 of pasta frolla
In this version of pasta frolla, I have played with different kinds of flours, using almond, whole-grain barley and, most recently, coconut flour instead of some of the all-purpose flour. If you want to try a different version of pasta frolla that uses some flours that you wouldn’t normally use, this is a good recipe to try. All the flours listed below (whole-wheat pastry, almond flour, coconut flour and barley flour) are available at health food stores. You may even find them at well-stocked supermarkets.The preparation for this version of pasta frolla is very similar to the preparation for Version 1.
Ingredients
- 1/3 cup [80 ml, 75 g, 2 2/3 oz.] superfine sugar or 1/2 cup [120ml, 60 g, 2 oz]powdered sugar (see Note 1.)
- 1/2 cup [120 ml, 65 g, 2 3/8 oz.] unbleached all-purpose flour
- 1/2 cup [120ml, 65 g. 2 1/4 oz.] whole-wheat pastry flour
- 1/4 cup [60ml, 28 g, 1 oz] almond flour, or almond meal, or coconut flour
- 1/4 cup [60ml, 28 g, 1 oz.] whole-grain barley flour or unbleached all-purpose flour
- a pinch of salt
- 6 tablespoons[90ml, 85 g, 3 oz] cold unsalted butter, cut into small pieces
- 1 large egg, lightly beaten
- 1/4 teaspoon vanilla extract (you can also use vanilla sugar; see Note 2.)
Note 2: There are different ways of making vanilla sugar. I keep vanilla beans in a jar half-filled with sugar until I need to use them, for example, to make vanilla ice cream. After I remove the split bean from the custard that will go into the ice cream maker, I rinse it, dry it and put it back in the jar with sugar.
Directions:
By hand:
- Whisk together sugar, flours and salt in a bowl.
- Rub or cut the butter into the sugar and flour mixture until it has the consistency of coarse crumbs. You can do this in the bowl or on your work surface, using your fingertips or an implement of choice.
- Make a well in the center of the flour and butter mixture and pour the beaten egg and vanilla extract into it.
- Use a fork to incorporate the liquid into mixture and then use your fingertips.
- Knead lightly just until the dough comes together into a ball.
- Shape the dough into a flat disk and wrap in plastic wrap. Place the dough in the refrigerator and chill for at least two hours. You can refrigerate the dough overnight.
- Put sugar, flour, and salt in the bowl of the food processor and pulse a few times to mix.
- Add butter and pulse a few times until the mixture has the consistency of coarse meal.
- Empty food processor's bowl onto your work surface.
- Make a well in the center of the mounded flour and butter mixture and pour the beaten egg and vanilla extract into it.
- Use a fork to incorporate the liquid into the solid ingredients then use your fingertips.
- Knead lightly just until the dough comes together into a ball.
- Shape the dough into a flat disk and wrap in plastic wrap. Place the dough in the refrigerator and chill for at least two hours. You can refrigerate the dough overnight.

Ideas for Filling for Your Crostata
Whether you choose to make Version 1 or 2 of the pasta frolla, there are numerous fillings that you can choose from for your crostata. I am suggesting some filling for you here (and including assemblage and baking instructions). But be brave and creative and see what you can come up with!Crostata di Marmellata (crostata with a jam filling using Version 1 pasta frolla)
If you choose to make a crostata with a jam filling, you will need:
- 1 and 3/4 cups [415ml, 600 gm, 21 oz] of jam or fruit preserves, whatever flavor you like (Note: I use my homemade fruit preserves, which have a low sugar content. I recommend you choose a good quality product, made with mostly fruit.)
- Heat the oven to 375ºF [190ºC/gas mark 5].
- Take the pasta frolla out of the fridge, unwrap it and cut away ¼ of the dough. Reserve this dough to make the lattice top of the crostata. Refrigerate this dough while you work on the tart base.
- To help roll the crostata dough, keep the dough on top of the plastic wrap that you had it wrapped in. This can help rolling the dough and can also help when transferring the dough to your pan. You can also use parchment paper for this. However, you can also roll the dough directly on a work surface if you prefer.
- Lightly dust the top of the dough and your work surface (if you’re rolling directly on a work surface) with flour. Keep some flour handy to dust the dough as you go along.
- If the dough is very firm, start by pressing the dough with the rolling pin from the middle to each end, moving the rolling pin by a pin's width each time; turn the dough 180 degrees and repeat; when it softens, start rolling.
- Roll the dough into a circle about 1/8th inch (3 mm) thick.
- If you used the plastic wrap or parchment paper as rolling surface, flip dough over the pan, centering it, and delicately press it all around so the corners are well covered. Peel away the plastic wrap.
- Trim the excess dough hanging over the edges of the pan. Press the remaining dough around the border into the sides of the pan making sure the border is an even thickness all the way around.
- Prick the bottom of the dough with a fork in several places.
- Take out of the fridge the reserved pasta frolla you had cut away earlier. Roll it with your pin and cut into strips or use cookie cutters to make small shapes (this is not traditional, but it looks cute); or roll with your hands into ropes.
- Spread the jam or fruit preserves evenly over the bottom of the crostata.
- Use the prepared strips or rolls of dough to make a lattice over the surface, or decorate with the cut shapes. (Note: You can use dough scraps to make cookies: see the Additional Information section for some pointers)
- Brush the border and strips of dough with the reserved beaten eggs. You can add a drop or two of water to the beaten eggs if you don’t have enough liquid.
- Put the tart in the oven and bake for 25 minutes.
- After 25 minutes, check the tart and continue baking until the tart is of a nice golden hue. (Note: Every oven is different. In my oven it took 34 minutes to bake the tart until golden.)
- When done, remove the tart from the oven and let cool. If you have used a tart pan with a removable bottom, then release the tart base from the fluted tart ring. Make sure the tart is completely cool before slicing and serving.


Crostata con la Crema (crostata with pastry cream filling using Version 1 pasta frolla)

If you choose to make a crostata with pastry cream filling, you will need:
- One batch of pastry cream (Note: For the recipe that I used, see #5 of the Additional Information section. Prepare the pastry cream in advance of assembling the crostata.
- Heat the oven to 350ºF [180ºC/gas mark 4].
- Take the pasta frolla out of the fridge, unwrap it and cut away ¼ of the dough. Reserve this dough to make the lattice top of the crostata. Refrigerate this dough while you work on the tart base.
- To help roll the crostata dough, keep the dough on top of the plastic wrap that you had it wrapped in. This can help rolling the dough and can also help when transferring the dough to your pan. You can also use parchment paper for this. However, you can also roll the dough directly on a work surface if you prefer.
- Lightly dust the top of the dough and your work surface (if you’re rolling directly on a work surface) with flour. Keep some flour handy to dust the dough as you go along.
- If the dough is very firm, start by pressing the dough with the rolling pin from the middle to each end, moving the rolling pin by a pin's width each time; turn the dough 180 degrees and repeat; when it softens, start rolling.
- Roll the dough into a circle about 1/8th inch (3 mm) thick.
- If you used the plastic wrap or parchment paper as rolling surface, flip dough over the pan, centering it, and delicately press it all around so the corners are well covered. Peel away the plastic wrap.
- Trim the excess dough hanging over the edges of the pan. Press the remaining dough around the border into the sides of the pan making sure the border is an even thickness all the way around.
- Prick the bottom of the dough with a fork in several places.
- Take out of the fridge the reserved pasta frolla you had cut away earlier. Roll it with your pin and cut into strips or use cookie cutters to make small shapes (this is not traditional, but it looks cute); or roll with your hands into ropes.
- Instead of jam or fruit preserves, cover the bottom of the crostata crust evenly with the pastry cream.
- Use the prepared strips or rolls of dough to make a lattice over the surface, or decorate with the cut shapes. (Note: You can use dough scraps to make cookies: see the Additional Information section for some pointers)
- Brush the border and strips of dough with the reserved beaten eggs. You can add a drop or two of water to the beaten eggs if you don’t have enough liquid.
- Put the tart in the oven and bake for 30 minutes.
- After 35 minutes, check the tart, and continue baking until the tart is of a nice golden hue. (Note: Every oven is different. In my oven it took 45 minutes to bake the tart until golden.)
- When done, remove the tart from the oven and let cool. If you have used a tart pan with a removable bottom, then release the tart base from the fluted tart ring. Make sure the tart is completely cool before slicing and serving.
Crostata di Frutta Fresca (crostata with fresh fruit using Version 1 or 2 of pasta frolla)
Note: This filling variation involves a process called “blind-baking”. (If you’re not familiar with blind-baking, see #4 in the Additional Information section for an explanation and a video on blind-baking.)In its simplest form, a crostata with fresh fruit has 3 components:
- the pasta frolla base, blind-baked
- a layer of pastry cream
- a layer of fruit
- a blind-baked shell made using pasta frolla
- a batch of pastry cream, prepared in advance and cooled (Note: For the recipe that I used, see #5 of the Additional Information section. For this crostata I make half that recipe.)
- enough fresh fruit to cover the top of your crostata (Note: You can choose anything you like, including berries, stone fruit, , kiwis, bananas, etc. See the Additional Information section for more information on using fresh fruit.)
- Preheat the oven to 350ºF [180ºC/gas mark 4].
- Roll out a batch of the pasta frolla and cover the base of the tart pan. (You can use Version 1 or 2: if you use Version 1, you will have more leftover pasta frolla to turn into cookies.)
- Cut a piece of parchment paper or aluminum foil large enough to cover the bottom of the crust and extend out a bit over the edges of the pan.
- You can use pie weights or dry beans to blind bake. Place whatever weight you’re using directly on the parchment paper or aluminum foil in an even layer.
- Place the crostata shell in the oven and bake for 20 minutes.
- Remove the weights and parchment paper and continue baking the crostata shell until the border is light golden, about 5 minutes (watch carefully to avoid over-baking, which results in a hard shell). In the absence of weight, the crust may rise in the middle: if that occurs, gently push it back down with the back of a spoon.
- Remove from the oven and let the crostata shell cool completely before proceeding.
- If you use a tart pan with removable bottom, release the base from the fluted tart ring, then slide the cooled crostata shell on a serving plate for filling. (Note: If you’ve used a cake pan or pie plate, use a bit of care in taking the shell out of the baking vessel.)
- Spread the prepared pastry cream over the cooled shell.
- Decorate the surface with fresh fruit. The crostata must be cool, but not cold, so if you refrigerate it, take it out of the fridge half an hour before serving. This crostata is best eaten the same day it is prepared.
You may be interested to know that in Science in the Kitchen and the Art of Eating Well, Artusi actually describes three recipes for pasta frolla. For crostata, Artusi recommends using his recipe C, made with butter and strutto, which is rendered pork fat used for cooking. Version 1 of the pasta frolla that I have given you here is a variation of Artusi’s Recipe B.
Here’s another version of crostata with fruit preserves inspired by Artusi's recipe
This is a video from an Italian web site that shows you how to make pasta frolla. It’s dubbed in English. Note that the recipe and the procedure used are a bit different from the ones I employ here; however, it’s a useful link:
A video from the same Italian food web site that shows how to make crostata con le fragole (crostata with fresh strawberries) and in the process shows how to blind-bake the tart shell
Blind-baking is a process often used in baking. To blind-bake a tart shell, you line the unbaked tart (once you’ve placed it in the tart pan) with parchment paper or aluminum foil. You then fill the tart with pie weights. If you don’t have pie weights, you can use dried beans. You pour these on top of the parchment paper or aluminum foil to weigh the paper down. You then bake the tart for a period of time to ensure that it is at least partially cooked. The weights help to ensure that the tart base does not bubble up during baking and that it bakes evenly. The blind-baked tart is then cooled and filled according to the recipe instructions. (Note that in the video, the dough is rolled to 1 cm [3/8th inch] thickness, thicker than than what I do.)
This is the recipe that I use for pastry cream. You are welcome to use a different recipe. If you decide to follow mine, note that it is lightly sweetened.
A blog post with an interesting discussion on crostata, the many recipes for it, and the balance of ingredients.
For more crostata ideas, check out these two recipes that you can find on my blog:
A more elaborate recipe for fresh fruit tart that you can adapt (I have not tried it).
A couple of ideas on how to use leftover pasta frolla dough:
Notes on using a different baking pan. If you don't have a fluted round tart pan with removable bottom, as described in the Equipment section at the beginning, you are not required to purchase one. As a reference, the one I have, purchased in a store in Northern California, was not expensive. However, if you don't have such a pan, a cake pan of the same size can be used, or a pie plate. I used my 9-inch cake pan, which is 9 inches [23 cm] wide and 1.5 [a bit less than 4 cm] inches high to make a crostata di marmellata. Making the border required a bit more dexterity since you want it to be lower than the rim of the pan. The crostata was ready a few minutes earlier than when I use the tart pan. I also used a 9.5 inches [24 cm] Pyrex pie plate to make a crostata di marmellata.. The baking time in this case was the same as the one noted in the recipe above. The plate is 1.75 inches [4.5 cm] so the same note about the border applied. I have never seen a crostata not baked in a pan. If you want to explore this option, use the descriptions and photos given above to guide your hands in shaping the crostata.
Note on white flour. I use all-purpose flour, the most commonly available flour in the US. Do not use bread flour or flour with a high protein content. If you use pastry flour, the volume measurement will be different, so use the weight.
Disclaimer:
The Daring Kitchen and its members in no way suggest we are medical professionals and therefore are NOT responsible for any error in reporting of gluten-free ingredients. If you have issues with digesting gluten, then it is YOUR responsibility to research the ingredient before using it. If you have allergies, it is YOUR responsibility to make sure any ingredient in a recipe will not adversely affect you. If you are lactose intolerant, it is YOUR responsibility to make sure any ingredient in a recipe will not adversely affect you. If you are vegetarian or vegan, it is YOUR responsibility to make sure any ingredient in a recipe will not adversely affect you. Please consult your physician with any questions before using a product you are not familiar with. Thank you!
__________________ Getcher Bitchon in the Kitchon!
Rock on Daring Kitchen type people! Rock on!
xoxo
Rock on Daring Kitchen type people! Rock on!
xoxo
...........................................................................................................................................................................
October 2010 Daring Baker Challenge: Doughnuts
Hello! I’m Lori of Butter Me Up and I am really excited to be hosting this month’s Daring Bakers Challenge. I must admit all sorts of options were running through my mind when I was asked to host. Should I try something really fancy? A real show stopper? Instead I decided to keep things simple, but hopefully offer up something that perhaps some people wouldn’t think to try making on their own - doughnuts!
Doughnuts can be quite simple to make and really don’t require a lot of special equipment. However there are a large number of varieties and many cultures have some version of a tasty fried dough such as beignets, crullers, fritters, Sufganiot, and krapfen, just to name a few.
In Canada (my home) doughnuts are quite popular, and apparently Canadians consume more doughnuts per capita than anyone else. Considering the multitude of Tim Horton’s shops in this country, it’s not too hard to believe.
Doughnuts generally fall into two categories: yeast and cake. Yeast doughnuts take a little longer as naturally one has to allow for rising time, but they create a lovely, fluffy and airy doughnut. Cake doughnuts are also popular and the batter allows for many different variations.
Some people may be a little timid of deep frying. Don’t. The most important thing is to be sure that you have everything at hand and are ready to go. Preparation is key when making doughnuts. It is important the oil be the correct temperature so that your doughnut is nice and crispy on the outside. If the oil is not hot enough, your end product will be too greasy. If too hot, they’ll cook too quickly on the outside and you may have an uncooked doughy centre.
The challenge is simply to make doughnuts! You can decide if you’d like them to be a cake or yeast doughnut. I have included recipes for two types of yeast doughnuts (one filled) and two types of cake doughnuts. Also included is a recipe for gluten-free doughnuts, but I’m afraid I haven’t tested it. I would encourage you to try both a cake and a yeast doughnut, and I strongly encourage you to get creative with your toppings and fillings. The sky is the limit! Feel free to dip them in chocolate, sprinkle them with sugar, or fill them with preserves, custard, or whatever you like. You could even get really creative and try making a savory doughnut! How about filling a doughnut with cheese and some herbs?
I really hope you have fun with this challenge!
Recipe Source: I am including four recipes:
The yeast doughnut is from Alton Brown:
http://www.foodnetwork.com/recipes/alton-brown/yeast-doughnuts-recipe/in...
The cake doughnut is a Nancy Silverton recipe:
http://www.seriouseats.com/recipes/2007/06/cook-the-book-oldfashioned-bu...
The raspberry jam bomboloni recipe is a Kate Neumann recipe:
http://www.foodandwine.com/recipes/raspberry-jam-bomboloni
The pumpkin doughnuts are from Bon Appétit: http://www.epicurious.com/recipes/food/views/Pumpkin-Doughnuts-with-Powd...
Blog-checking lines: The October 2010 Daring Bakers challenge was hosted by Lori of Butter Me Up. Lori chose to challenge DBers to make doughnuts. She used several sources for her recipes including Alton Brown, Nancy Silverton, Kate Neumann and Epicurious.
Posting Date: October 27, 2010
Download the printable .pdf of the challenge HERE!
Note: I recommend placing your uncooked doughnut on your slotted spoon first and lowering it into the hot oil that way to reduce the chance of injury. Also, try to always turn the spoon away from you to reduce the chances of oil splashing back up.Mandatory Items: Use any of the recipes provided. Naturally, accommodations are made for those with dietary/allergic restrictions. I’ve attached a link to a gluten free recipe below in the “Additional Information” section.
Variations allowed: Use your creativity to take these recipes and tweak them to come up with new, delicious varieties of doughnuts. You can use any type of toppings and fillings, you can make any shape you’d like, and you can make any size you like. You can add ingredients to the batters to make flavored doughnuts. The possibilities are endless.
Preparation time: See recipes for prep/rising/cooking times for each.
Equipment required:
- A Dutch oven or deep skillet (I prefer using a Dutch oven to reduce splatter)
- Deep fry thermometer, candy thermometer or any thermometer that will withstand and measure temperatures of up to 380 degrees
- Metal slotted spoon, metal slotted spatula or tongs (do NOT use plastic - it will melt!)
- Cookie sheets or a wire rack lined with paper towels to allow doughnuts to drain
- Electric hand mixer or stand mixer, or a bowl and a spoon if you are able to utilize a lot of elbow grease
- Doughnut or biscuit cutters or you can use a glass and a piping tip for the center
- Pastry bag (if you choose to make Bomboloni or any filled doughnut) or a squeeze bottle with a good tip that will poke a hole in your Bomboloni. Another way to fill a doughnut is to use the tip of a sharp knife to poke a hole in the doughnut and then use a ziplock bag filled with filling and cut on one corner to fill the doughnut.
Preparation time:
Hands on prep time - 25 minutes
Rising time - 1.5 hours total
Cooking time - 12 minutes
Yield: 20 to 25 doughnuts & 20 to 25 doughnut holes, depending on size
Ingredients
Milk 1.5 cup / 360 ml
Vegetable Shortening 1/3 cup / 80 ml / 70 gm / 2.5 oz (can substitute butter, margarine or lard)
Active Dry Yeast 4.5 teaspoon (2 pkgs.) / 22.5 ml / 14 gm / ½ oz
Warm Water 1/3 cup / 80 ml (95°F to 105°F / 35°C to 41°C)
Eggs, Large, beaten 2
White Granulated Sugar ¼ cup / 60 ml / 55 gm / 2 oz
Table Salt 1.5 teaspoon / 7.5 ml / 9 gm / 1/3 oz
Nutmeg, grated 1 tsp. / 5 ml / 6 gm / ¼ oz
All Purpose Flour 4 2/3 cup / 1,120 ml / 650 gm / 23 oz + extra for dusting surface
Canola Oil DEPENDS on size of vessel you are frying in – you want THREE (3) inches of oil (can substitute any flavorless oil used for frying)
Directions:
- Place the milk in a medium saucepan and heat over medium heat just until warm enough to melt the shortening. (Make sure the shortening is melted so that it incorporates well into the batter.)
- Place the shortening in a bowl and pour warmed milk over. Set aside.
- In a small bowl, sprinkle the yeast over the warm water and let dissolve for 5 minutes. It should get foamy. After 5 minutes, pour the yeast mixture into the large bowl of a stand mixer and add the milk and shortening mixture, first making sure the milk and shortening mixture has cooled to lukewarm.
- Add the eggs, sugar, salt, nutmeg, and half of the flour. Using the paddle attachment of your mixer (if you have one), combine the ingredients on low speed until flour is incorporated and then turn the speed up to medium and beat until well combined.
- Add the remaining flour, combining on low speed at first, and then increase the speed to medium and beat well.
- Change to the dough hook attachment of the mixer and beat on medium speed until the dough pulls away from the bowl and becomes smooth, approximately 3 to 4 minutes (for me this only took about two minutes). If you do not have a dough hook/stand mixer – knead until the dough is smooth and not sticky.
- Transfer to a well-oiled bowl, cover, and let rise for 1 hour or until doubled in size.
- On a well-floured surface, roll out dough to 3/8-inch (9 mm)thick. (Make sure the surface really is well-floured otherwise your doughnuts will stick to the counter).
- Cut out dough using a 2 1/2-inch (65 mm) doughnut cutter or pastry ring or drinking glass and using a 7/8-inch (22 mm) ring for the center whole. Set on floured baking sheet, cover lightly with a tea towel, and let rise for 30 minutes.
- Preheat the oil in a deep fryer or Dutch oven to 365 °F/185°C.
- Gently place the doughnuts into the oil, 3 to 4 at a time. Cook for 1 minute per side or until golden brown (my doughnuts only took about 30 seconds on each side at this temperature).
- Transfer to a cooling rack placed in baking pan. Allow to cool for 15 to 20 minutes prior to glazing, if desired.


Old-Fashioned Buttermilk Cake Doughnuts:
Preparation time:
Hands on prep time - 25 minutes
Cooking time - 12 minutes
Yield: About 15 doughnuts & 15 doughnut holes, depending on size
Ingredients
Sour Cream ¼ cup / 60 ml / 60 gm / 2 oz
All Purpose Flour 3 ¼ cup / 780 ml / 455 gm / 16 oz + extra for dusting surface
White Granulated Sugar ¾ cup / 180 ml / 170 gm / 6 oz
Baking Soda ½ teaspoon / 2.5 ml / 3 gm / .1 oz
Baking Powder 1 teaspoon / 5 ml / 6 gm / .2 oz
Kosher (Flaked) Salt 1 teaspoon / 5 ml / 6 gm / .2 oz (If using table salt, only use ½ teaspoon)
Nutmeg, grated 1.5 teaspoon / 7.5 ml / 9 gm / .3 oz
Active Dry Yeast 1 1/8 teaspoon / 5.6 ml / 3.5 gm / .125 oz
Buttermilk ¾ cup + 2 Tablespoon / 210 ml / 225 gm / 7 ¾ oz
Egg, Large 1
Egg Yolk, Large 2
Pure Vanilla Extract 1 Tablespoon / 15 ml
Powdered (Icing) Sugar ¼ cup / 120 ml / 65 gm / 2.3 oz (Used for decorating and is optional)
Directions:
- In a small stainless-steel bowl set over a pot of gently simmering water, heat the sour cream until just warm.
- Heat the oil to 375°F/190°C.
- Over a large mixing bowl, sift together the flour, sugar, baking soda, baking powder, salt, nutmeg; make a large well in the center. Place the yeast in the well; pour the sour cream over it. Allow it to soften (if using packed fresh yeast), about 1 minute.
- Pour the buttermilk, whole egg, egg yolks, and vanilla extract into the well. Using one hand, gradually draw in the dry ingredients. The mixture should be fairly smooth before you draw in more flour. Mix until it is completely incorporated. The dough will be very sticky. Wash and dry your hands and dust them with flour.
- Sift an even layer of flour onto a work surface. Don’t be afraid to use a lot of flour. You don’t want the doughnuts sticking to your counter. Scrape dough out of bowl onto the surface; sift another layer of flour over dough. Working quickly, pat dough into an even 1/2-inch (12.5 mm) thickness. Dip cutter in flour and, cutting as closely together as possible, cut out the doughnuts and holes. Place holes and doughnuts on a floured surface. Working quickly, gather scraps of dough together, pat into 1/2-inch (12.5 mm) thickness, and cut out remaining doughnuts and holes.
- Drop three to four doughnuts at a time into the hot oil. Once they turn golden brown, turn them and cook the other side. Cooking times may vary, but with my oil at 375 °F/190°C, I found they only took about 20 to 30 seconds per side.
- Once cooked, place on a baking sheet covered with paper towels to drain.


Bomboloni:
Preparation time:
Hands on prep time - 35 minutes
Rising time - 1 1/2 hours plus overnight
Cooking time - 10 minutes
Yield: About 32 Bomboloni
Ingredients
Water, Lukewarm 1/3 cup + 1 Tablespoon
Active Dry Yeast 3 ¼ teaspoon (1.5 pkgs.) / 16.25 ml / 10 gm / .35 oz
Honey 1.5 Tablespoon / 22.5 ml
All Purpose Flour 3 cup / 720 ml / 420 gm / 14 ¾ oz
Milk 3 Tablespoon / 45 ml
Egg Yolk, Large 6
White Granulated Sugar 1/3 cup / 80 ml / 75 gm / 2 2/3 oz + more for rolling
Kosher (Flaked) Salt 2 teaspoon / 10 ml / 6 gm / .2 oz
Butter, Unsalted 3 Tablespoon / 45 ml / 42 gm / 1.5 oz
Canola Oil 3 cup / 720 ml / (Or any other flavorless oil used for frying)
Raspberry Jam, Seedless ¾ cup / 180 ml / 300 gm / 10.5 oz (or any flavor jam, preserves, jelly)
Directions:
- In the bowl of a standing electric mixer, mix the water, yeast, honey and 1 cup plus 2 tablespoons (160 gm) of the flour. (Alternatively, whisk the ingredients by hand.) Cover with plastic wrap and let stand at room temperature until foamy, about 1 hour.
- Return the bowl to the mixer, fitted with a dough hook. Add the remaining 1 ¾ cups plus 2 tablespoons (260 gm) of flour, along with the milk, egg yolks, 1/3 cup of granulated sugar and the salt. Mix at low speed until blended, then add the butter and knead at medium speed until silky but sticky, about 5 minutes; the dough will not pull away from the side of the bowl.
- Using an oiled spatula, scrape the dough into an oiled bowl and cover with plastic wrap. Refrigerate overnight.
- In a large saucepan, heat the canola oil to 360°F/180°C. Line a rack with paper towels. Fill a shallow bowl with 1/2 inch (12 mm)of granulated sugar. On a lightly floured surface, roll out the dough a scant 1/2 inch (12 mm) thick. Using a 2-inch (50 mm) round biscuit cutter, stamp out rounds. The original recipe said to not re-roll the dough, but I did and found it to be fine. Fry the rounds, 4 to 5 at a time, until they are browned, about 4 minutes (mine only took about a minute each – try to go more by sight). Be sure to keep the oil between 360°F and 375°F 180°C and 190°C. Drain the bomboloni on paper towels.
- Roll them in the granulated sugar.
Filling Directions:
Fit a pastry bag with a plain donut tip (or a 1/4-inch (6 mm) tip) and fill with the preserves (you can also use a squeeze bottle). Poke the tip three-fourths of the way into the bomboloni and squeeze in the preserves, pulling the tip out slightly as you squeeze to fill them as much as possible. Serve warm.


Pumpkin Doughnuts:
Preparation time:
Hands on prep time - 15 minutes
Chilling time - 3 hours
Cooking time - 10 minutes
Yield: About 24 doughnuts & 24 doughnut holes
Ingredients
All Purpose Flour 3.5 cup / 840 ml / 490 gm / 17 ¼ oz
Baking Powder 4 teaspoon / 20 ml / 24 gm / .85 oz
Table Salt 1 teaspoon / 5 ml / 6 gm / .2 oz
Cinnamon, ground 1 teaspoon / 5 ml / 6 gm / .2 oz
Ginger, ground ½ teaspoon / 2.5 ml / 3 gm / .1 oz
Baking Soda ½ teaspoon / 2.5 ml / 3 gm / .1 oz
Nutmeg, ground ¼ teaspoon / 1.25 ml / 1.5 gm / .05 oz
Cloves, ground 1/8 teaspoon / .6 ml / ¾ gm / .025 oz
White Granulated Sugar 1 cup / 240 ml / 225 gm / 8 oz
Butter, Unsalted 3 Tablespoon / 45 ml / 42 gm / 1.5 oz
Egg, Large 1
Egg Yolk, Large 2
Pure Vanilla Extract 1 teaspoon / 5 ml
Buttermilk ½ cup + 1 Tablespoon / 135 ml /
Pumpkin 1 cup / 240 ml / 285 gm / 10 oz (Canned pure pumpkin or fresh cooked and pureed pumpkin – DON’T use pumpkin pie mix!)
Canola Oil DEPENDS on size of vessel you are frying in – you want THREE (3) inches of oil (can substitute any flavorless oil used for frying)
Powdered Sugar Glaze:
Powdered (Icing) Sugar 2 cup / 480 ml / 250 gm / 9 oz
Whipping Cream (About 32% butter fat) 4 Tablespoon + more if needed / 60 ml
Directions:
- Whisk together the first 8 ingredients in medium bowl to blend. Using electric mixer, beat sugar and butter in large bowl until blended (the mixture will be grainy and not smooth). Beat in egg, then yolks and vanilla. Gradually beat in buttermilk; beat in pumpkin. Using rubber spatula, fold in dry ingredients in 4 additions, blending gently after each addition. Cover with plastic; chill 3 hours.
- Sprinkle 2 rimmed baking sheets lightly with flour. Press out 1/3 of dough on floured surface to 1/2- to 2/3-inch (12 mm to 15 mm) thickness. Using 2 1/2-inch (65 mm) -diameter round cutter, cut out dough rounds. Arrange on sheets. Repeat with remaining dough in 2 more batches. Gather dough scraps. Press out dough and cut out more dough rounds until all dough is used.
- Using 1-inch (25 mm) diameter round cutter, cut out center of each dough round to make doughnuts and doughnut holes.
- Line 2 baking sheets with several layers of paper towels. Pour oil into large deep skillet to depth of 1 1/2 inches (40 mm). Attach deep-fry thermometer and heat oil to 365°F to 370°F (185°C to 188°C). Fry doughnut holes in 2 batches until golden brown, turning occasionally, about 2 minutes. Using slotted spoon, transfer to paper towels to drain. Fry doughnuts, 3 or 4 at a time, until golden brown, adjusting heat to maintain temperature, about 1 minute per side. Using slotted spoon, transfer doughnuts to paper towels to drain. Cool completely.
Glaze Directions:
- Whisk powdered sugar and 4 tablespoons whipping cream to blend. Whisk in additional cream, 1 teaspoon at a time, to form medium thick glaze.
- Can be made up to 3 hours ahead.
- Add doughnut holes to bowl of spiced sugar and toss to coat.
- Spread doughnuts on 1 side with powdered sugar glaze.
- Arrange doughnuts, glazed side up, on racks. Let stand until glaze sets, at least 30 minutes.


Additional Information:
Gluten-free recipe from Whole Living Daily:
http://wholelivingdaily.wholeliving.com/2010/06/fried-donuts-food-allerg...
Nancy Silverton’s instructions for doughnut making:
http://www.seriouseats.com/recipes/2007/06/cook-the-book-nancy-silverton...
Alton Brown making the Yeast Doughnuts:
http://www.youtube.com/watch?v=AP8L9FXVNq4
This video is adorable – it’s a girl who has never made doughnuts before. What’s great too is that she uses what she has and didn’t buy any extra equipment/gadgets. Oh and it’s funny.
http://www.youtube.com/watch?v=Uw3iR3jA8Vc
A baked version of doughnuts and he shows how to make them in a bowl using a spoon + kneading:
http://wickedhowtos.com/index.php/2010/01/02/how-to-make-doughnuts/
Photos of doughnuts for inspiration on Flickr:
http://www.flickr.com/search/?q=doughnut&w=all
''''''''''''''''''''''''''''''''''''''''''''''''''''''''''''''''''''''''''''''''''''''''''''''''''''''
September 2010 Daring Baker Challenge: Decorated Sugar Cookies
__________________________________________________

Hello Daring Bakers! I’m Mandy from “What the Fruitcake?!” and I’m so excited about being your hostess for this month’s challenge.
Download the printable .pdf of the challenge HERE!
It took me a long while to decide on a challenge and eventually I settled on something that I had never done before but had long admired. Decorated Sugar Cookies, and I’m not talking random squiggles and dots, I’m talking about beautifully decorated cookies that are perfect to give as a gift or to make for party or wedding favours.What I love about these cookies is that the sugar cookie recipe is really basic and you’d probably have all of the ingredients in your kitchen already. What makes them so impressive is that just the use of a little bit of imagination, these simple sugar cookies are made gorgeous enough to give away or to make for birthdays, bridal or baby showers, wedding favours, at Christmas or Valentines. Definitely something to keep in the file for any event you can think of.
I’ve used Peggy Porschen’s recipe for the challenge recipe. Sugar cookie recipes commonly have either baking powder or bicarb of soda, but this recipe is a little different in that it doesn’t use a raising agent which makes them great so if you’re using intricate cookie cutters, they hold their shape while baking. Perfect for decorating with royal icing! So get out your rolling pins and I hope you enjoy this month’s challenge!

Recipe Source
Basic Sugar Cookie recipe adapted from Peggy Porschen:
http://www.peggyporschen.com/images/press/pdf/Coso-Bride-Oct-Nov-2008.pdf
Also found in her book: “Romantic Cakes” http://www.peggyporschen.com/book-detail.asp?ID=2
Royal Icing recipe adapted from The Joy of Baking:
http://www.joyofbaking.com/RoyalIcing.html
Blog-checking lines
The September 2010 Daring Bakers’ challenge was hosted by Mandy of “What the Fruitcake?!” Mandy challenged everyone to make Decorated Sugar Cookies based on recipes from Peggy Porschen and The Joy of Baking.
Posting Date
27 September 2010

Notes
• I’m setting a theme for this month’s challenge, and the theme is “September”. For me, September is my 2 year wedding anniversary, it’s also the month my in-laws will be visiting us from South Africa. For you, it may be back to school; the start of Spring or Autumn/Fall depending where you are in the world; September could also be someone special’s birthday or even the beginning of your favourite sporting season. Whatever happens in your life in September, that’s what I’d like your cookies to be about.
• I have not shown the process of making Royal Icing from scratch as making it is not mandatory, but I have included links at the end of the post with recipes for Royal Icings made with meringue powder or vegan and egg free as well as included a recipe for Royal Icing made with egg whites.
• You can make these over the course of weeks if you’d like, if kept in an airtight container the cookies can last a month, so if you’re busy and only have little bits of time for the challenge, you can do these very easily in stages. If you do have time, depending on how you decide to decorate your cookies, it can take 1-2 days to allow for drying time for the icing.
• I’ve included some really useful video tutorials from YouTube which you can find at the end of the post.
• And for your inspiration/ogling, there are also links to some beautifully decorated cookies.
Mandatory
• You must make the Basic Sugar Cookie recipe provided (unless specific diet restrictions apply)
• You must decorate your cookies with the theme of September, whatever that means to you
Variations Allowed
• While you must use Peggy Porschen’s sugar cookies recipe, you are allowed to add your own flavourings to the dough, so if you’d like to add a pinch of cinnamon & nutmeg, substitute some of the flour for cocoa, or maybe add orange zest, go for it!
• You don’t have to make your own royal icing from scratch, you may use a store bought mix.
• You may make any shape cookie you like so long as it has the theme of September, this means you could do round or square cookies and pipe pictures/words on them or use specifically shaped cookie cutters (butterflies, flowers, hearts etc)
• You may also use coloured sugars, luster dust, edible glitter or flakes, dragees and coloured sprinkles to decorate your cookies.
• I’ve provided links to vegan, egg free and gluten free sugar cookies at the end of this post. To make the recipe dairy free, use margarine or your favourite dairy free spread instead of butter.

Preparation Time
30 minutes: Making dough & rolling
1 hour min: Refrigeration
8-15 minutes: Baking per tray depending on size of cookies
Equipment Required
- Parchment paper
- Rolling pin
- 5mm guide sticks (optional)
- Cookie cutters or sharp knife
- Baking trays
- Wire cooling rack
- Spatulas
- Mixing bowls
- Measuring cups/spoons or weighing scale
- Sieve
- Icing bags / Parchment Cones
- Sizes 1 to 5 plain icing tips (2 and 4 being the most common to use)
- Star icing tips (optional)
- Couplers (optional)
- Toothpicks
- Elastic bands

Basic Sugar Cookies:
Makes Approximately 36x 10cm / 4" Cookies
200g / 7oz / ½ cup + 6 Tbsp Unsalted Butter, at room temperature
400g / 14oz / 3 cups + 3 Tbsp All Purpose / Plain Flour
200g / 7oz / 1 cup Caster Sugar / Superfine Sugar
1 Large Egg, lightly beaten
5ml / 1 tsp Vanilla Extract / Or seeds from 1 vanilla bean
Directions
• Cream together the butter, sugar and any flavourings you’re using. Beat until just becoming
creamy in texture.
• Tip: Don’t over mix otherwise you’ll incorporate too much air and the cookies will spread during
baking, losing their shape.
• Beat in the egg until well combined, make sure to scrape down the sides of the bowl.
Add the sifted flour and mix on low until a non sticky dough forms.
• Tip: I don’t have a stand mixer so I find it easier to switch to dough hooks at this stage to avoid
flour flying everywhere.
• Knead into a ball and divide into 2 or 3 pieces.
• Roll out each portion between parchment paper to a thickness of about 5mm/1/5 inch (0.2 inch)
• Refrigerate for a minimum of 30mins.
• Tip: Recipes commonly just wrap the whole ball of dough in clingwrap and then refrigerate it for an
hour or overnight, but by rolling the dough between parchment, this shortens the chilling time and
then it’s also been rolled out while still soft making it easier and quicker.
• Once chilled, peel off parchment and place dough on a lightly floured surface.
• Cut out shapes with cookie cutters or a sharp knife.
• Arrange shapes on parchment lined baking sheets and refrigerate for another 30mins to an hour.
• Tip: It’s very important you chill them again otherwise they’ll spread while baking.
• Re-roll scraps and follow the above process until all scraps are used up.
• Preheat oven to 180°C (160°C Fan Assisted) / 350°F / Gas Mark 4.
• Bake until golden around the edges, about 8-15mins depending on the size of the cookies.
• Tip: Bake same sized cookies together otherwise mixing smaller with larger cookies could result in
some cookies being baked before others are done.
• Tip: Rotate baking sheets half way through baking if your oven bakes unevenly.
• Leave to cool on cooling racks.
• Once completely cooled, decorate as desired.
• Tip: If wrapped in tinfoil/cling wrap or kept in airtight containers in a cool place, un-decorated
cookies can last up to a month.

Royal Icing:
315g – 375g / 11oz – 13oz / 2½ - 3 cups Icing / Confectioner’s / Powdered Sugar, unsifted
2 Large Egg Whites
10ml / 2 tsp Lemon Juice
5ml / 1 tsp Almond Extract, optional
Directions
• Beat egg whites with lemon juice until combined.
• Tip: It’s important that the bowls/spoons/spatulas and beaters you use are thoroughly cleaned and
grease free.
• Sift the icing sugar to remove lumps and add it to the egg whites.
• Tip: I’ve listed 2 amounts of icing sugar, the lesser amount is good for a flooding consistency, and the larger amount is for outlining, but you can add even more for a much thicker consistency good for writing. If you add too much icing sugar or would like to make a thinner consistency, add very small amounts of water, a few drops at a time, until you reach the consistency you need.
• Beat on low until combined and smooth.
• Use immediately or keep in an airtight container.
• Tip: Royal Icing starts to harden as soon as it’s in contact with air so make sure to cover containers with plastic wrap while not in use.

Decorating Your Cookies: Flooding
“Flooding” a cookie is a technique used when covering a cookie with Royal Icing.
1. You outline the area you want to flood which helps create a dam
2. Then fill or flood inside the area you’ve outlined
Decorating Your Cookies: What You'll Need
- Piping bags / Parchment Cones / Ziplock Bags
- Elastic bands
- Piping tips (between sizes 1 & 5)
- Couplers
- Glasses (handy for standing your piping bags in)
- Clean clothes, dry & damp
- Toothpicks
- Gel or paste food colouring

Decorating Your Cookies: Royal Icing
The most important thing when it comes to decorating with Royal Icing is the consistency.
There are two ways of flooding your cookies. Some like to do the outline with a thicker icing and then flood with a thinner icing. Some like to use the same icing to do both which saves time and you don’t have to have two different piping bags for each colour you’re using.
The Same Consistency Method
Consistency:
• Mix your royal icing according to the recipe/instructions
• Drag a knife through the surface of the Royal Icing and count to 10
• If the surface becomes smooth between 5 & 10 seconds, the icing is at the correct consistency
• Tip: If your icing is too thick, thin it by adding a few drops of water. Mix, do the 10 second test, then if it’s still too thick, add a few more drops of water, repeat, etc.
• Tip: To thicken your icing, add small amounts of icing sugar until thick enough for the 10 second test
Two Different Consistencies Method
Consistency:
• Mix your royal icing according to the recipe/instructions.
• Separate into 2 different bowls, one lot of icing for outlining, the other for flooding.
• For the outlining icing, drag a knife through the surface of the Royal Icing.
• If the surface becomes smooth at around 10 seconds, the icing is at the correct consistency.
• Tip: If your icing is too thick, thin it by adding a few drops of water. Mix, count to 10 seconds, then if it’s still too thick, add a few more drops of water, repeat, etc.
• Tip: To thicken your icing, add small amounts of icing sugar until thick enough for the 10 second test.
• For the flooding/filling icing, drag a knife through the surface of the Royal Icing.
• If the surface becomes smooth at around 3-4 seconds, the icing is at the correct consistency.
• Tip: If your icing is too thick, thin it by adding a few drops of water. Mix, count to 3-4 seconds, then if it’s still too thick, add a few more drops of water, repeat, etc.
• Tip: To thicken your icing, add small amounts of icing sugar until thick enough for the 3-4 second test.

Colouring
• Separate Royal Icing into separate bowls for each colour you plan on using.
• Tip: Make sure to cover the bowls with cling film or a damp cloth to prevent the top from setting and then making lumps
• Using a toothpick, add gel or paste colouring to each bowl and mix thoroughly until desired colour is reached
• Tip: You can use liquid food colouring but you might not be able to get the desired strength of colour, liquid colouring will also thin out the icing so you’ll need to add more icing sugar to thicken it again.

Prepping and Filling Your Bag
• Attach your icing tips to the piping bags using couplers
• Tip: You don’t need to use a coupler but it makes it easier if you want to change tip sizes
• Tip: A size 1 tip is best for doing intricate details. A size 2 tip is good for some details and outlining. Fill or flood with sizes 2 – 5.
• Tip: You don’t need a piping bag, you can use a parchment cone or ziplock bag with a tiny bit snipped off the corner. I would however recommend getting a piping set if you don’t have one as it will be much easier and more precise.
• Stand the piping bags in glasses with the tops of the bags folded over the top of the glass.
• Fill your icing bags with each coloured icing.
• Tie the ends of the piping bags with elastic bands.

Decorating: Outlining
• Fit the piping bag with a size 2 or 3 tip.
• Tip: Or snip a very small bit of the corner off of a parchment cone or Ziploc bag
• Hold the piping bag at a 45 degree angle above the cookie where you want to start the outline.
• Gently squeeze the piping bag and start moving in the direction you want to outline the cookie.
• Start lifting the piping bag away from the cookie so that the flow of icing falls onto the cookie, making it an even and neater outline.
• As you start to reach the beginning of the outline, bring the piping tip closer to the surface of the cookie to meet the start of the icing outline.
• Tip: If you’re doing an intricate cookie, like a snow flake, you won’t be able to lift the tip as far away from the cookie.
• If you’re doing a different colour border, eg a black border, let the outline dry before flooding. If using the same colour for the outline as you’re flooding with, begin flooding after doing the outline.
Decorating: Flooding
• Fit the piping bag with a size 2-5 tip, the bigger the area being filled, the bigger the tip.
• Tip: Or cut slightly more off the corner of a Ziploc bag to create a slightly larger opening.
• Quickly zigzag back and forth over the area you want to fill.
• Tip: You need to be quick when flooding the cookie so don’t worry too much if it’s not filled in neatly.
• Using a toothpick or clean paintbrush, push the icing around into the gaps that are still remaining.
• Either pick up the cookie and tip it from side to side to even out the filling, or lightly bang the cookie down on your kitchen counter.

Decorating: Melding Colours
• If you would like to add lines or dots to the base colour that you flooded the cookie with so that they meld and dry as a smooth surface, you need to add the lines/dots/patterns as quickly as possible after flooding and smoothing the surface of the cookie.
• Tip: Make sure to have all the colours you’re planning on using ready and close by so that you can switch between colours quickly
• Simply pipe other colours onto the flooded surface in patterns or lines which you can either leave as that or then drag a toothpick through to make marbling patterns.

Decorating: On top of flooding
• If you’d like to do other patterns/outlines or writing on top of the flooded surface so that they are raised above the flooded background, simply allow the icing to dry, preferably over night.
• Fit the piping bag with tip sizes 1-3.
• Pipe patterns or write on top of the dry icing
• Tip: For writing, the consistency of your icing should be thicker rather than thinner, drag a knife through your icing and when the surface smoothes around 12-15 seconds, the consistency is correct.
Packaging and Storing
• Once fully decorated, allow cookies to dry for 24 hours in a cool and dry area.
• Stack cookies in an airtight container, from largest cookies at the bottom, to smallest and more intricate at the top, with parchment or wax free paper in between the layers.
• Store in a cool and dry area with the container’s lid firmly sealed.
• Will last for about a month if stored this way.

General Baking Tips
• When measuring by volume (cup) always shift/aerate your flour/icing sugar in the container/bag before measuring because it settles as it sits and so you end up with more flour/icing sugar in your cup. I do this by moving the ingredient around with a spoon, whisk or fork.
• When measuring flour or icing sugar by volume (cup) never scoop the flour/icing sugar up with the cup otherwise you compress the contents and this can make a big difference in the amount you’re using. Rather, spoon the ingredient into the cup until level with the top.
• When measuring baking powder or baking soda, always level off the top of the measuring spoon with something flat (like the back of a knife) as these ingredients need to be accurately measured.
• When mixing your ingredients, always follow the recipe instructions, especially when it comes to beating in eggs and flour, so if it specifies to mix until just combined or to beat for 4 minutes, follow the instructions to get best results.
• Unless otherwise specified, always have your ingredients at room temperature.
• It’s always best to invest in an oven thermometer so that you know exactly the temperature you’re baking at then you can also find out if you have cold or hot spots in your oven.
• If you need to rotate your trays midst baking, always allow at least half the baking time to lapse before opening your oven to move baking trays around, this allows time for your baked goods to form a good structure so that they won’t flop.
General Royal Icing Tips
• Keep a damp cloth handy while decorating your cookies so that if you’re switching between different icing bags, you can keep the tips covered with the damp cloth so that the icing doesn’t dry and clog them.
• If your icing tips do clog, use a toothpick or pin to unclog them.
• Always pipe a little bit of royal icing onto a board/paper towel before you begin to make sure there are no air bubbles.
• Remember to always cover bowls containing royal icing wither cling wrap, a damp cloth or sealable lid so that the surface doesn’t dry.
• Don’t store anything decorated with royal icing in the fridge otherwise the royal icing will
become tacky.
Additional Information
Vegan Sugar Cookie Recipes:
http://www.johnandkristie.com/archives/2005/10/perfect_sugar_c.html
http://www.familyoven.com/offsite?r_id=221279&u=http://www.recipezaar.com/166084
http://www.vegan-nutritionista.com/vegan-dessert-recipes.html
http://www.chezbettay.com/pages/desserts1/drts_sugarcookie1.html
Gluten Free Sugar Cookie Recipes:
http://glutenfreegirl.blogspot.com/2005/12/may-you-have-house-full-of-laughter.html
http://www.fitnessandfreebies.com/celiac/cookies5.html
http://glutenfree.wordpress.com/2009/09/03/soft-and-chewy-gluten-free-sugar-cookies/
http://glutenfreecooking.about.com/od/dessertsandsweets/r/glutenfreedecoratedsugarcookierecipe.htm
Egg Free Sugar Cookie Recipes:
http://www.slashfood.com/2007/12/04/cookie-a-day-eleanors-sugar-cookies/
http://debralegg.com/2009/02/12/egg-free-cutout-sugar-cookies/
http://messageboards.ivillage.com/n/mb/message.asp?webtag=iv-ppallergies&msg=18512.1
http://www.buzzle.com/articles/sugar-cookies-without-eggs.html
Royal Icing Recipes (Using egg whites or meringue powder)
http://www.joyofbaking.com/RoyalIcing.html
Vegan/Egg Free Royal Icing Recipes
http://veglicious.blogspot.com/2008/07/royal-icing-decorations.html
http://vegetationramblings.blogspot.com/2007/05/molasses-cookies.html
Sugar Cookie Icing (egg free)
http://allrecipes.com/Recipe/Sugar-Cookie-Icing/Detail.aspx
http://cookiecrazie.blogspot.com/p/faq.html
Helpful Videos:
Making Royal Icing:
Part 1: http://www.youtube.com/watch#!v=2nFnQiAB_BU&feature=channel
Part 2: http://www.youtube.com/watch#!v=wkZfya6aVZo&feature=channel
Decorating with Royal Icing:
Part 1: http://www.youtube.com/watch#!v=9pUGmWA9n1s&feature=channel
Part 2: http://www.youtube.com/watch#!v=PFTAxNxDd5I&feature=channel
Other: http://www.youtube.com/watch?v=tZBXVveAEPE
Decorating with Squeeze Bottles:
http://www.youtube.com/watch?v=SC5EhOfnr98
Inspiration:
http://sweetopia.net/
http://www.flickriver.com/groups/cookiecuttercookies/pool/interesting/
http://www.slashfood.com/2008/02/08/love-letter-cookies/
http://www.flickr.com/photos/72102376@N00/1354171334/
http://marzipanmom.blogspot.com/2010/06/flag-day-cookies-and-recent-baking.html
http://iammommy.typepad.com/i_am_baker/2010/06/sixty.html
http://bakeat350.blogspot.com/2010/06/hot-diggety-dog-its-beer-thirty.html
http://curiousconfections.com/lemon-sugar-cookies
http://bakeat350.blogspot.com/2010/05/strawberry-picking.html
http://treats-sf.blogspot.com/2010/05/cherry-blossom-cookies.html
http://diamondsfordessert.blogspot.com/2010/04/controller-cookies_18.html
Other Tutorials:
http://sweetopia.net/category/tutorials/
How to Make Your Own Cookie Cutters:
http://www.youtube.com/watch?v=2HgFx4_M-ao
http://blog.jugglingfrogs.com/2007/10/make-your-own-cookie-cutter-from-clip.html
http://www.cutoutandkeep.net/projects/homemade_cookie_cutters_2
-------------------------------------------------------------------------------------------------------------
August Daring Daring Bakers: Baked Alaska
Hi Daring Bakers! I’m Elissa of 17 and Baking (I’m now 18 years old
). I joined Daring Bakers last April and have loved every minute of it. I’m so thrilled to be hosting a challenge before I leave for college at the end of August! Jen of Sugar High Fridays chose brown butter as this month’s theme ingredient, and I chose to showcase it in the form of brown butter pound cake. Since August brings the heat, I’ve chosen two desserts that use both cake and ice cream – Ice Cream Petit Fours and Baked Alaska. The Baked Alaska is simply cake topped with ice cream and swirled with torched meringue – it’s very simple and open to endless flavor profiles. The Ice Cream Petit Fours are definitely trickier, but I’m so excited to see the incredible decorations and variations the Daring Bakers will come up with! You can make one or both desserts, but no matter what, you’ll be browning butter and churning ice cream and getting creative.
Recipe Source: The brown butter pound cake recipe is adapted from the October 2009 edition of Gourmet. The vanilla ice cream is from ice cream genius David Lebovitz, adapted from The Perfect Scoop. The chocolate glaze for the petit fours is a larger adapted version of this ganache from Godiva Chocolate and the meringue for the Baked Alaska is a larger version of this meringue from Gourmet, May 1995.
Blog-checking lines: The August 2010 Daring Bakers’ challenge was hosted by Elissa of 17 and Baking. For the first time, The Daring Bakers partnered with Sugar High Fridays for a co-event and Elissa was the gracious hostess of both. Using the theme of beurre noisette, or browned butter, Elissa chose to challenge Daring Bakers to make a pound cake to be used in either a Baked Alaska or in Ice Cream Petit Fours. The sources for Elissa’s challenge were Gourmet magazine and David Lebovitz’s “The Perfect Scoop”.
Posting Date: August 27, 2010
Download the printable .pdf of the challenge HERE!
Note:• The challenge does not require you to make both desserts. If you want to do both, you will need to make two brown butter pound cakes. The amount of ice cream you will need depends on how large you make your Baked Alaskas, but the recipe provided below makes one quart.
• While there is not a great deal of active time, this challenge cannot be easily completed in a day because of freezing time. Make the ice cream first, then the pound cake, then the glaze/meringue as stated in the assembly instructions.
• The pound cake calls for cake flour. You can make 1 cup of cake flour by placing 2 tablespoons of corn starch in a 1 cup measure, and filling to the top with all purpose flour.
• The ice cream can be flavored however you want by infusing the cream, stirring in extracts or mix ins, or folding in purees, sauces, etc.
• Instead of using a tea cup as a mold for the Baked Alaska, you can simply top the cake round with a scoop of ice cream and freeze until solid.
• For the petit fours, you are not required to use the chocolate glaze and can use your own recipe for fondant, poured fondant, royal icing, or marzipan. I recommend the chocolate glaze because it freezes well and balances the sweetness of the ice cream, but it does limit the scope of your decorations.
Mandatory: Whether you make the Baked Alaska, the petit fours, or both, you must make the brown butter pound cake as written and the ice cream from scratch.
Variations Allowed: Both desserts can be made in any size or shape, and the ice cream can be any flavor you can think of! For the Baked Alaska, you can flavor the meringue however you want. For the petit fours, you are not required to use the chocolate glaze, or you can add additional flavors. You can also brush the cake with a simple syrup if desired.
Preparation time:
Ice cream – 45 min active time, ice cream rests/chills for 1 hour then overnight. Without an ice cream maker, the ice cream chills 2-3 hours and must be stirred every 30 minutes.
Brown Butter Pound Cake – 2 hours (includes cooling time)
Chocolate Glaze – 15 minutes
Meringue – 10 minutes
Assembly of Ice Cream Petit Fours – Ice cream must be frozen ahead of time several hours, then the cake and ice cream freeze overnight. After dipping, the petit fours freeze for one hours.
Assembly of Baked Alaska – Ice cream must be frozen head of time several hours, then the Baked Alaska is frozen 1 hour or up to one day.
Equipment required:
• Small and medium saucepans
• Paring knife
• 2 quart (2 litres) bowl
• Electric mixer
• Whisk
• Spatula
• Sieve
• 9”x9” (23cmx23cm) square baking pan
• 10” (25 cm) skillet
• Cake leveler/serrated knife
• Cooling racks
• Rimmed half sheets
• Teacups
• Plastic wrap
• Piping bags (optional)
• Ice cream maker (optional)
• Cooking blow torch (optional)
Directions:
Vanilla Ice Cream
1 cup (250ml) whole milk
A pinch of salt
3/4 cup (165g) sugar
1 vanilla bean, split lengthwise OR 2 teaspoons (10ml) pure vanilla extract
2 cups (500ml) heavy (approx 35% butterfat) cream
5 large egg yolks
1 teaspoon (5ml) pure vanilla extract
1. Heat the milk, salt, and sugar in a medium saucepan until the liquid steams. Scrape out the seeds of the vanilla bean with a paring knife and add to the milk, along with the bean pod. Cover, remove from heat, and let infuse for an hour. (If you do not have a vanilla bean, simply heat the milk, salt, and sugar in a medium saucepan until the liquid steams, then let cool to room temperature.)
2. Set up an ice bath by placing a 2-quart (2 litre) bowl inside a large bowl partially filled with water and ice. Put a strainer on top of the smaller bowl and pour in the cream.
3. In another bowl, lightly beat the egg yolks together. Reheat the milk in the medium saucepan until warmed, and then gradually pour ¼ cup warmed milk into the yolks, constantly whisking to keep the eggs from scrambling. Once the yolks are warmed, scrape the yolk and milk mixture back into the saucepan of warmed milk and cook over low heat. Stir constantly and scrape the bottom with a spatula until the mixture thickens into a custard which thinly coats the back of the spatula.
4. Strain the custard into the heavy cream and stir the mixture until cooled. Add the vanilla extract (1 teaspoon [5ml] if you are using a vanilla bean; 3 teaspoons [15ml] if you are not using a vanilla bean) and refrigerate until thoroughly chilled, preferably overnight.
5. Remove the vanilla bean and freeze in an ice cream maker. If you don’t have an ice cream maker, you can make it without a machine. See instructions from David Lebovitz: http://www.davidlebovitz.com/archives/2007/07/making_ice_crea_1.html

Brown Butter Pound Cake
19 tablespoons (9.5 oz) (275g) unsalted (sweet) butter
2 cups (200g) sifted cake flour (not self-rising; sift before measuring) (See “Note” section for cake flour substitution)
1 teaspoon (5g) baking powder
1/2 teaspoon (3g) salt
1/2 cup (110g) packed light brown sugar
1/3 (75g) cup granulated sugar
4 large eggs
1/2 teaspoon pure vanilla extract
1. Preheat the oven to 325°F/160°C and put a rack in the center. Butter and flour a 9”x9” (23cmx23cm) square pan.
2. Place the butter in a 10” (25cm) skillet over medium heat. Brown the butter until the milk solids are a dark chocolate brown and the butter smells nutty. (Don’t take your eyes off the butter in case it burns.) Pour into a shallow bowl and chill in the freezer until just congealed, 15-30 minutes.
3. Whisk together cake flour, baking powder, and salt.
4. Beat the brown butter, light brown sugar, and granulated sugar in an electric mixer until light and fluffy, about 2 minutes. Beat in the eggs one at a time, mixing well, and then the vanilla extract.
5. Stir in the flour mixture at low speed until just combined.
6. Scrape the batter into the greased and floured 9”x9” (23cmx23cm) square pan. Smooth the top with a rubber spatula and rap the pan on the counter. Bake until golden brown on top and when a toothpick inserted into the center comes out clean, about 25 minutes.
7. Cool in the pan 10 minutes. Run a knife along the edge and invert right-side-up onto a cooling rack to cool completely.
Chocolate Glaze (For the Ice Cream Petit Fours)
9 ounces (250g) dark chocolate, finely chopped
1 cup (250 ml) heavy (approx 35% butterfat) cream
1 1/2 tablespoons (32g) light corn syrup, Golden syrup, or agave nectar
2 teaspoons (10ml) vanilla extract
Stir the heavy cream and light corn syrup in a small saucepan over medium heat until it comes to a boil. Remove from heat and add the dark chocolate. Let sit 30 seconds, then stir to completely melt the chocolate. Stir in the vanilla and let cool until tepid before glazing the petit fours.

Meringue (For the Baked Alaska)
8 large egg whites
½ teaspoon (3g) cream of tartar
½ teaspoon (3g) salt
1 cup (220g) sugar
Beat the egg whites, cream of tartar, and salt on high speed in an electric mixer until soft peaks form. Beat in the sugar gradually in a slow stream until stiff peaks form.

Assembly Instructions – Ice Cream Petit Fours
1. Line a 9”x9” (23cmx23cm) pan with plastic wrap, so that no sides of the pan are exposed and so there is some extra plastic wrap hanging off the sides. Spread 1 ¾ to 2 cups (450ml to 500ml) ice cream into the pan. Cover with more plastic wrap and freeze several hours.
2. Once the brown butter pound cake has completely cooled, level the top with a cake leveler or a serrated knife. Then split the cake in half horizontally to form two thin layers.
3. Unwrap the frozen ice cream. Flip out onto one of the layers of cake and top with the second layer of cake. Wrap well in plastic wrap and return to the freezer overnight.
4. Make the chocolate glaze (see above.)
5. While the glaze cools, trim ¾” (2cm) off each side of the ice cream cake to leave a perfectly square 7.5” (19cm) ice cream cake. Cut the cake into twenty five petit fours, each 1.5”x1.5” (4cmx4cm).

6. Glaze the petit fours one at a time: place a petit four on a fork and spoon chocolate glaze over it.

7. Place the petit fours on a parchment-lined baking sheet and return to the freezer for one hour.

Assembly Instructions – Baked Alaska
1. Line four 4” (10cm) diameter tea cups with plastic wrap, so that plastic wrap covers all the sides and hangs over the edge. Fill to the top with ice cream. Cover the top with the overhanging plastic wrap and freeze for several hours, or until solid.


2. Level the top of the brown butter pound cake with a serrated knife or with a cake leveler. Cut out four 4” (10cm) diameter circles from the cake. Discard the scraps or use for another purpose.
3. Make the meringue (see above.)
4. Unwrap the ice cream “cups” and invert on top of a cake round. Trim any extra cake if necessary.

5. Pipe the meringue over the ice cream and cake, or smooth it over with a spatula, so that none of the ice cream or cake is exposed. Freeze for one hour or up to a day.

6. Burn the tips of the meringue with a cooking blow torch. Or, bake the meringue-topped Baked Alaskas on a rimmed baking sheet in a 500°F/260°C oven for 5 minutes until lightly golden. Serve immediately.

I made a strawberry ice cream. I made the meringue, chocolate sauce, and brown butter pound cake exactly as written.


Additional Information:
http://simplyrecipes.com/recipes/how_to_brown_butter/ - Great article on browning butter with step by step photos
http://www.davidlebovitz.com/archives/2007/07/making_ice_crea_1.html - Making Ice Cream without a Machine
http://www.youtube.com/watch?v=X7aTU5wLyz0&feature=fvsr – Video of how to transfer ice cream from plastic wrap-lined cup to cake (Baked Alaska)
http://www.youtube.com/watch?v=v98pZYBnUEc – Video on how to glaze petit fours (fast forward to 3:00 minutes. Includes poured fondant recipe)
http://www.dianasdesserts.com/index.cfm/fuseaction/recipes.recipeListing/filter/dianas/recipeID/1485/Recipe.cfm - Poured fondant recipe (Petit Fours)
http://userealbutter.com/2008/04/15/lemon-petits-fours-recipe/ - Simple syrup and poured fondant recipes (Petit Fours)
http://www.bakersroyale.com/cakes/easter-tea-cakes/ - Poured buttercream instructions
Petit Four decoration ideas:
http://i.timeinc.net/recipes/i/recipes/oh/cwsl/raspberry-petit-fours-oh-1923725-l.jpg
http://www.mrs-o-kitchen.com/images/9nancy.jpg
http://thebridescafe.typepad.com/my_weblog/images/2008/02/05/c6.jpg
http://www.bakersroyale.com/cakes/easter-tea-cakes/
http://www.beau-coup.com/Pictures/signature-petit-fours(2).jpg
http://www.pinkcakebox.com/images/cake109a.jpg
http://www.roses-and-teacups.com/DD/b_CHOC.jpg
http://www.brightideas.com/userContent/IdeaImages/ideas_0_1023/Idea_267/triple_choc_petits_fours_l.jpg
Baked Alaska decoration ideas:
http://img.timeinc.net/recipes/i/recipes/su/08/07/baked-alaska-su-1816275-l.jpg
http://whatscookingamerica.net/History/Cakes/BakedAlaska.jpg
http://www.countryliving.com/cm/countryliving/images/1i/baked-alaska-de.gif
http://img.foodnetwork.com/FOOD/2009/06/17/FNM080109Cover021_pink_s4x3_lg.jpg
http://www.calstrawberry.com/recipes/recipeImages/Strawberry%20Baked%20Alaska.jpg
http://www.bizbash.com/content/editorial/StoryPhoto/big/e15109image10.jpg
http://zoebakes.com/?p=967
__________________
Host: Elissa @ 17 and Baking
http://17andbaking.com/
-------------------------------------------------------------------------------------------------------------
July 2010 Daring Bakers Challenge: Swiss Swirl Ice Cream
A big hello to all the daring bakers, old and new. As for myself, I am Sunita. I blog at Sunita’s world- life and food and have been doing so for the past three and a half years. This month I will be completely three years as a daring baker. And what a joy ride it has been; as a part of this wonderful group, I have tried out so many new things, things that I probably would not have tried by myself. So, thanks to Lis and Ivonne for starting this great group, where every challenge has something new to learn. And I am excited to be your hostess this month.

The recipe for this month’s challenge has been adapted from this Swiss swirl ice cream cake from the Taste of Home website. Slices of Swiss roll are used to line a bowl and then filled with vanilla ice-cream, hot fudge ice cream topping and chocolate ice cream. The picture looked like so much fun that I have been waiting to make it for a while. What better timing than to make it along with fellow daring bakers to celebrate my three years with this amazing group. I have taken the basic idea from the above website and have developed the recipe. Hope you like it. The recipe does not require a lot of hands on time, but definitely requires a lot of cooling and freezing time between layers. Unlike the original recipe, we are going to make each layer from scratch. So, if you are planning to make it in one day, it might be a bit of a struggle.

Recipe source- Inspired by the Swiss swirl ice cream cake from the Taste of Home website
The recipes for the cake, filling, eggless ice creams and the fudge topping have been developed by myself.
Blog checking lines- The July 2010 Daring Bakers’ challenge was hosted by Sunita of Sunita’s world – life and food. Sunita challenged everyone to make an ice-cream filled Swiss roll that’s then used to make a bombe with hot fudge. Her recipe is based on an ice cream cake recipe from Taste of Home.-
Posting date-27th July,2010
Notes-
For the 2 Swiss rolls-
30 mins each + cooling time (at least 30 minutes) before filling and rolling. The filling can be made while the cakes cool.
-For the ice creams- 5+10 minutes + freezing time
For the fudge topping- 5 minutes + cooling time
Assembly- At least an hour of freezing time between each layer (I took much more)
Equipment required-
The Swiss rolls-
Preparation time- 10 minutes
Baking time- 10-12 minutes
Rolling and cooling time- at least 30 minutes
Filling-5-8 minutes
Filling and rolling- 5-10 minutes
Ingredients-
6 medium sized eggs
1 C / 225 gms caster sugar /8 oz+ extra for rolling
6 tblsp / 45gms/ a pinch over 1.5 oz of all purpose (plain) flour + 5 tblsp/40gm /a pinch under 1.5 oz of natural unsweetened cocoa powder, sifted together
2 tblsp /30ml / 1 fl oz of boiling water
a little oil for brushing the pans
For the filling-
2C / 500 mls/ 16 fl oz of whipping cream
1 vanilla pod, cut into small pieces of about ½ cm (or 1 tsp vanilla extract)
5 tblsp / 70gms/2.5oz of caster sugar
Method-


The vanilla ice cream-
Preparation time-5 minutes+freezing
I have made the ice cream without an ice cream maker.
Ingredients-
2 and ½ C / 625 ml / 20 fl oz of whipping cream
1 vanilla bean, minced or 1 tsp/ 5 ml/ .15 fl oz vanilla extract
½ C / 115gms/ 4 oz of granulated sugar
Method-
Grind together the sugar and vanilla in a food processor. In a mixing bowl, add the cream and vanilla –sugar mixture and whisk lightly till everything is mixed together. If you are using the vanilla extract, grind the sugar on its own and then and the sugar along with the vanilla extract to the cream.
Pour into a freezer friendly container and freeze till firm around the edges. Remove from the freezer, beat till smooth and return to the freezer. Do this 3-4 times and then set completely.

The Hot fudge sauce- I made this just after adding the layer of vanilla ice cream to the cake.
Preparation time-2 minutes
Cooking time-2 minutes
Ingredients-
1 C / 230gms/ 8 oz of caster sugar
3 tblsp / 24gms/1.5 oz of natural unsweetened cocoa powder
2 tblsp /15gms/ 1 oz of cornflour/cornstarch
1 and ½ C /355ml /12 fl oz of water
1 tblsp /14gms/ 1 oz butter
1 tsp/5 ml / .15 fl oz vanilla extract
Method-


The chocolate ice cream-
Preparation time- 5 minutes + freezing
Ingredients-
2C/ 500 ml whipping cream
1 C/230gms/8 oz caster sugar
3 tblsp/ 24 gms/1.5 oz of natural unsweetened cocoa powder
Method-


Helpful links-
http://www.bbcgoodfood.com/videos/1050/rolling-a-swiss-roll
http://www.youtube.com/watch?v=_aw0pLOryEQ
http://www.davidlebovitz.com/archives/2007/11/the_easiest_cho.html
http://www.davidlebovitz.com/archives/2007/11/the_easiest_cho.html
http://www.flickr.com/photos/bossacafez/2721078037/
http://i98.photobucket.com/albums/l278/lucyphotos_06/TigerRoll.jpg
http://www.luvyu.com/File_05.jpg
That’s it! I now await the unleashing of the endless creativity of all my fellow daring bakers out there! So get baking and rolling and freezing! And most importantly, don’t forget to have fun!

Host: Elissa @ 17 and Baking
http://17andbaking.com/
-------------------------------------------------------------------------------------------------------------
July 2010 Daring Bakers Challenge: Swiss Swirl Ice Cream
A big hello to all the daring bakers, old and new. As for myself, I am Sunita. I blog at Sunita’s world- life and food and have been doing so for the past three and a half years. This month I will be completely three years as a daring baker. And what a joy ride it has been; as a part of this wonderful group, I have tried out so many new things, things that I probably would not have tried by myself. So, thanks to Lis and Ivonne for starting this great group, where every challenge has something new to learn. And I am excited to be your hostess this month.
The recipe for this month’s challenge has been adapted from this Swiss swirl ice cream cake from the Taste of Home website. Slices of Swiss roll are used to line a bowl and then filled with vanilla ice-cream, hot fudge ice cream topping and chocolate ice cream. The picture looked like so much fun that I have been waiting to make it for a while. What better timing than to make it along with fellow daring bakers to celebrate my three years with this amazing group. I have taken the basic idea from the above website and have developed the recipe. Hope you like it. The recipe does not require a lot of hands on time, but definitely requires a lot of cooling and freezing time between layers. Unlike the original recipe, we are going to make each layer from scratch. So, if you are planning to make it in one day, it might be a bit of a struggle.
Recipe source- Inspired by the Swiss swirl ice cream cake from the Taste of Home website
The recipes for the cake, filling, eggless ice creams and the fudge topping have been developed by myself.
Blog checking lines- The July 2010 Daring Bakers’ challenge was hosted by Sunita of Sunita’s world – life and food. Sunita challenged everyone to make an ice-cream filled Swiss roll that’s then used to make a bombe with hot fudge. Her recipe is based on an ice cream cake recipe from Taste of Home.-
Posting date-27th July,2010
Notes-
- You do not need an ice cream maker for this recipe. But if you will be using one, make sure you churn the ice cream according to the manufacturer’s instructions after mixing the ingredients.
- Whipping cream is a lighter version of double cream, with at least 35 per cent fat, and it whips beautifully without being quite so rich.
- Vanilla extract is made from vanilla beans that have been steeped in alcohol while vanilla essence is commercial manufactured by chemicals.
- Caster sugar is finely ground granulated sugar. It can also be found as “superfine sugar”, “fruit sugar” or “quick dissolving sugar”. If you can’t find it, you can make your own by whizzing some regular granulated sugar in the food processor or blender.
- Keep aside enough time for cooling and chilling the rolls and also for the layers to firm up before adding the next one. Moreover, the ice creams have also got to be made before assembling. I spread out the challenge over two days. I made the cakes and ice creams on the first day, and the fudge topping and assembly on the second day.
- While adding the final layer with the second ice-cream, make sure not to add it right to the brim. It may spill and will not look good.
- While inverting the final dessert onto the serving plate, if the cling film refuses to budge from the bowl, just wipe the outside of the bowl with a kitchen towel dampened with hot water. The bowl will release from the dessert very easily.
- Take the dessert out of the freezer at least 10 minutes before serving, of course depending on how hot it is in your neck of the woods.
- Dip the knife in hot water for easy slicing.
- You must make the Swiss rolls, a filling for them, two ice creams and a fudge sauce, from scratch.
- You must set the dessert in a bowl/pan etc in the order given in the recipe-Swiss roll, first ice-cream, the fudge topping and, finally, the second ice cream.
- You can either follow the given recipes for all the components or change the flavour of the Swiss rolls, filling, ice creams and fudge topping.
- You can make it in whatever shape and size you want.
For the 2 Swiss rolls-
30 mins each + cooling time (at least 30 minutes) before filling and rolling. The filling can be made while the cakes cool.
-For the ice creams- 5+10 minutes + freezing time
For the fudge topping- 5 minutes + cooling time
Assembly- At least an hour of freezing time between each layer (I took much more)
Equipment required-
- A large mixing bowl
- Spatula/mixing spoon
- Sieve
- A small saucepan
- Containers for ice creams
- Cling film/plastic wrap
- Greaseproof baking paper
- Food processor/grinder
- Electric/hand held beaters
- Whisk
- 2 Baking pans, 11 inches by 9 inches each
- Kitchen towels
- Cooling rack
- A pudding bowl / any other bowl, pan in which you are going to set the dessert. I used a 2 litre capacity, 9 inches in diameter and 4 inches deep.
- Freezer
- Oven
- Serving plate
- Knife
To download a printable .pdf of the challenge, click HERE!
Swiss roll ice cream cake (inspired by the recipe of the same name from the Taste of Home website)The Swiss rolls-
Preparation time- 10 minutes
Baking time- 10-12 minutes
Rolling and cooling time- at least 30 minutes
Filling-5-8 minutes
Filling and rolling- 5-10 minutes
Ingredients-
6 medium sized eggs
1 C / 225 gms caster sugar /8 oz+ extra for rolling
6 tblsp / 45gms/ a pinch over 1.5 oz of all purpose (plain) flour + 5 tblsp/40gm /a pinch under 1.5 oz of natural unsweetened cocoa powder, sifted together
2 tblsp /30ml / 1 fl oz of boiling water
a little oil for brushing the pans
For the filling-
2C / 500 mls/ 16 fl oz of whipping cream
1 vanilla pod, cut into small pieces of about ½ cm (or 1 tsp vanilla extract)
5 tblsp / 70gms/2.5oz of caster sugar
Method-
- Pre heat the oven at 200 deg C /400 deg F approximately. Brush the baking pans ( 11 inches by 9 inches ) with a little oil and line with greaseproof baking paper. If you have just one pan, bake one cake and then let the pan cool completely before using it for the next cake.
- In a large mixing bowl, add the eggs and sugar and beat till very thick; when the beaters are lifted, it should leave a trail on the surface for at least 10 seconds.
- Add the flour mixture, in three batches and fold in gently with a spatula. Fold in the water.
- Divide the mixture among the two baking pans and spread it out evenly, into the corners of the pans.
- Place a pan in the centre of the pre heated oven and bake for about 10-12 minutes or till the centre is springy to the touch.
- Spread a kitchen towel on the counter and sprinkle a little caster sugar over it.
- Turn the cake on to the towel and peel away the baking paper. Trim any crisp edges.
- Starting from one of the shorter sides, start to make a roll with the towel going inside. Cool the wrapped roll on a rack, seam side down.
- Repeat the same for the next cake as well.
- Grind together the vanilla pieces and sugar in a food processer till nicely mixed together. If you are using vanilla extract, just grind the sugar on its own and then add the sugar and extract to the cream.
- In a large bowl, add the cream and vanilla-sugar mixture and beat till very thick.
- Divide the cream mixture between the completely cooled cakes.
- Open the rolls and spread the cream mixture, making sure it does not go right to the edges (a border of ½ an inch should be fine).
- Roll the cakes up again, this time without the towel. Wrap in plastic wrap and chill in the fridge till needed, seam side down.
The vanilla ice cream-
Preparation time-5 minutes+freezing
I have made the ice cream without an ice cream maker.
Ingredients-
2 and ½ C / 625 ml / 20 fl oz of whipping cream
1 vanilla bean, minced or 1 tsp/ 5 ml/ .15 fl oz vanilla extract
½ C / 115gms/ 4 oz of granulated sugar
Method-
Grind together the sugar and vanilla in a food processor. In a mixing bowl, add the cream and vanilla –sugar mixture and whisk lightly till everything is mixed together. If you are using the vanilla extract, grind the sugar on its own and then and the sugar along with the vanilla extract to the cream.
Pour into a freezer friendly container and freeze till firm around the edges. Remove from the freezer, beat till smooth and return to the freezer. Do this 3-4 times and then set completely.
The Hot fudge sauce- I made this just after adding the layer of vanilla ice cream to the cake.
Preparation time-2 minutes
Cooking time-2 minutes
Ingredients-
1 C / 230gms/ 8 oz of caster sugar
3 tblsp / 24gms/1.5 oz of natural unsweetened cocoa powder
2 tblsp /15gms/ 1 oz of cornflour/cornstarch
1 and ½ C /355ml /12 fl oz of water
1 tblsp /14gms/ 1 oz butter
1 tsp/5 ml / .15 fl oz vanilla extract
Method-
- In a small saucepan, whisk together the sugar, cocoa powder, cornflour and water.
- Place the pan over heat, and stir constantly, till it begins to thicken and is smooth (for about 2 minutes).
- Remove from heat and mix in the butter and vanilla. Keep aside to cool .
The chocolate ice cream-
Preparation time- 5 minutes + freezing
Ingredients-
2C/ 500 ml whipping cream
1 C/230gms/8 oz caster sugar
3 tblsp/ 24 gms/1.5 oz of natural unsweetened cocoa powder
Method-
- Grind together the sugar and the cocoa powder in a food processor .
- In a saucepan, add all the ingredients and whisk lightly.
- Place the pan over heat and keep stirring till it begins to bubble around the edges.
- Remove from heat and cool completely before transferring to a freezer friendly container till firm around the edges. If you are using an ice cream maker, churn the ice cream according to the manufacturer’s instruction, after the mixture has cooled completely.
- 5. Remove from the freezer, beat till smooth and return to the freezer. Do this 3-4 times and then set completely.
- 1. Cut the Swiss rolls into 20 equal slices ( approximately 2 cms each ).
- 2. Cover the bottom and sides of the bowl in which you are going to set the dessert with cling film/plastic wrap.
- 3. Arrange two slices at the bottom of the pan, with their seam sides facing each other. Arrange the Swiss roll slices up the bowl, with the seam sides facing away from the bottom, to cover the sides of the bowl. Cover the bowl with plastic wrap and freeze till the slices are firm (at least 30 minutes).
- 4. Soften the vanilla ice cream. Take the bowl out of the freezer, remove the cling film cover and add the ice cream on top of the cake slices. Spread it out to cover the bottom and sides of the bowl. Cover the bowl with plastic wrap and freeze till firm ( at least 1 hour)
- 5. Add the fudge sauce over the vanilla ice cream, cover and freeze till firm . ( at least an hour)
- 6. Soften the chocolate ice cream and spread it over the fudge sauce. Cover with plastic wrap and freeze for at least 4-5 hours till completely set .
- 7. Remove the plastic cover, and place the serving plate on top of the bowl. Turn it upside down and remove the bowl and the plastic lining. If the bowl does not come away easily, wipe the outsides of the bowl with a kitchen towel dampened with hot water. The bowl will come away easily.
- 8. Keep the cake out of the freezer for at least 10 minutes before slicing, depending on how hot your region is. Slice with a sharp knife, dipped in hot water.
Helpful links-
http://www.bbcgoodfood.com/videos/1050/rolling-a-swiss-roll
http://www.youtube.com/watch?v=_aw0pLOryEQ
http://www.davidlebovitz.com/archives/2007/11/the_easiest_cho.html
http://www.davidlebovitz.com/archives/2007/11/the_easiest_cho.html
http://www.flickr.com/photos/bossacafez/2721078037/
http://i98.photobucket.com/albums/l278/lucyphotos_06/TigerRoll.jpg
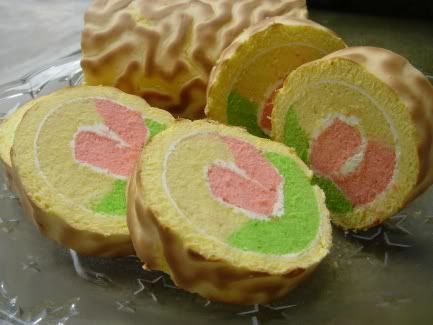
http://www.luvyu.com/File_05.jpg
That’s it! I now await the unleashing of the endless creativity of all my fellow daring bakers out there! So get baking and rolling and freezing! And most importantly, don’t forget to have fun!
----------------------------
Host: Sunita of Sunita's world
Host: Sunita of Sunita's world